


Black Horse P-47 Thunderbolt 60cc?


 03-20-2021, 03:01 PM
#53

Thread Starter
 03-20-2021, 03:28 PM
#54
Member

Avec un capot plat sans rebord j'utilise la technique du papier et du scotch, ci besoin je ferais une vid�o pour expliquer.
La avec un capot qui ce rel�ve je sais pas encore, je vais r�fl�chir au moment venu, mes je pense utiliser un compat.
La avec un capot qui ce rel�ve je sais pas encore, je vais r�fl�chir au moment venu, mes je pense utiliser un compat.
The following users liked this post:
RoysterDW (03-20-2021)
03-20-2021, 11:06 PM
#55
Thread Starter

The following users liked this post:
RoysterDW (03-21-2021)
The following users liked this post:
RoysterDW (03-21-2021)
03-31-2021, 01:56 AM
#62
Member
J'attends toujours le moteur pour continuer le montage.
En attendant je profite du beau temps pour finaliser les r�glage du Waco
The following users liked this post:
RoysterDW (03-31-2021)
04-03-2021, 07:43 AM
#63
Member
Je profite du mauvais temps de ce week-end pour c�bler et installer la partie r�ception.
Je suis toujours en attente du moteur pour d�terminer l'emplacement des accus.

Je suis toujours en attente du moteur pour d�terminer l'emplacement des accus.
The following users liked this post:
RoysterDW (04-03-2021)
04-03-2021, 02:37 PM
#64
Thread Starter

Thanks Manu.
What are the MPX plugs for? And what size servo arm did you use. I'm suprised you still havent got your engine. Plenty of stock here. Are you buying locally or overseas?
Still waiting on my airframe but slowly getting all the gear i need for the build. I just ordered 2 x Jeti liIon packs and a Jeti DSM10 redundant electronic switch.
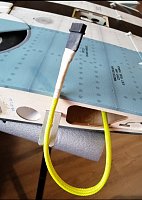
Interesting wing bolt system. At least they are hex bolts rather than thumb scews which would be a pain to screw in.
04-03-2021, 02:45 PM
#65
Thread Starter
Link below is a flight of the BH P47 with James from Motion RC. Its an electric setup with a Admiral 60cc electric motor. Flys amazingly well, and thats just on 10s with a 4 blade prop. I plan on flying mine on 12s with a 2 blade and with a Dualsky 60cc motor. I have the option to convert it to gas later, but love the reliability of an e-setup and can fly at my club super early in the morning.
04-03-2021, 03:26 PM
#66
Member
Les prises MPX sont pour les ailes
Pour le moteur j'ach�te en local, en ce moment en France c'est compliqu�, beaucoup de produits qui viennent d'Asie sont en rupture de stock.
https://www.flashrc.com/dle_engines/...e_engines.html
Les viss�s de fixation des ailes et tr�s pratique et rapide, j'ai le m�me syst�me sur mon Waco c'est top.
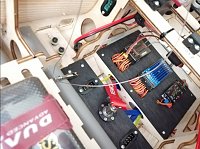
Pour les palonniers j'ai utilis� des Tower Pro, faut que je modifie celui de la d�rive, il est trop grand.
J'ai longuement regard� la vid�o de Motion rc, c'est ce qui m'a inciter � acheter le P47 😁
Pour le moteur j'ach�te en local, en ce moment en France c'est compliqu�, beaucoup de produits qui viennent d'Asie sont en rupture de stock.
https://www.flashrc.com/dle_engines/...e_engines.html
Les viss�s de fixation des ailes et tr�s pratique et rapide, j'ai le m�me syst�me sur mon Waco c'est top.
Pour les palonniers j'ai utilis� des Tower Pro, faut que je modifie celui de la d�rive, il est trop grand.
J'ai longuement regard� la vid�o de Motion rc, c'est ce qui m'a inciter � acheter le P47 😁
Last edited by manu_cc; 04-03-2021 at 03:28 PM.
The following users liked this post:
RoysterDW (04-04-2021)


 04-04-2021, 05:00 PM
#68
Thread Starter
Looks great Manu
I saw that James from Motion RC had spent 2hrs on the rear gear doors. I wasnt looking forward to that. I'm glad you sorted it out. Hopefully it didnt take 2hrs for you to get them working!
I saw that James from Motion RC had spent 2hrs on the rear gear doors. I wasnt looking forward to that. I'm glad you sorted it out. Hopefully it didnt take 2hrs for you to get them working!
04-04-2021, 05:12 PM
#69
Member
Je prendrais la mesures des tiges et chapes pour vous aider dans le montage.
The following users liked this post:
RoysterDW (04-04-2021)
04-04-2021, 07:02 PM
#70
Thread Starter
04-06-2021, 03:02 PM
#71
Member
Je viens de recevoir le moteur 😁😁😁
je vais pouvoir continuer le montage, et j'esp�re faire le premier vole la semaine prochaine 🤩
En attendant le moteur, j'avais commancer � peindre le faut


je vais pouvoir continuer le montage, et j'esp�re faire le premier vole la semaine prochaine 🤩
En attendant le moteur, j'avais commancer � peindre le faut
The following users liked this post:
RoysterDW (04-06-2021)

The following users liked this post:
RoysterDW (04-06-2021)