


Leopard 1s
 01-14-2023, 05:54 PM
#26

Thread Starter

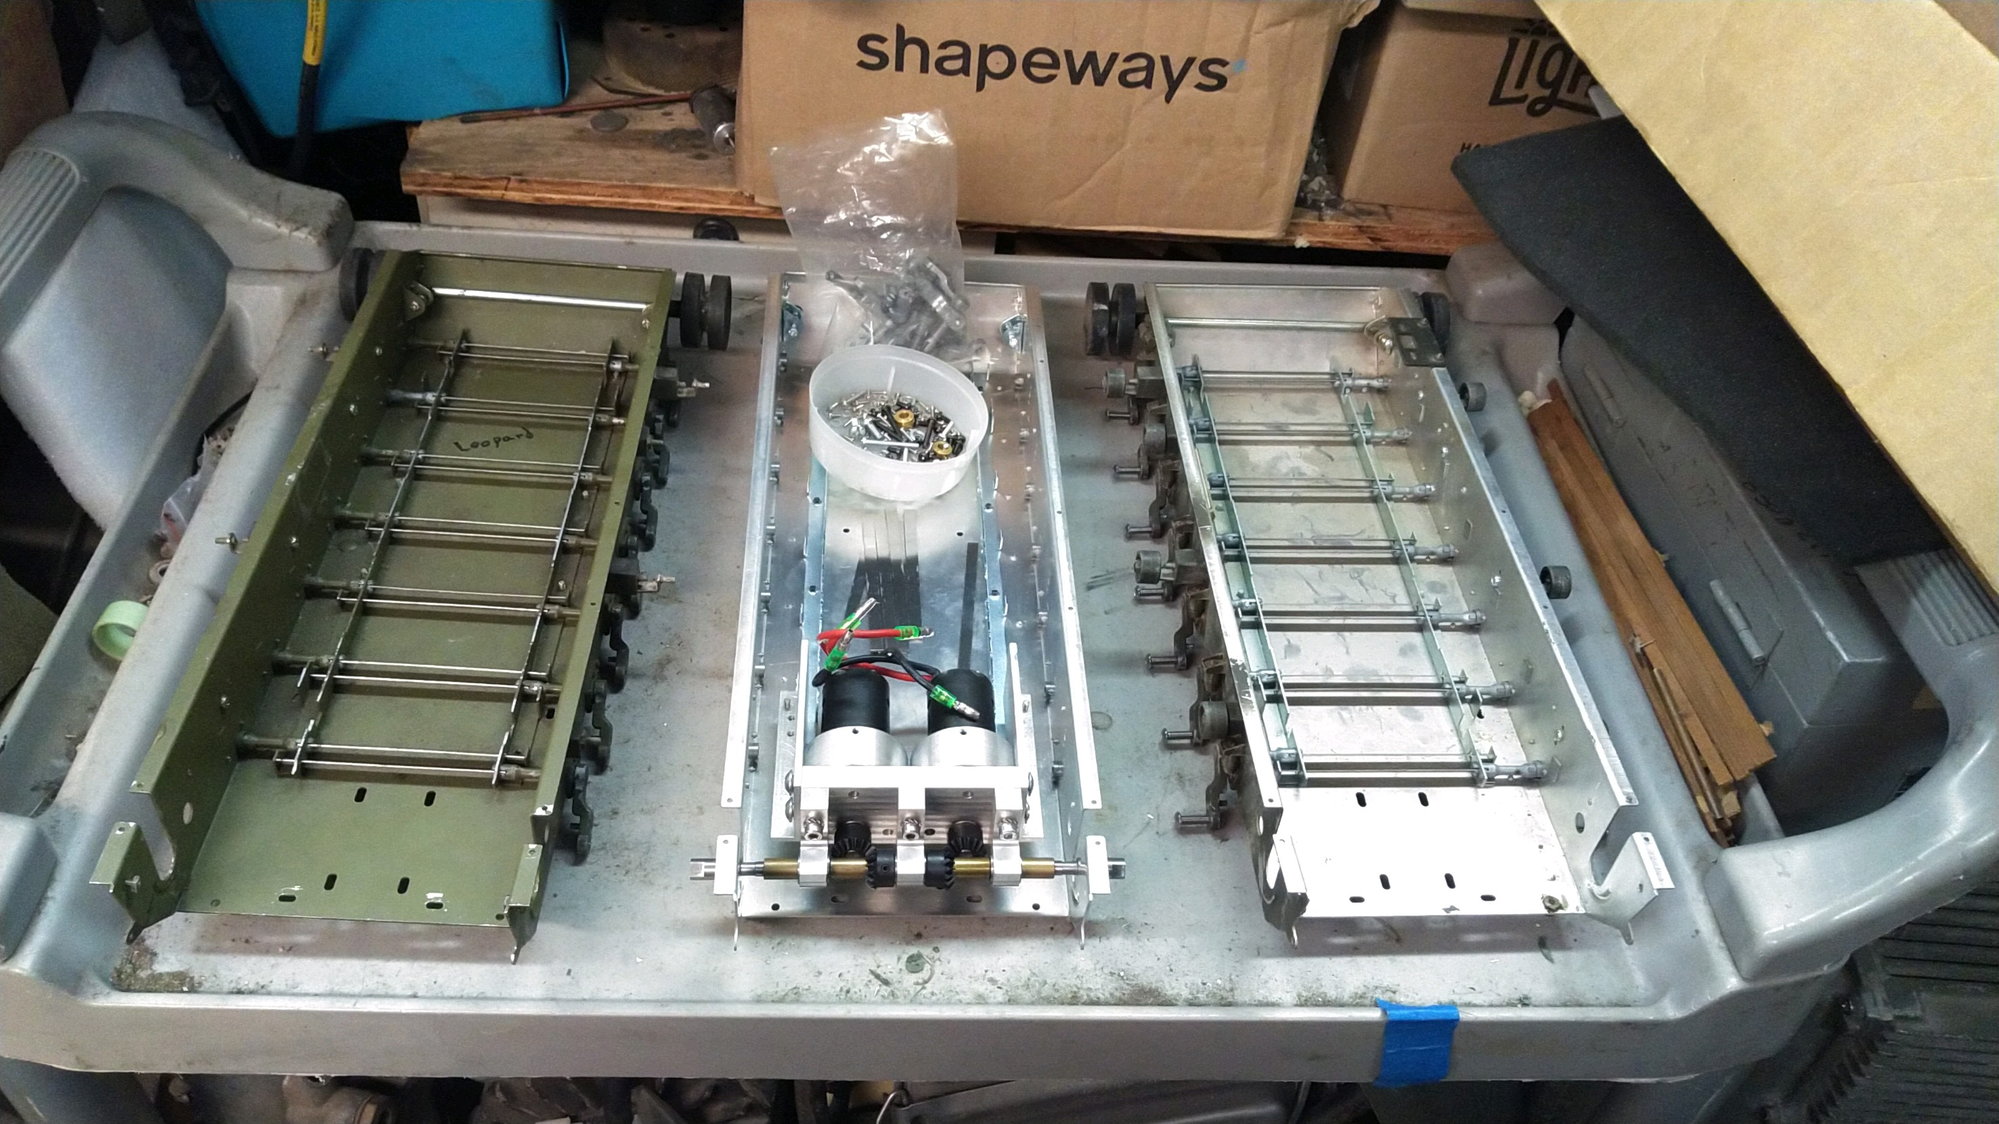
Im back to working on my Tamiya Leopard 1 tanks. The chassis in the middle is brand new old stock New In Box. It is the static version that has emty transmissions with just shafts to hold the sprockets in place. It now has an ETO trany I asked Bob to custom make for me when I thought that would be the only Leopard 1 I was going to build.
Here I am with one completed and 3 on the bench and a hoooooooben 1a5 on the way.... I like NATO tanks I guess.
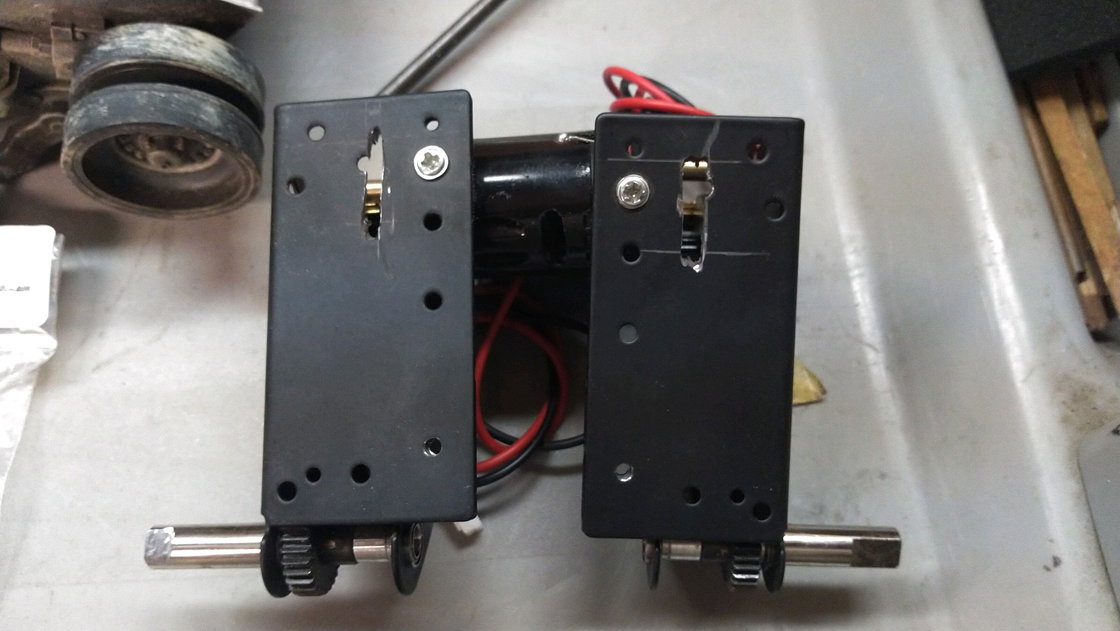
The other two chassis will get Taigen tranys soon I think once I make more custom mounts from my jig I made up.
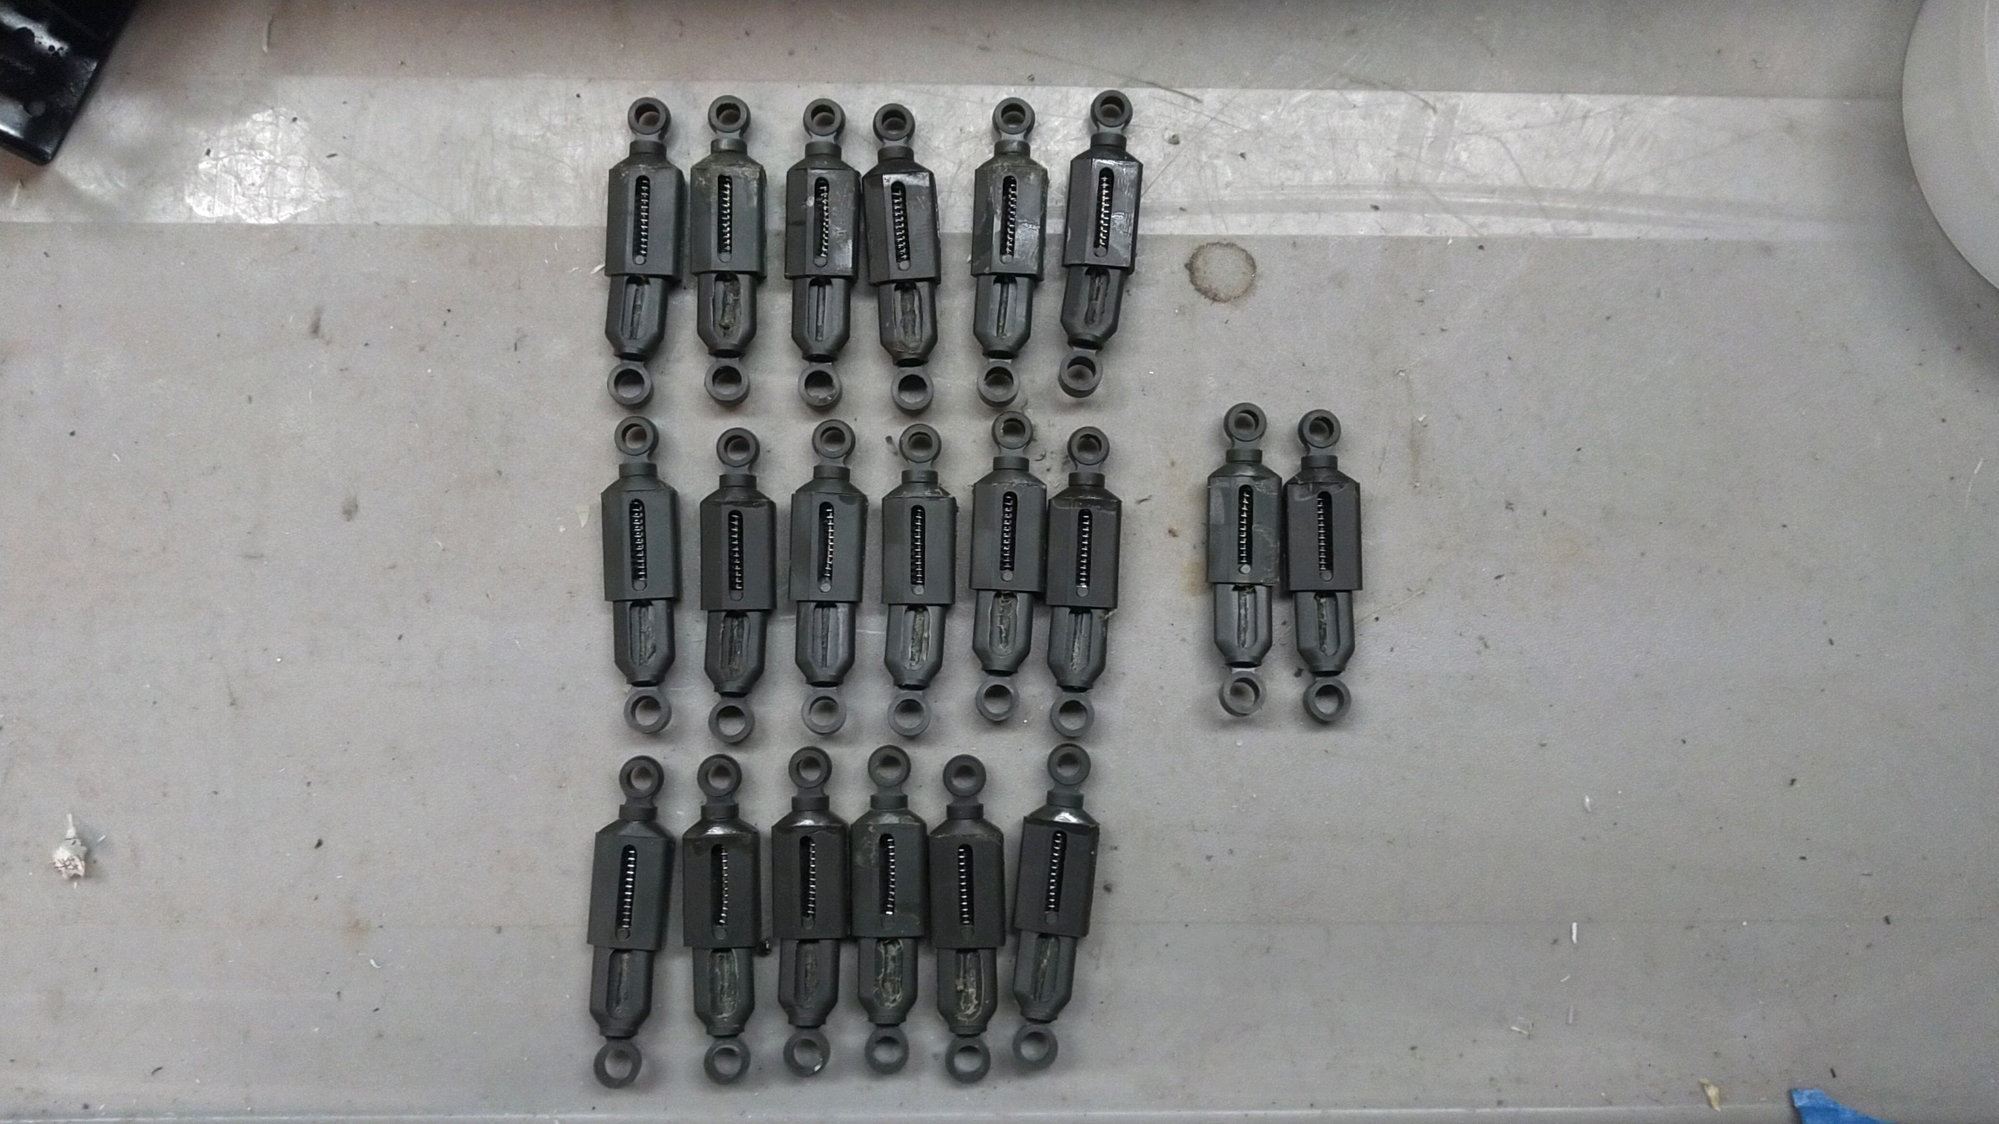
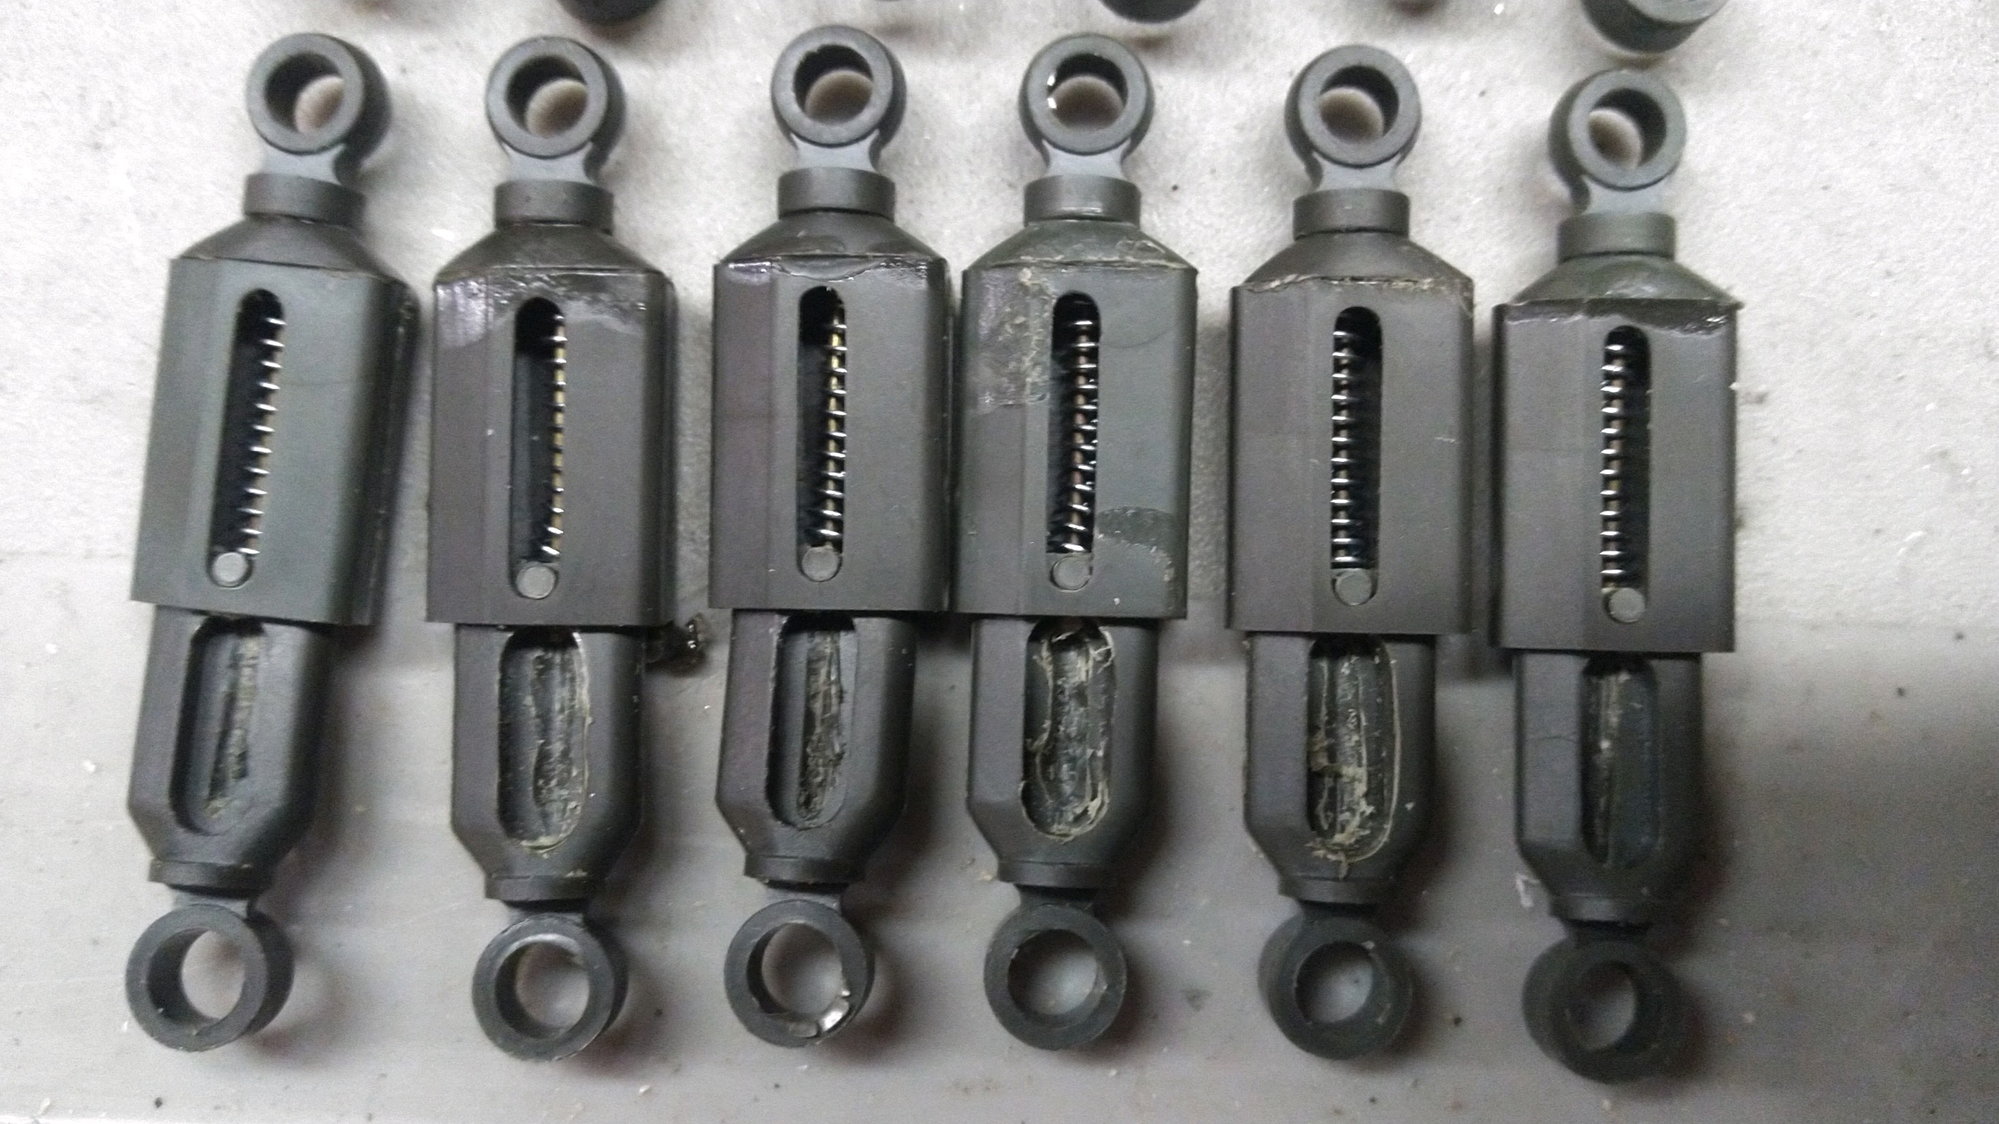
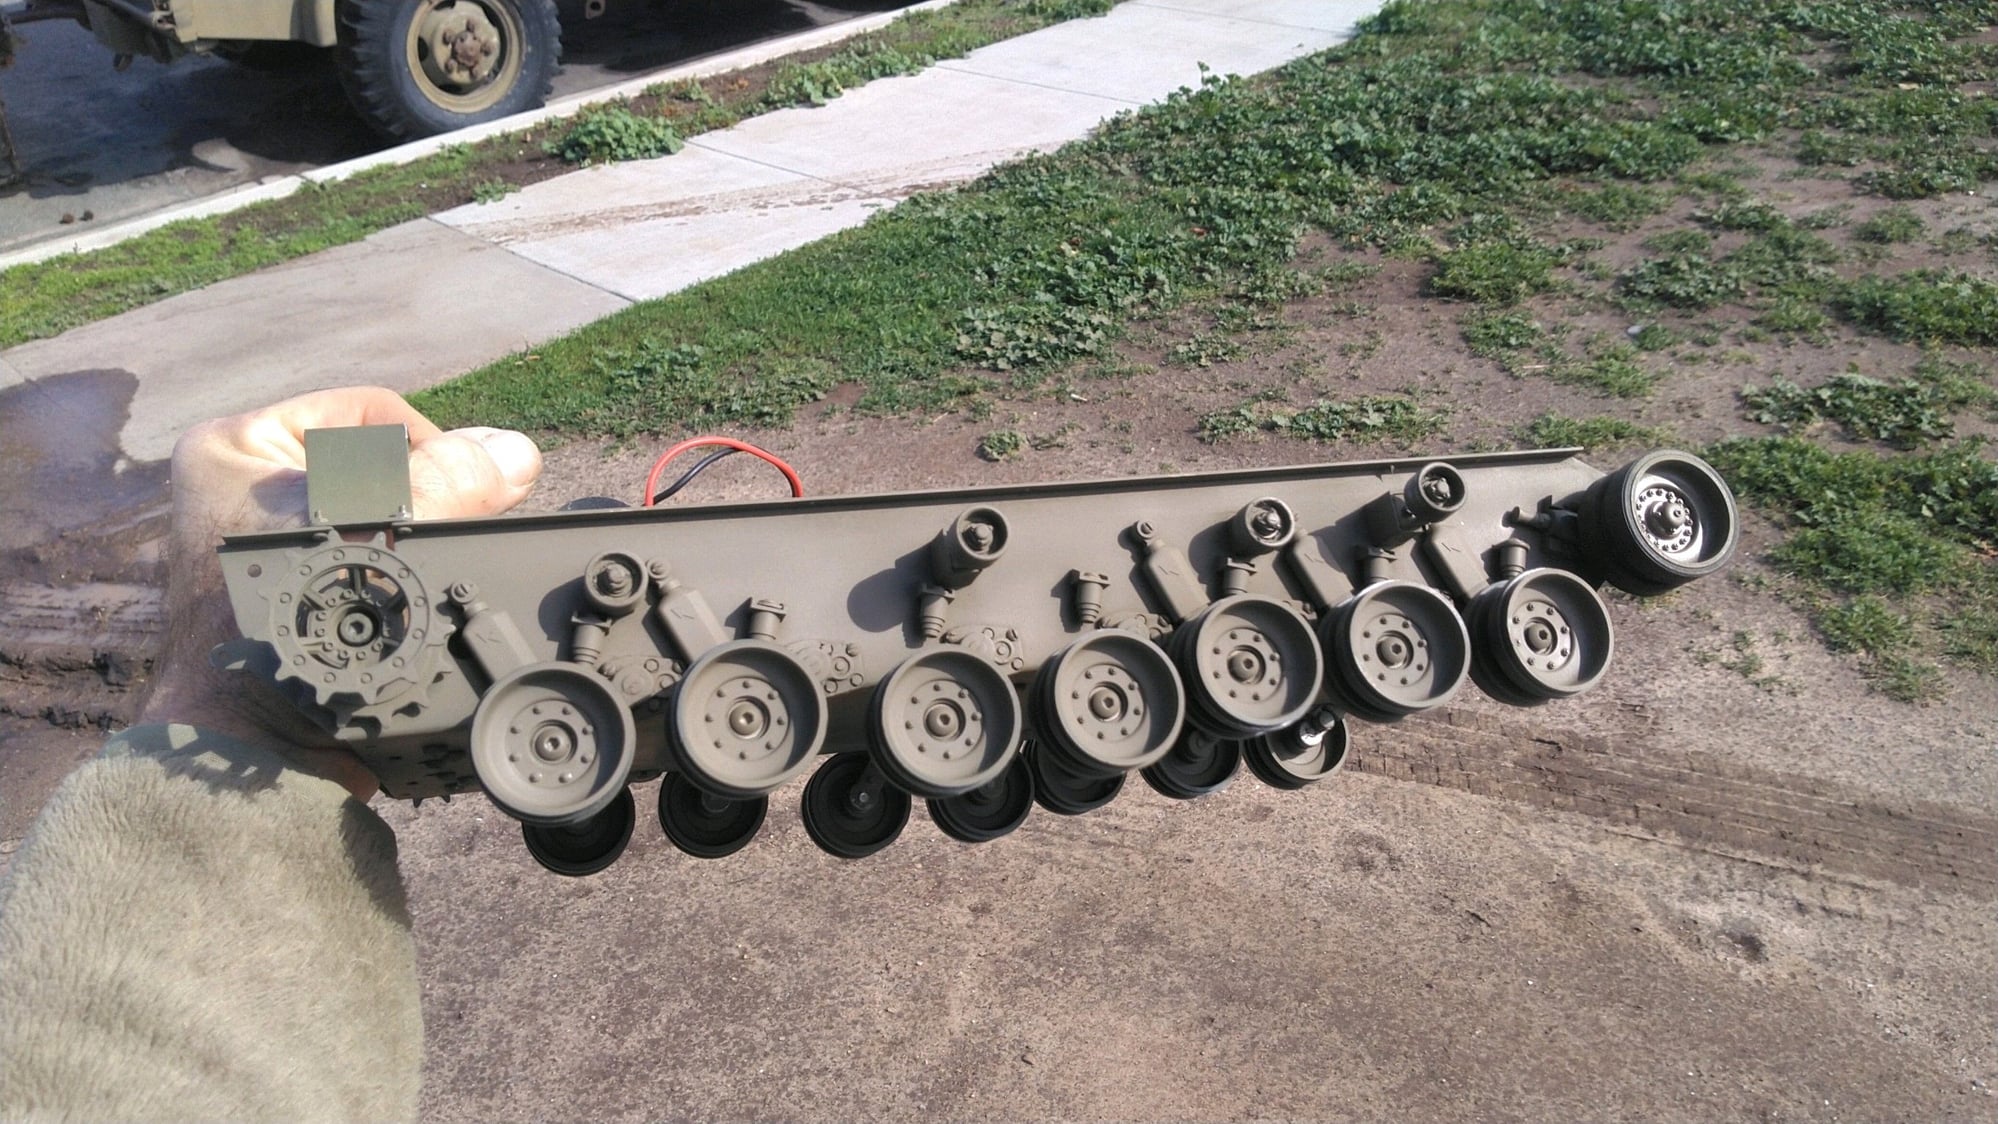
I dread getting to the point I need to make the shock absorbers with springs in them like I did my first build, the 1A7 modernized build. It needed two on each rear and one one each front to help support the additional weight of the newer tranys. Thats 6 per tank 18 total..... sigh..... Slowly getting there.
Here I am with one completed and 3 on the bench and a hoooooooben 1a5 on the way.... I like NATO tanks I guess.
The other two chassis will get Taigen tranys soon I think once I make more custom mounts from my jig I made up.
I dread getting to the point I need to make the shock absorbers with springs in them like I did my first build, the 1A7 modernized build. It needed two on each rear and one one each front to help support the additional weight of the newer tranys. Thats 6 per tank 18 total..... sigh..... Slowly getting there.
 01-15-2023, 05:14 AM
#27
 01-21-2023, 08:48 AM
#28
Thread Starter
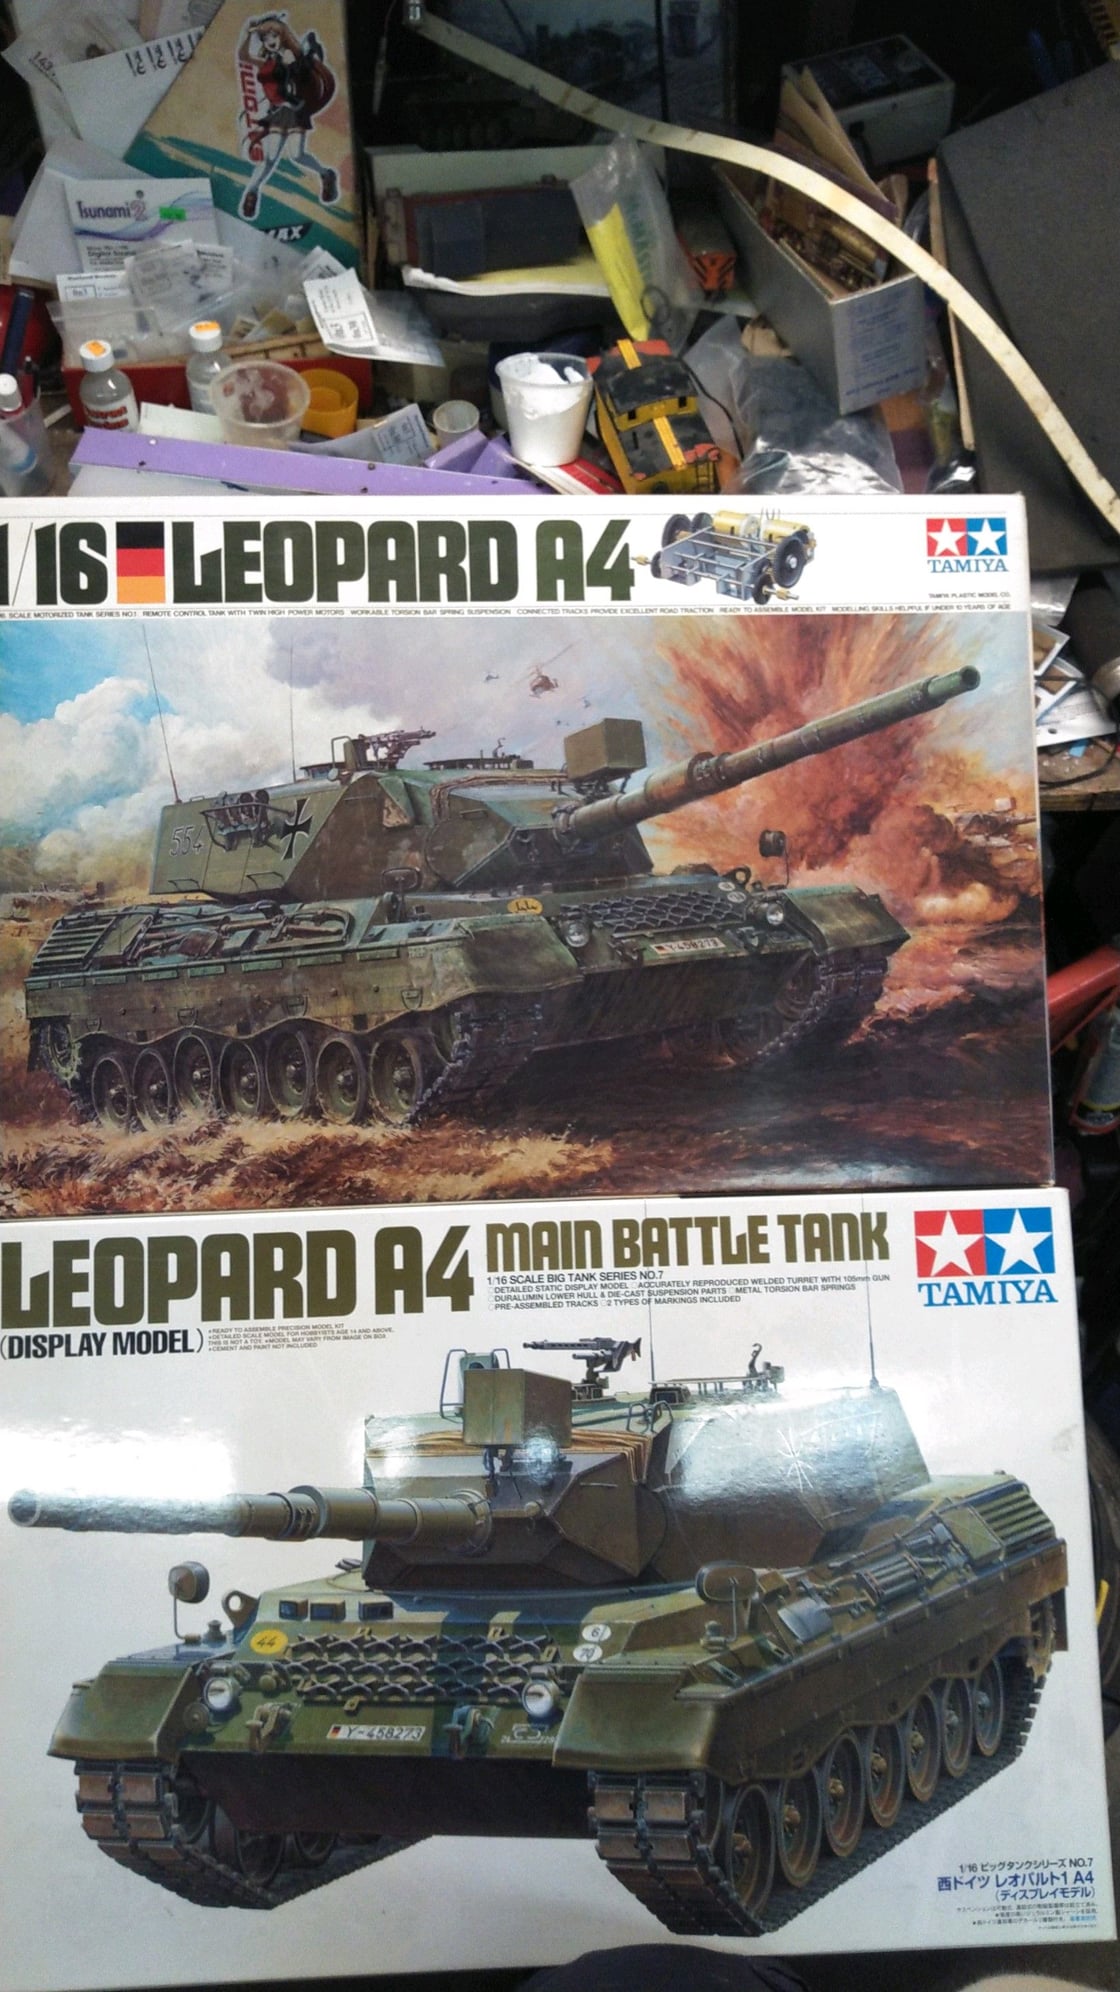
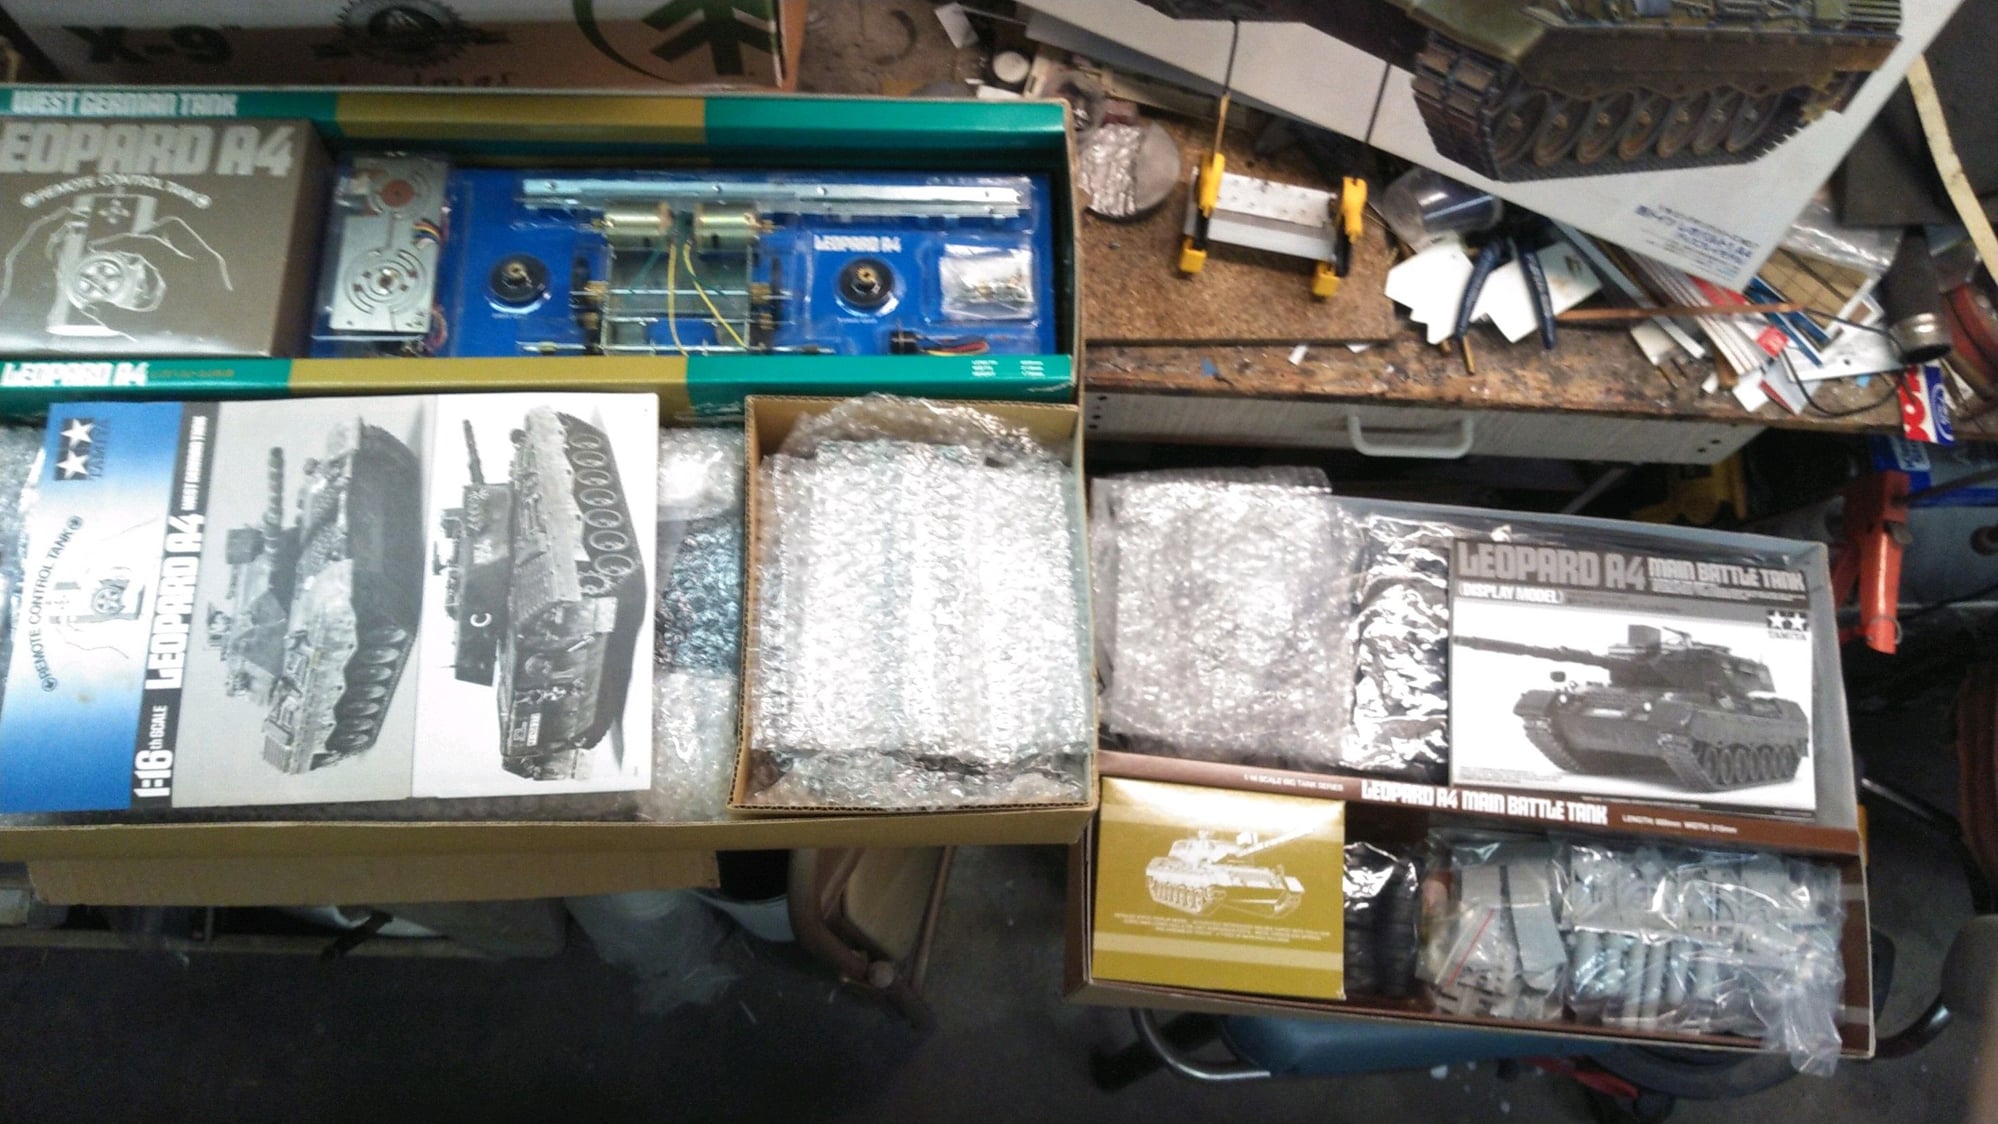
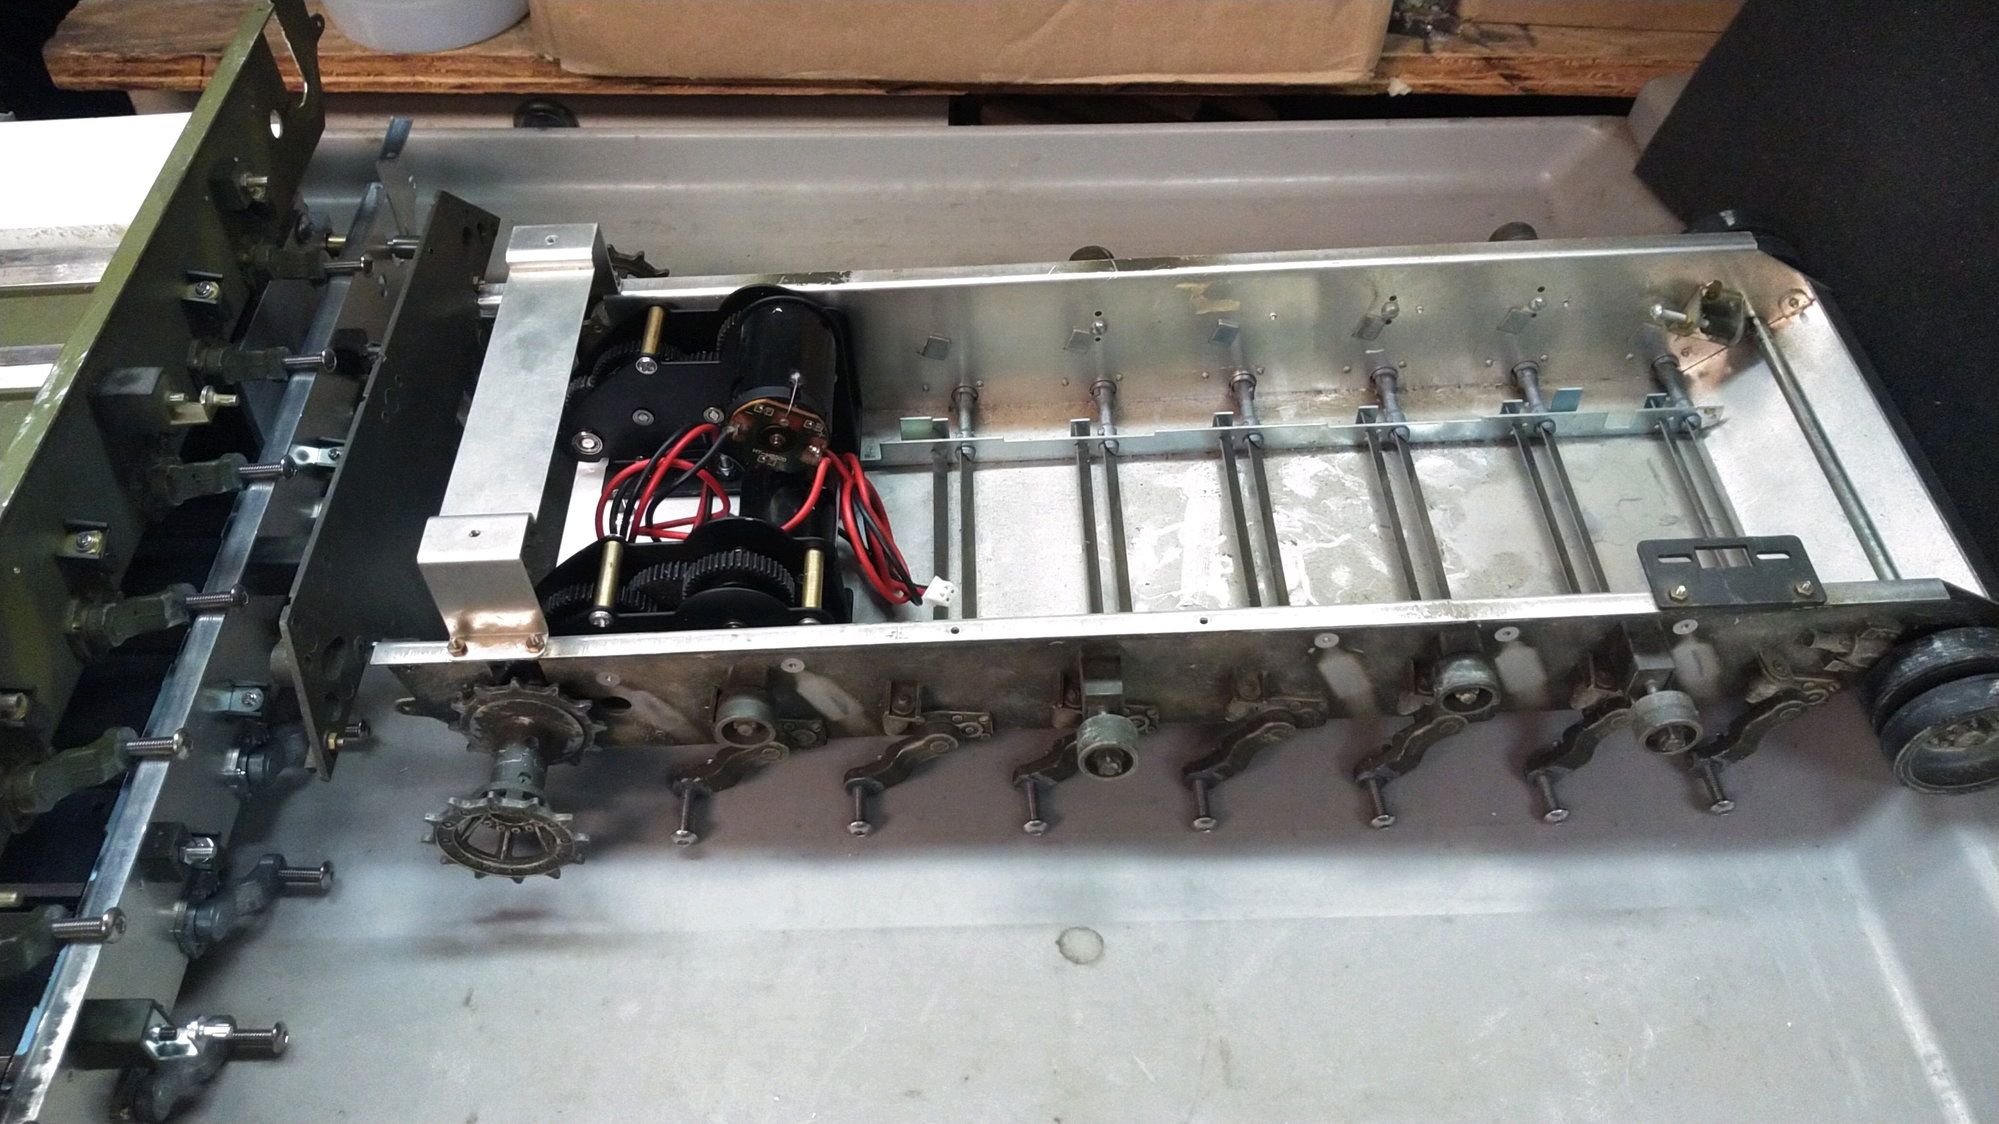
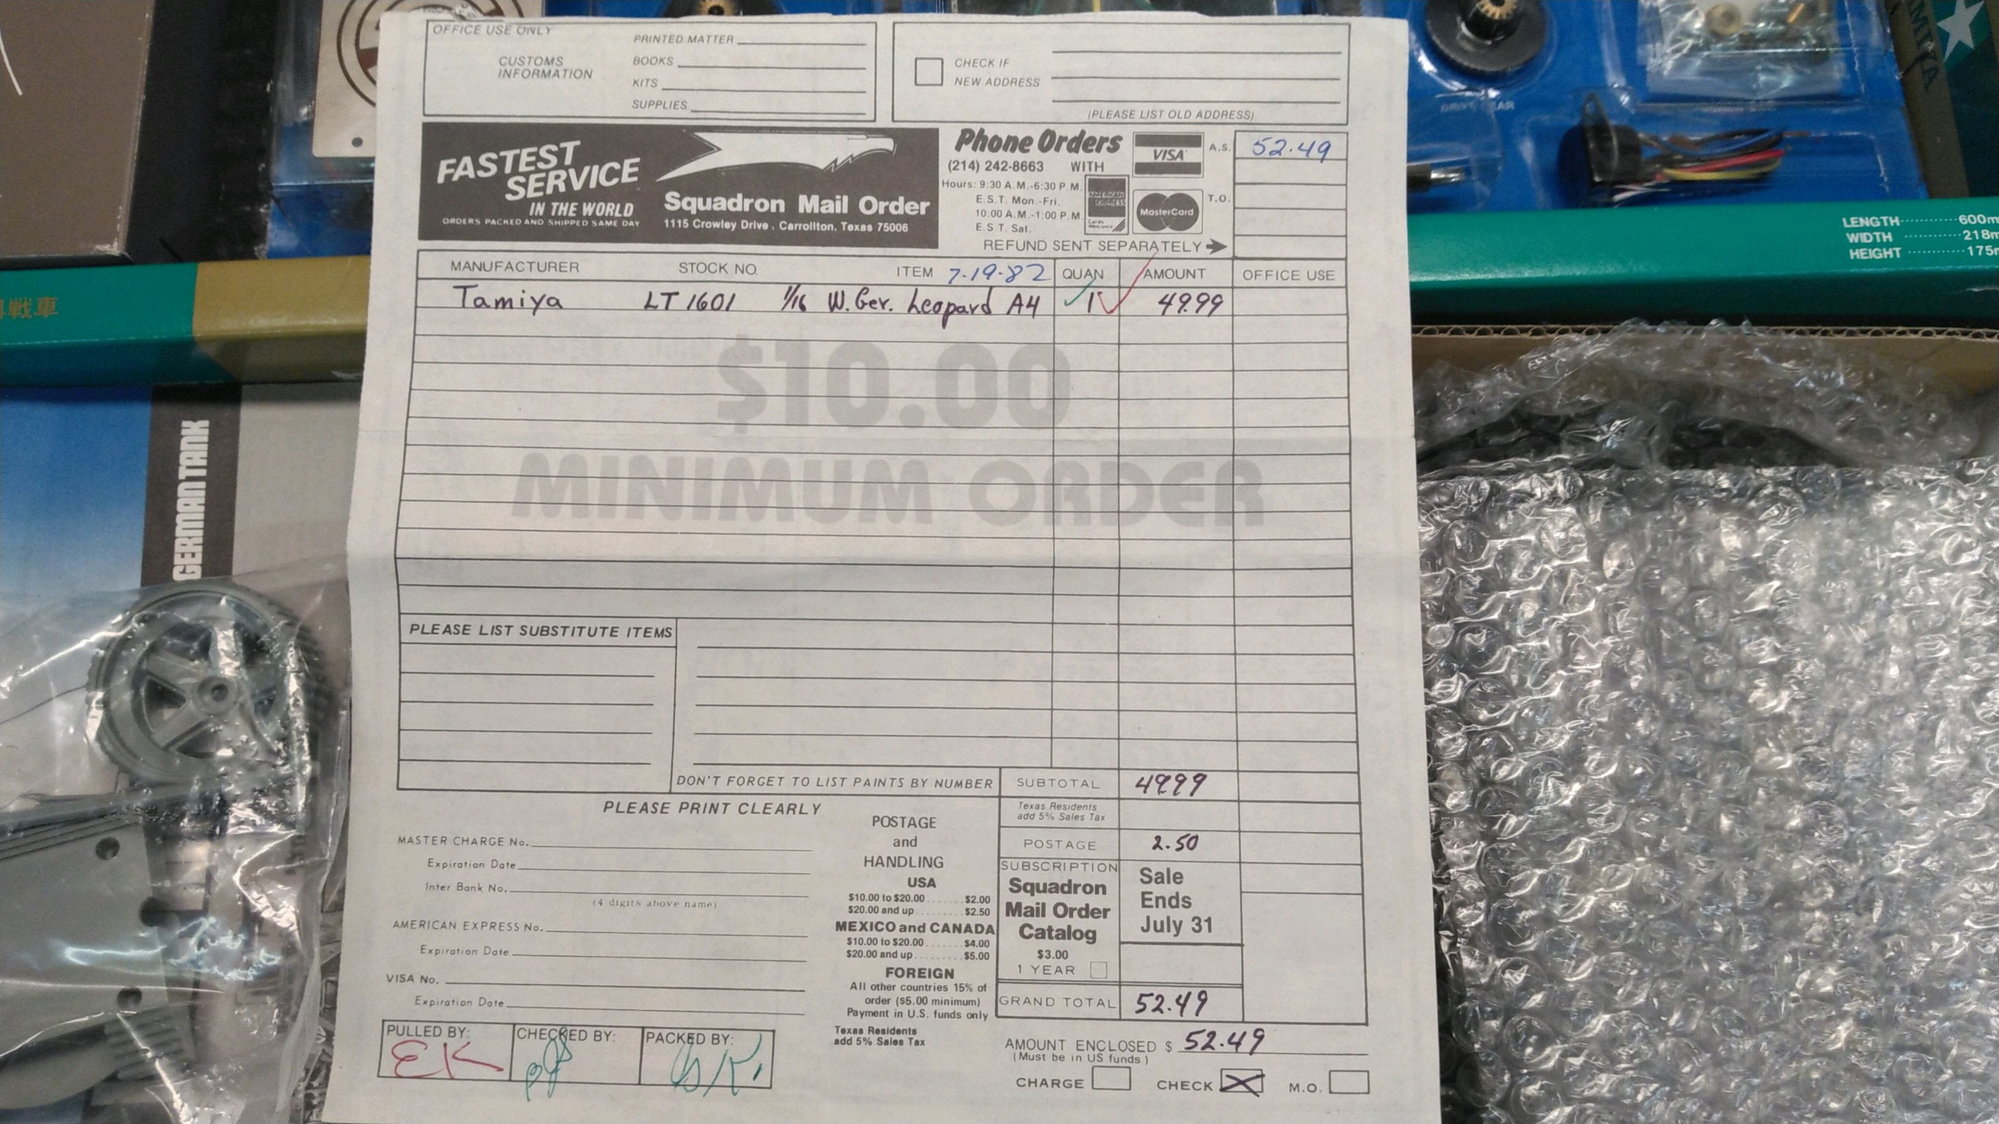
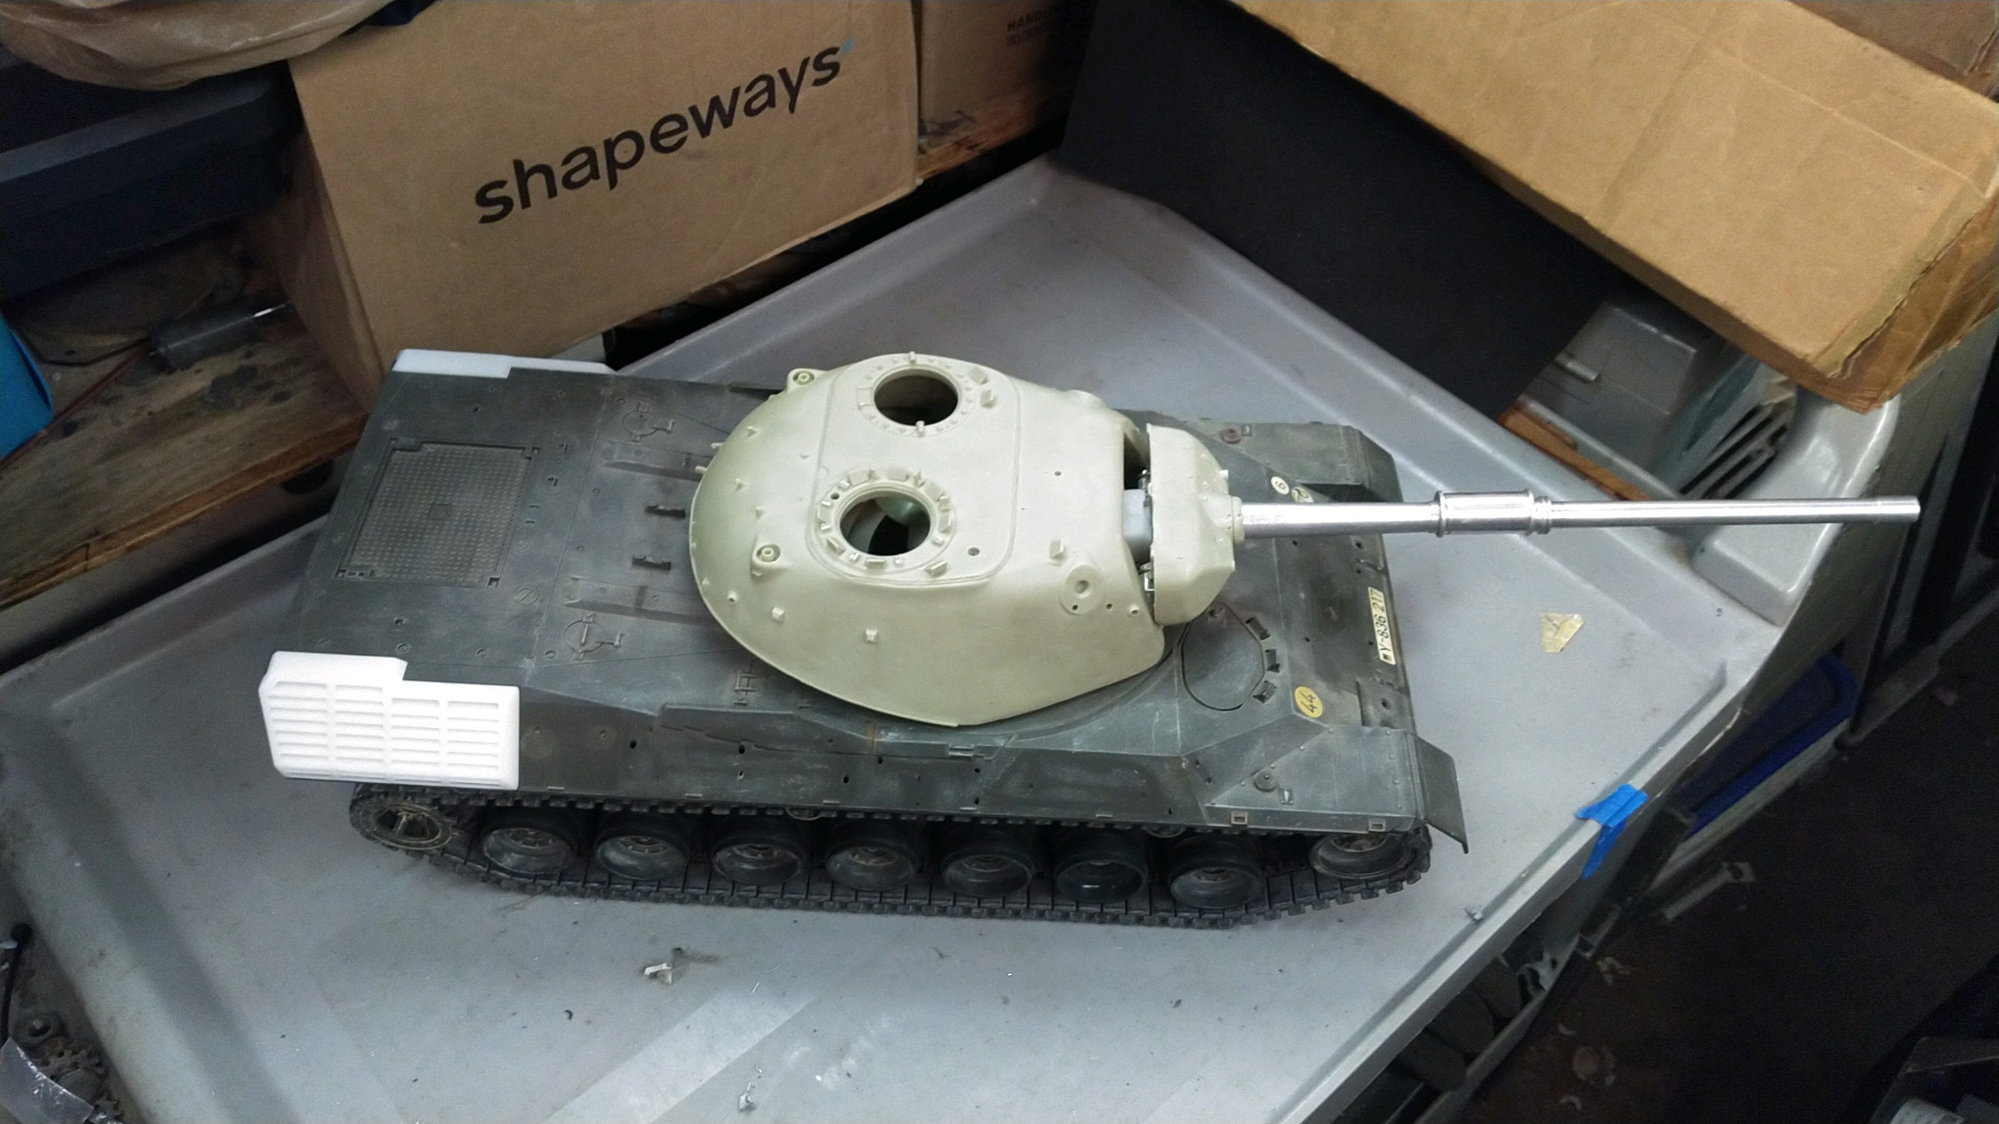
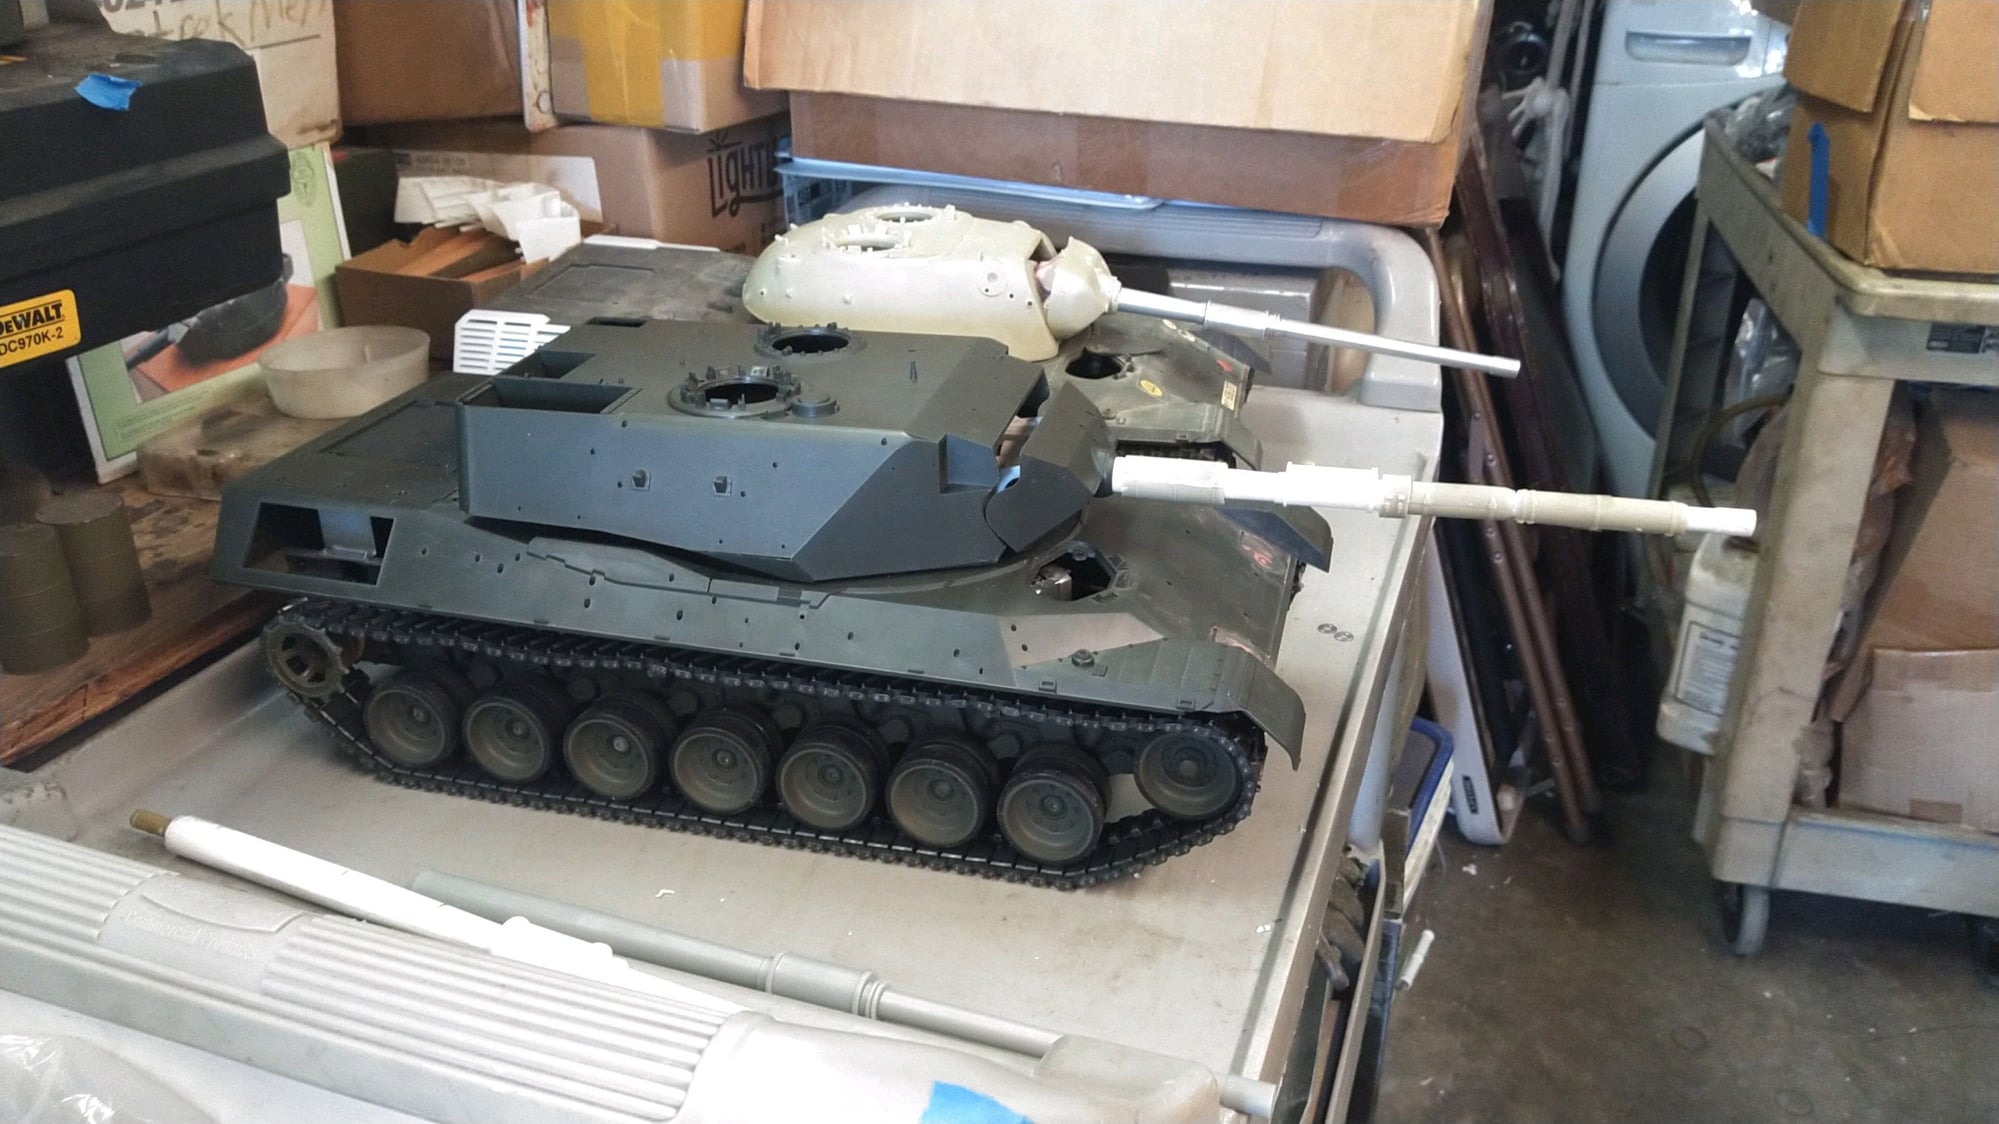
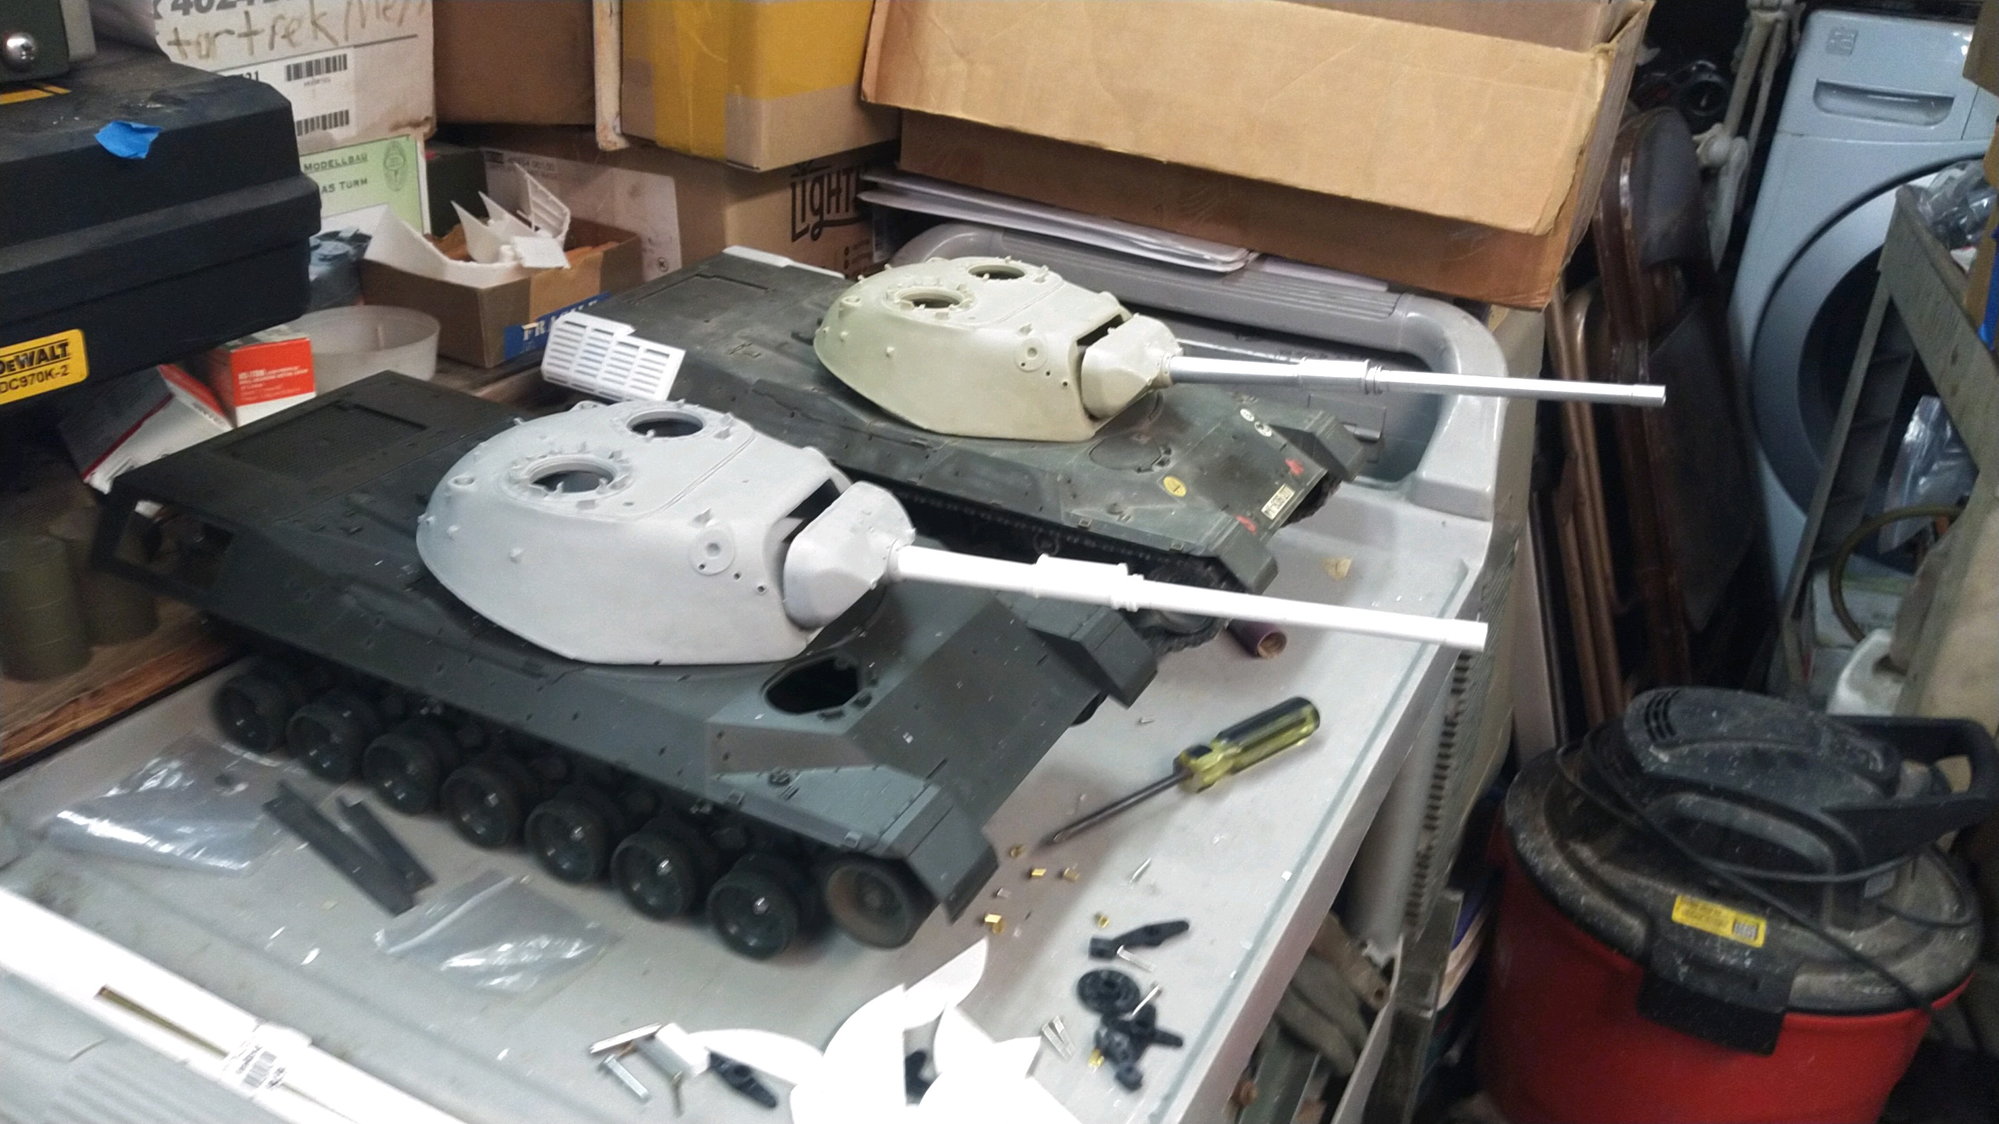
Work progresses on the Leopard 1 builds. Ive been digging into the new in box kits for the necessary parts as I move forward. It feel strange building a kit this old and rare. The remote motorized Leopard has the receipt in it from 1982. I sure paid dearly for this kit. I was sad to find though that it had a plastic chassis, plastic arms, and plastic sprockets as well as the transmission, while it has dual motors, they are tiny hobby motors. Totally useless for RC. So I got a salvaged metal clutch drive chassis to supplant in this kit build and use the kit parts to overhual the chassis for its worn and missing parts. I also had to manufacture my own metal brackets for the arm stops as they were aparantly missing from the chassis.
Im starting to settle in on the tanks Im going to build. Im going to build a random strange A3 that has no side skirts, tool boxes, and a profile barrel with a oddball stowage compartment on the rear of the turret instead of the standard known type. Leopard 1 experts were unable to indentify the tank when I posted it but its likely Danish or Austrailian early model, maybe a prototype.
I am leaning toward making one an A3 in Aussie livery as well.
The last will be an early round turret model from some random EU country I havent decided on yet.
When I get my Hooben A5 Im leaning toward doing it as a Canadian C2 circa early 2000s pre Mexas.
01-21-2023, 11:48 AM
#29
Member

Nice project, very cool to see 3 of these being built in a different way.
Those new HL style gearboxes seem to fit well. A good amount of space in that lower hull!
If you're missing any parts and need something drawn up you know where to find me
Those new HL style gearboxes seem to fit well. A good amount of space in that lower hull!
If you're missing any parts and need something drawn up you know where to find me
01-21-2023, 02:59 PM
#30
Personally I would feel worse letting a kit just languish in a box for eternity. At least by building it, others get to enjoy it also. Looking forward to seeing how they turn out.
01-25-2023, 08:32 AM
#31
Thread Starter
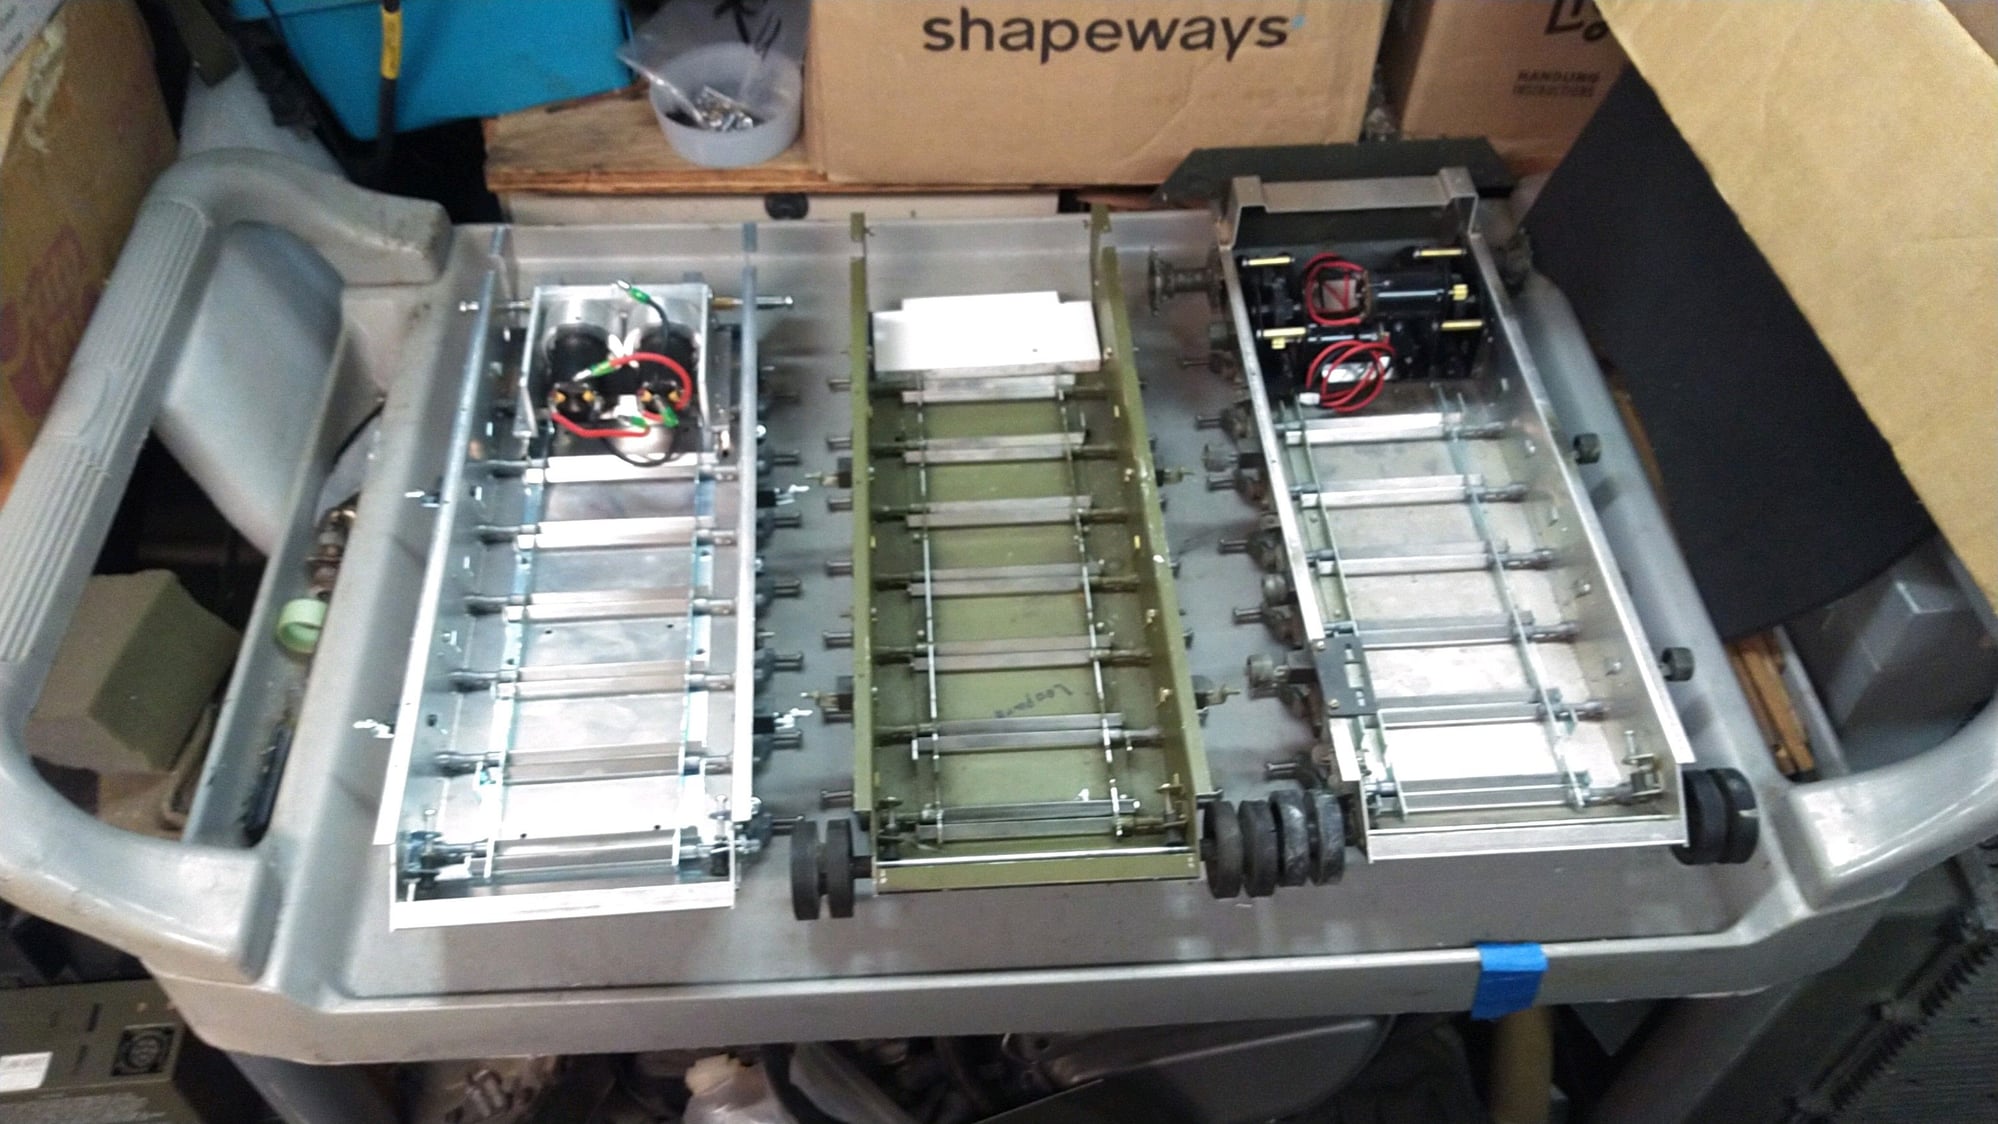
Work continues on the chassis of these 3 leopards.
Here are the finished working shock absorbers that help support the added weight of the transmissions and turret component system.
I use 6 per tank based on my 1A7 prototype build.
Two on each rear and one on each side in the front.
The two extra ones may be needed on the tank with the ETO tranny because I think it is heavier than the taigen tranys.
 02-01-2023, 07:04 AM
#33
Thread Starter
I lost a wheel off one of the use chassis, the one with the round turret on it actually. Probably over at my buddies where I used the lathe. I went back and looked and no joy so... at least the kits come with one spare wheel each.
Work is moving along but Ive run out of time. My 3d printer has arrived for the sherman hvss products and I need to focus my time there now. Anxious to get more done on these but have to budget my time.
Work is moving along but Ive run out of time. My 3d printer has arrived for the sherman hvss products and I need to focus my time there now. Anxious to get more done on these but have to budget my time.
02-08-2023, 05:53 AM
#34
Thread Starter
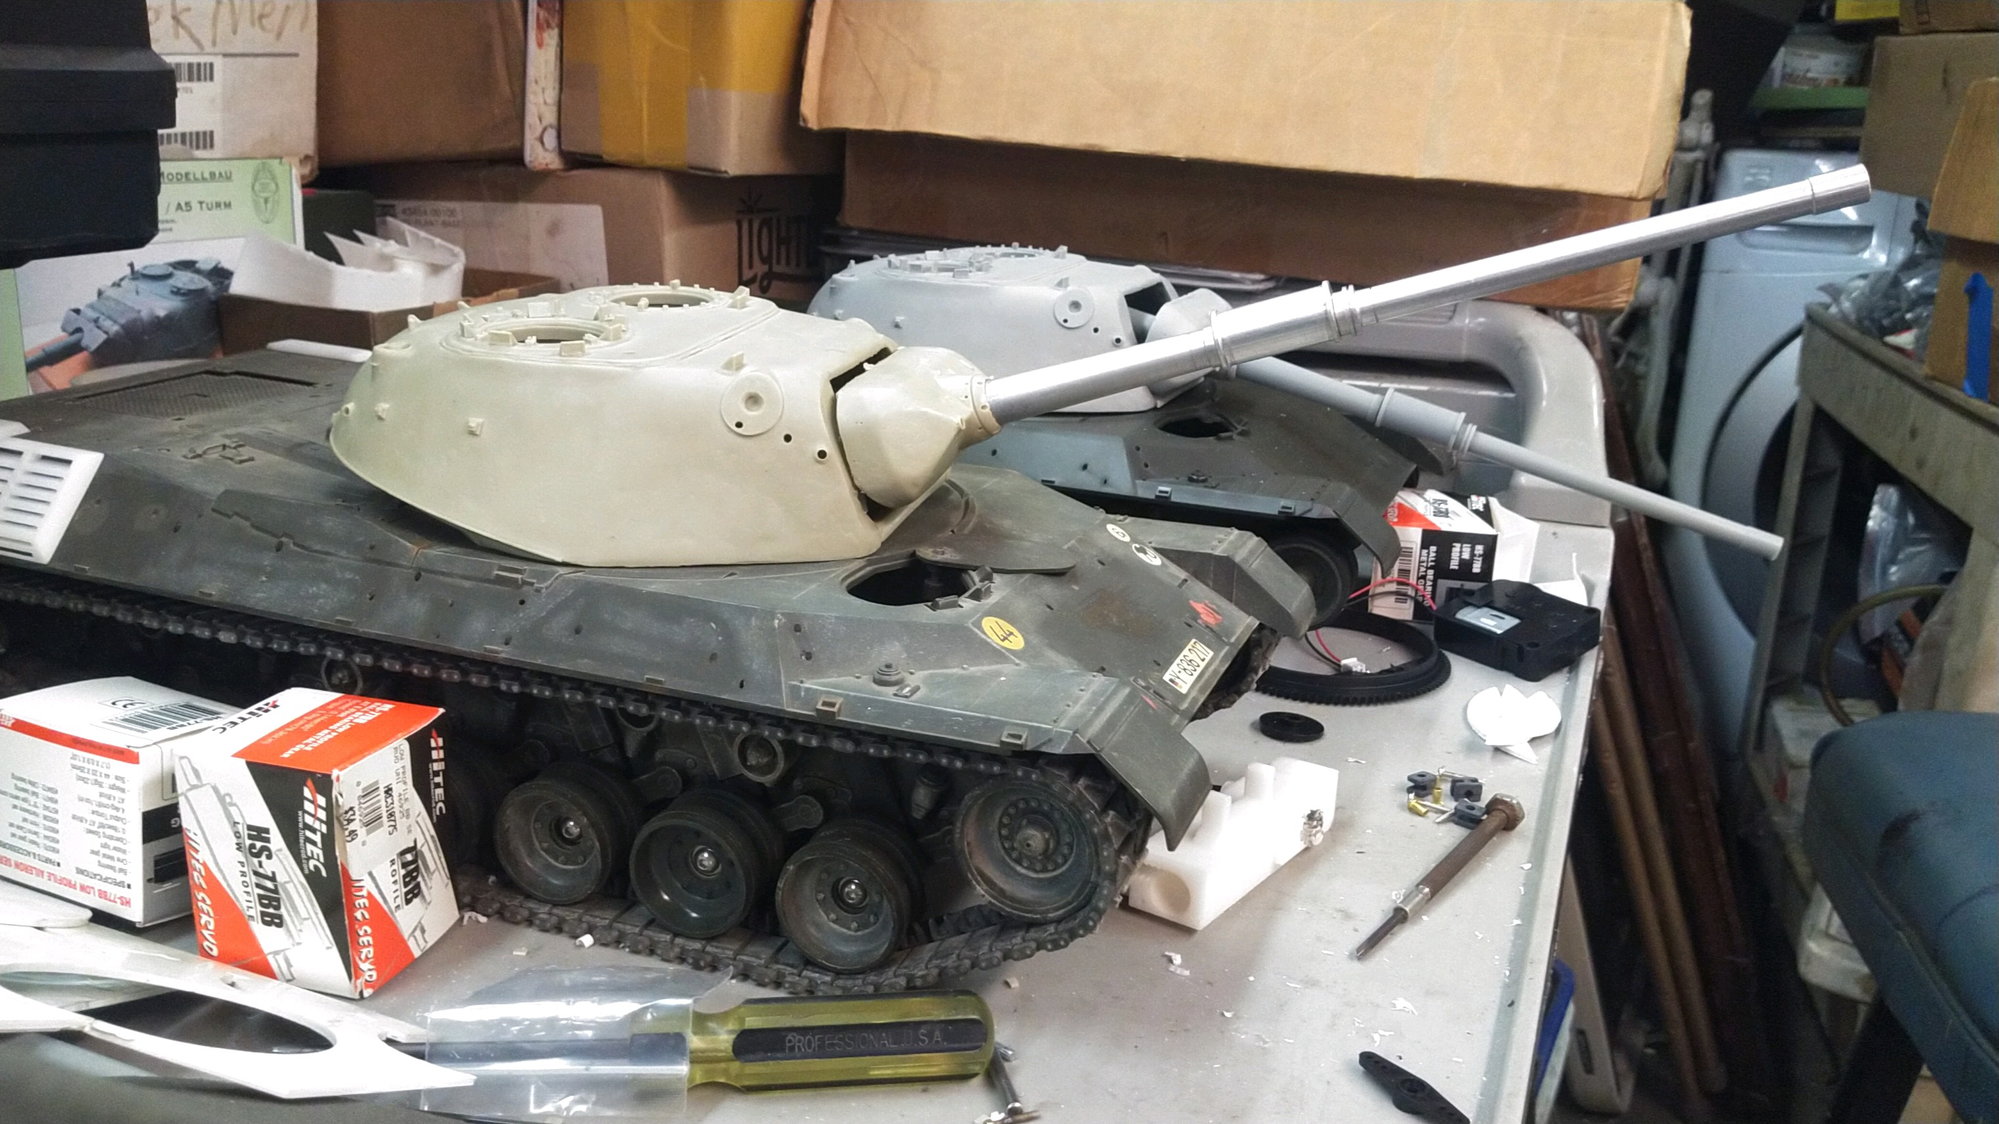
Well Im at this stage now. The recoil mounts are in two of the tanks now.
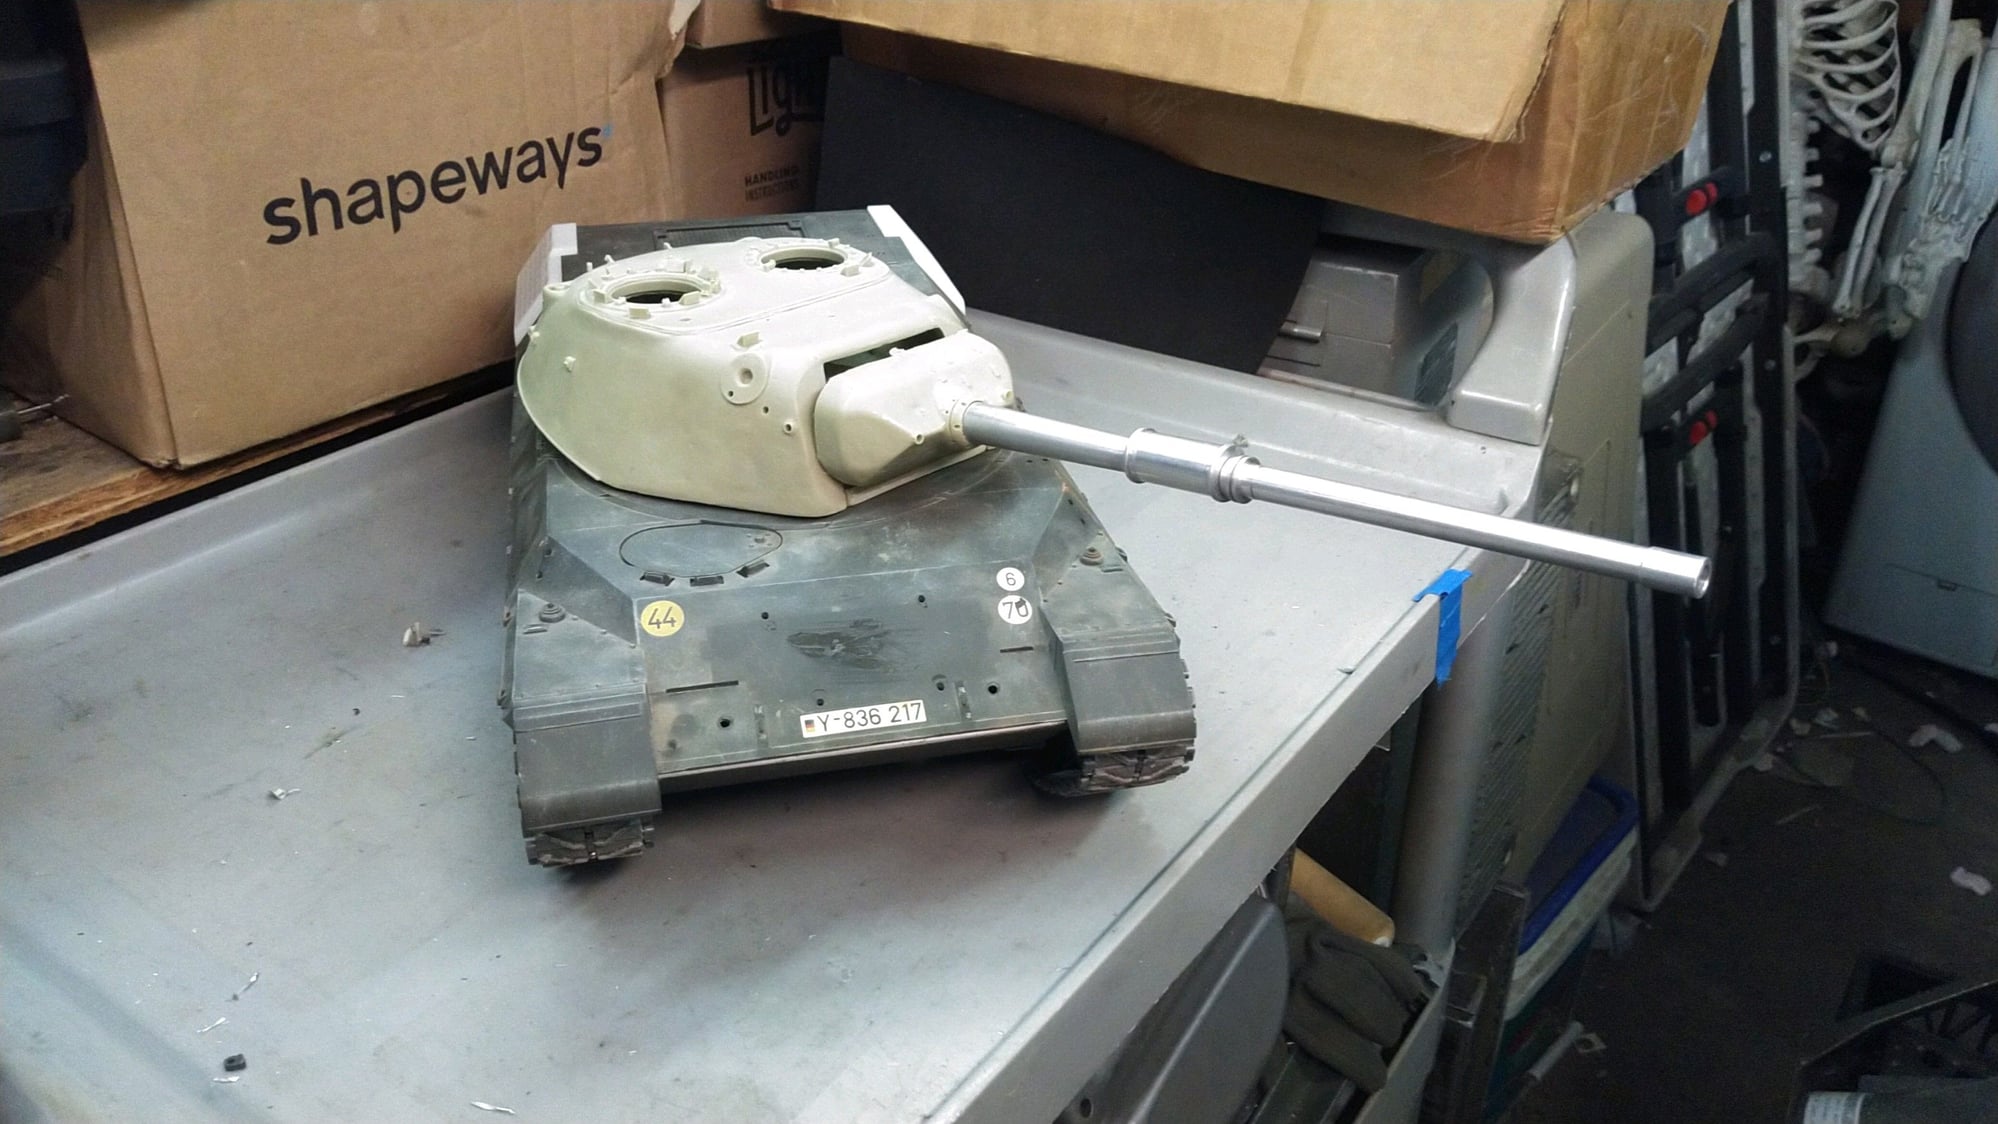
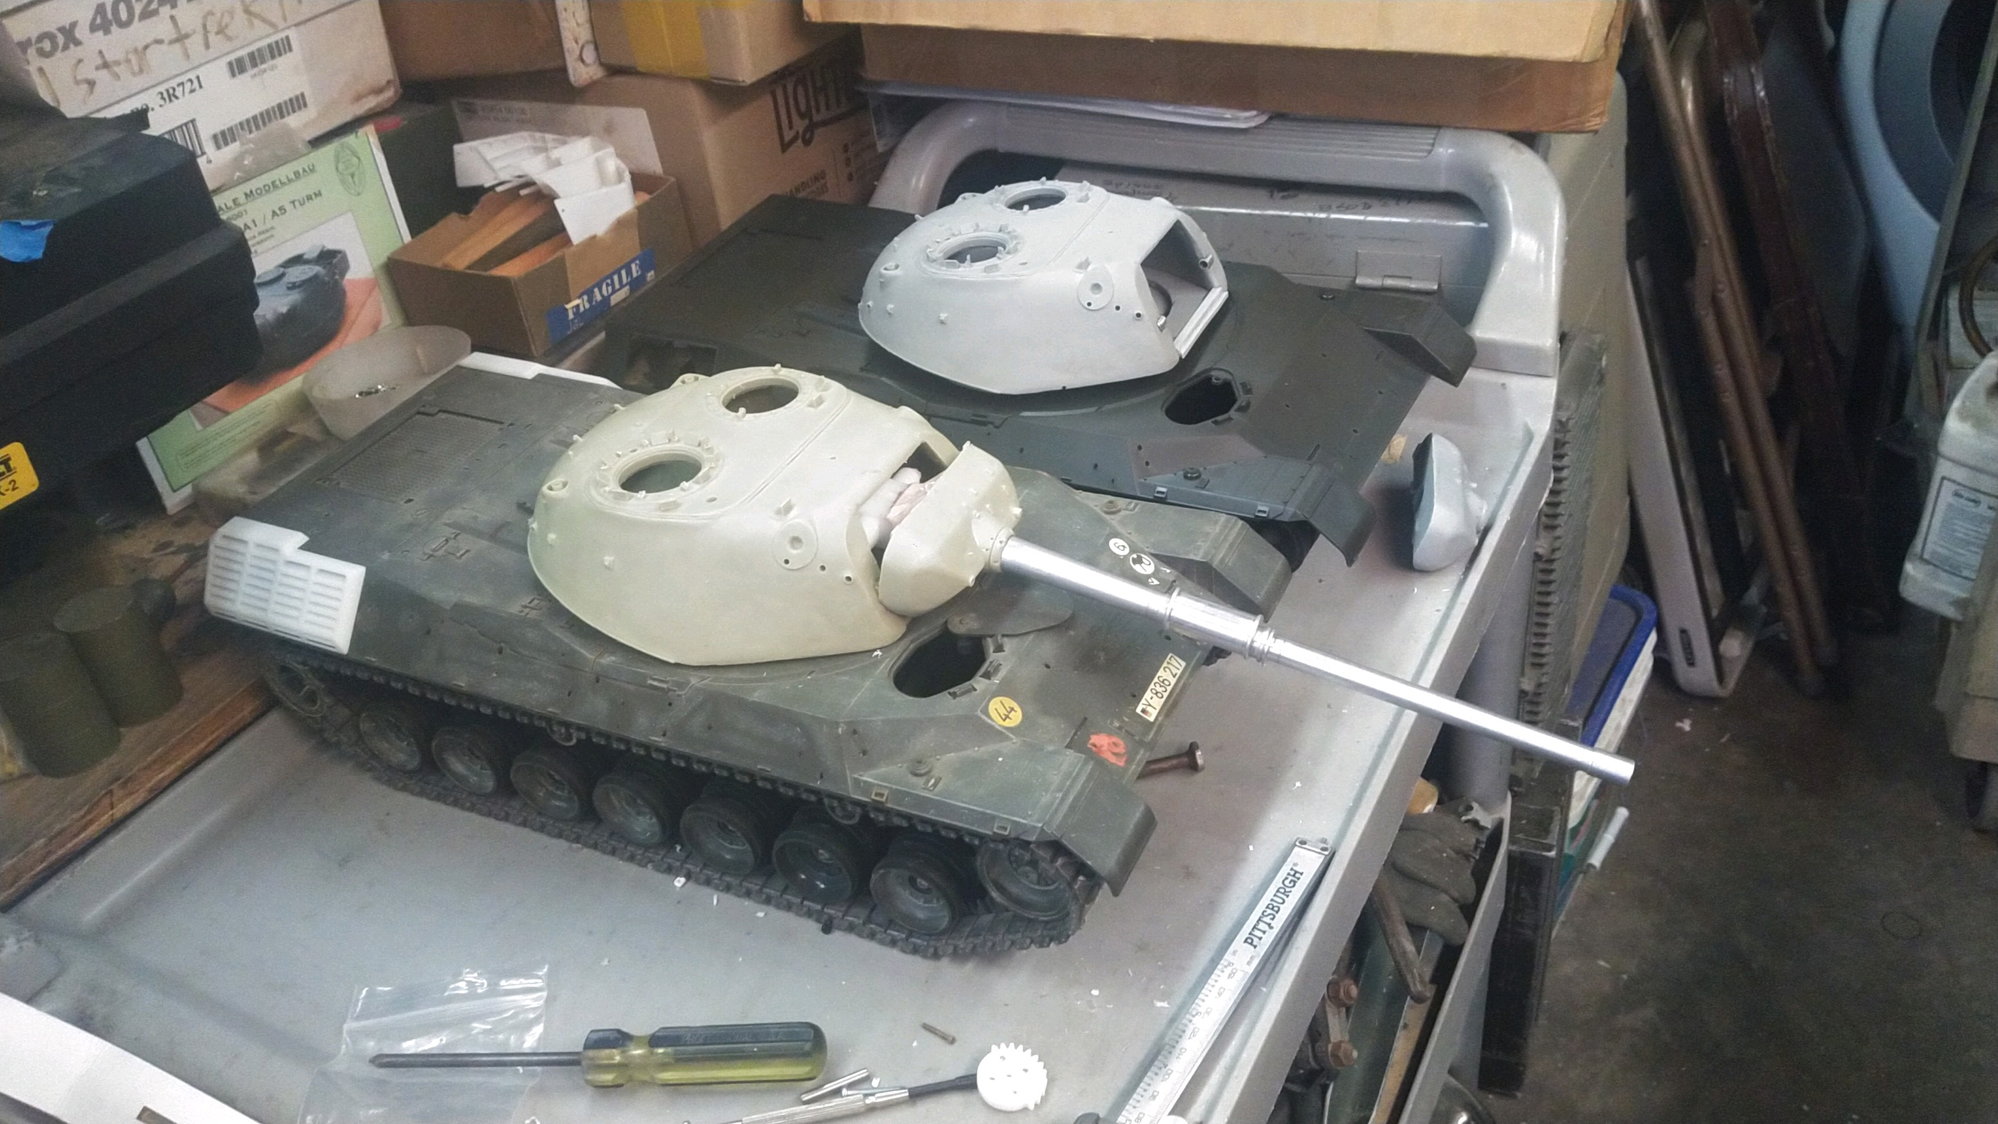
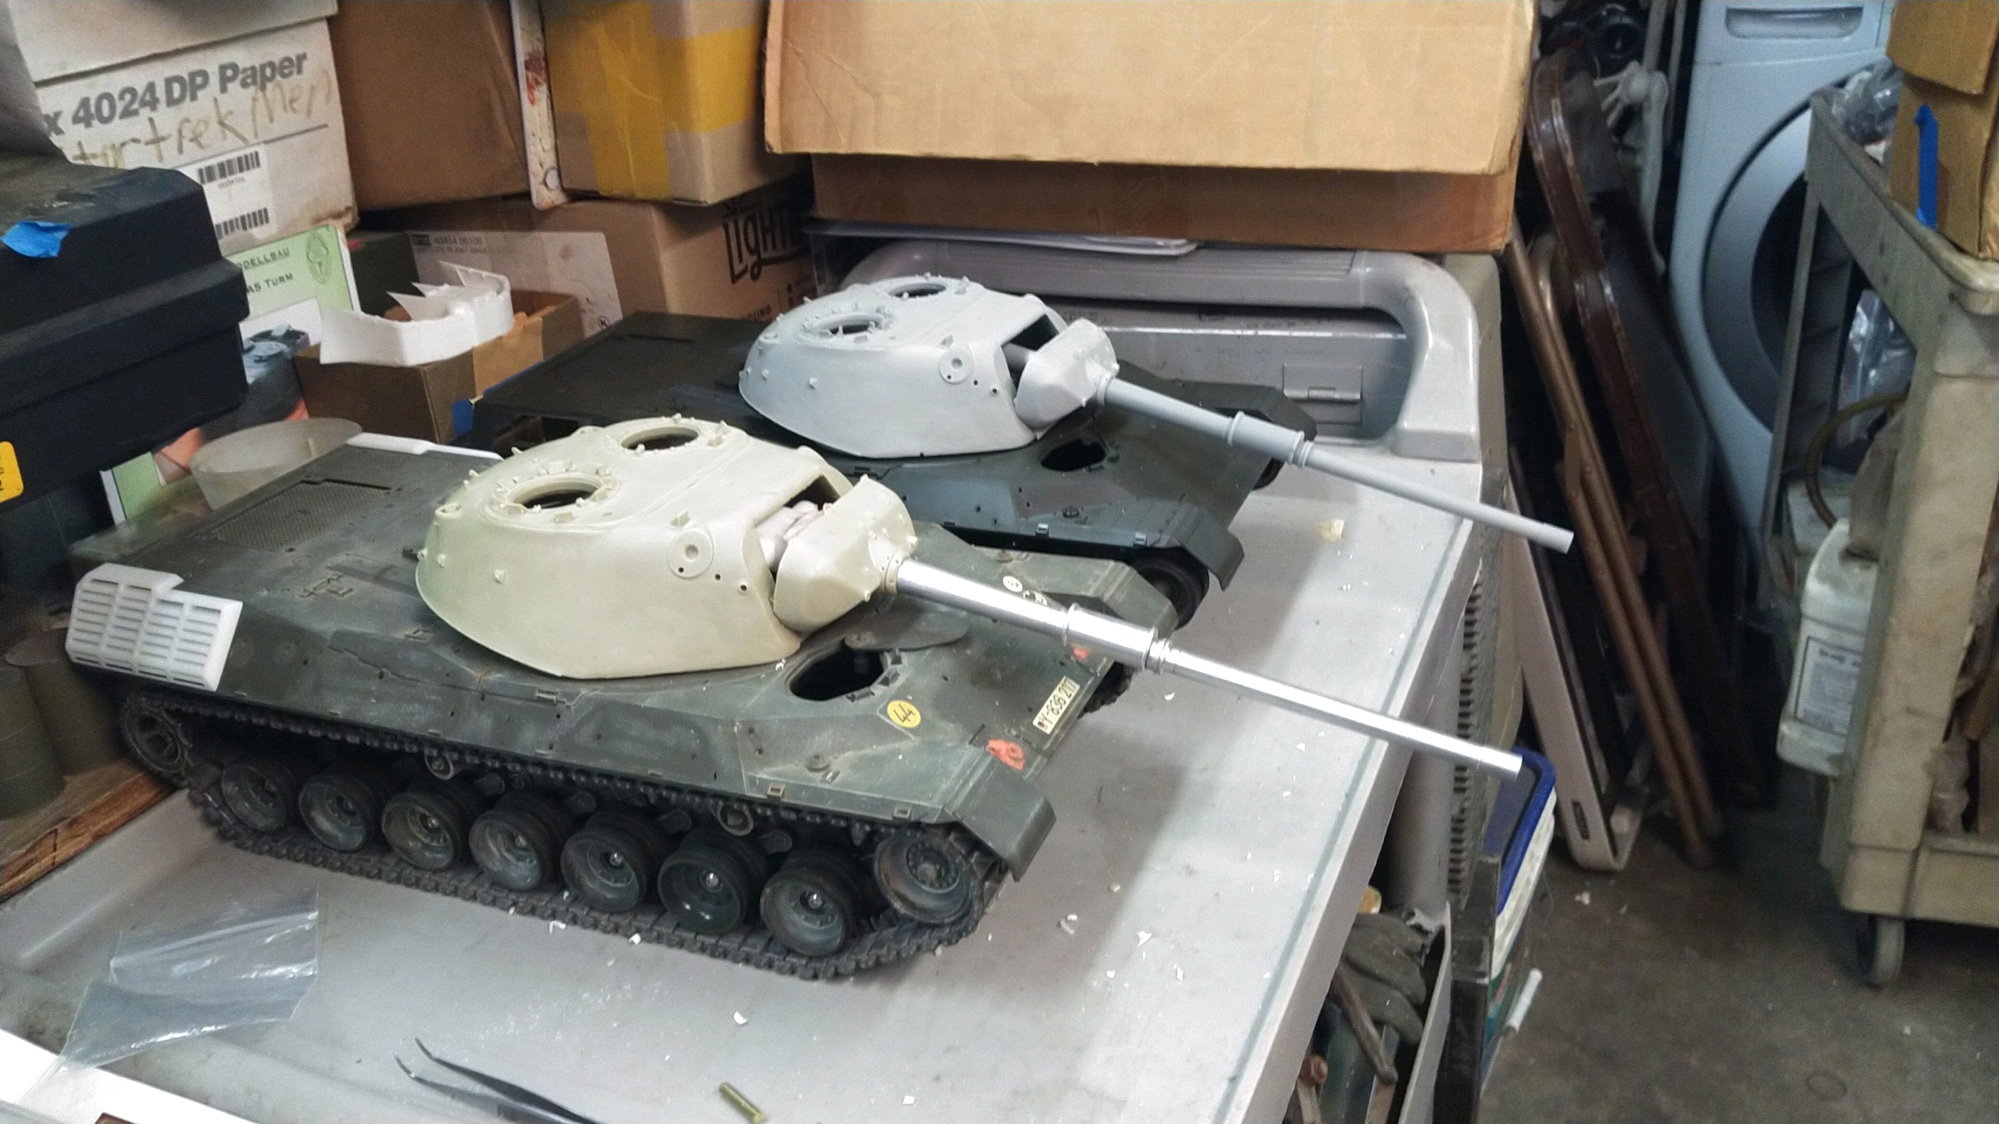
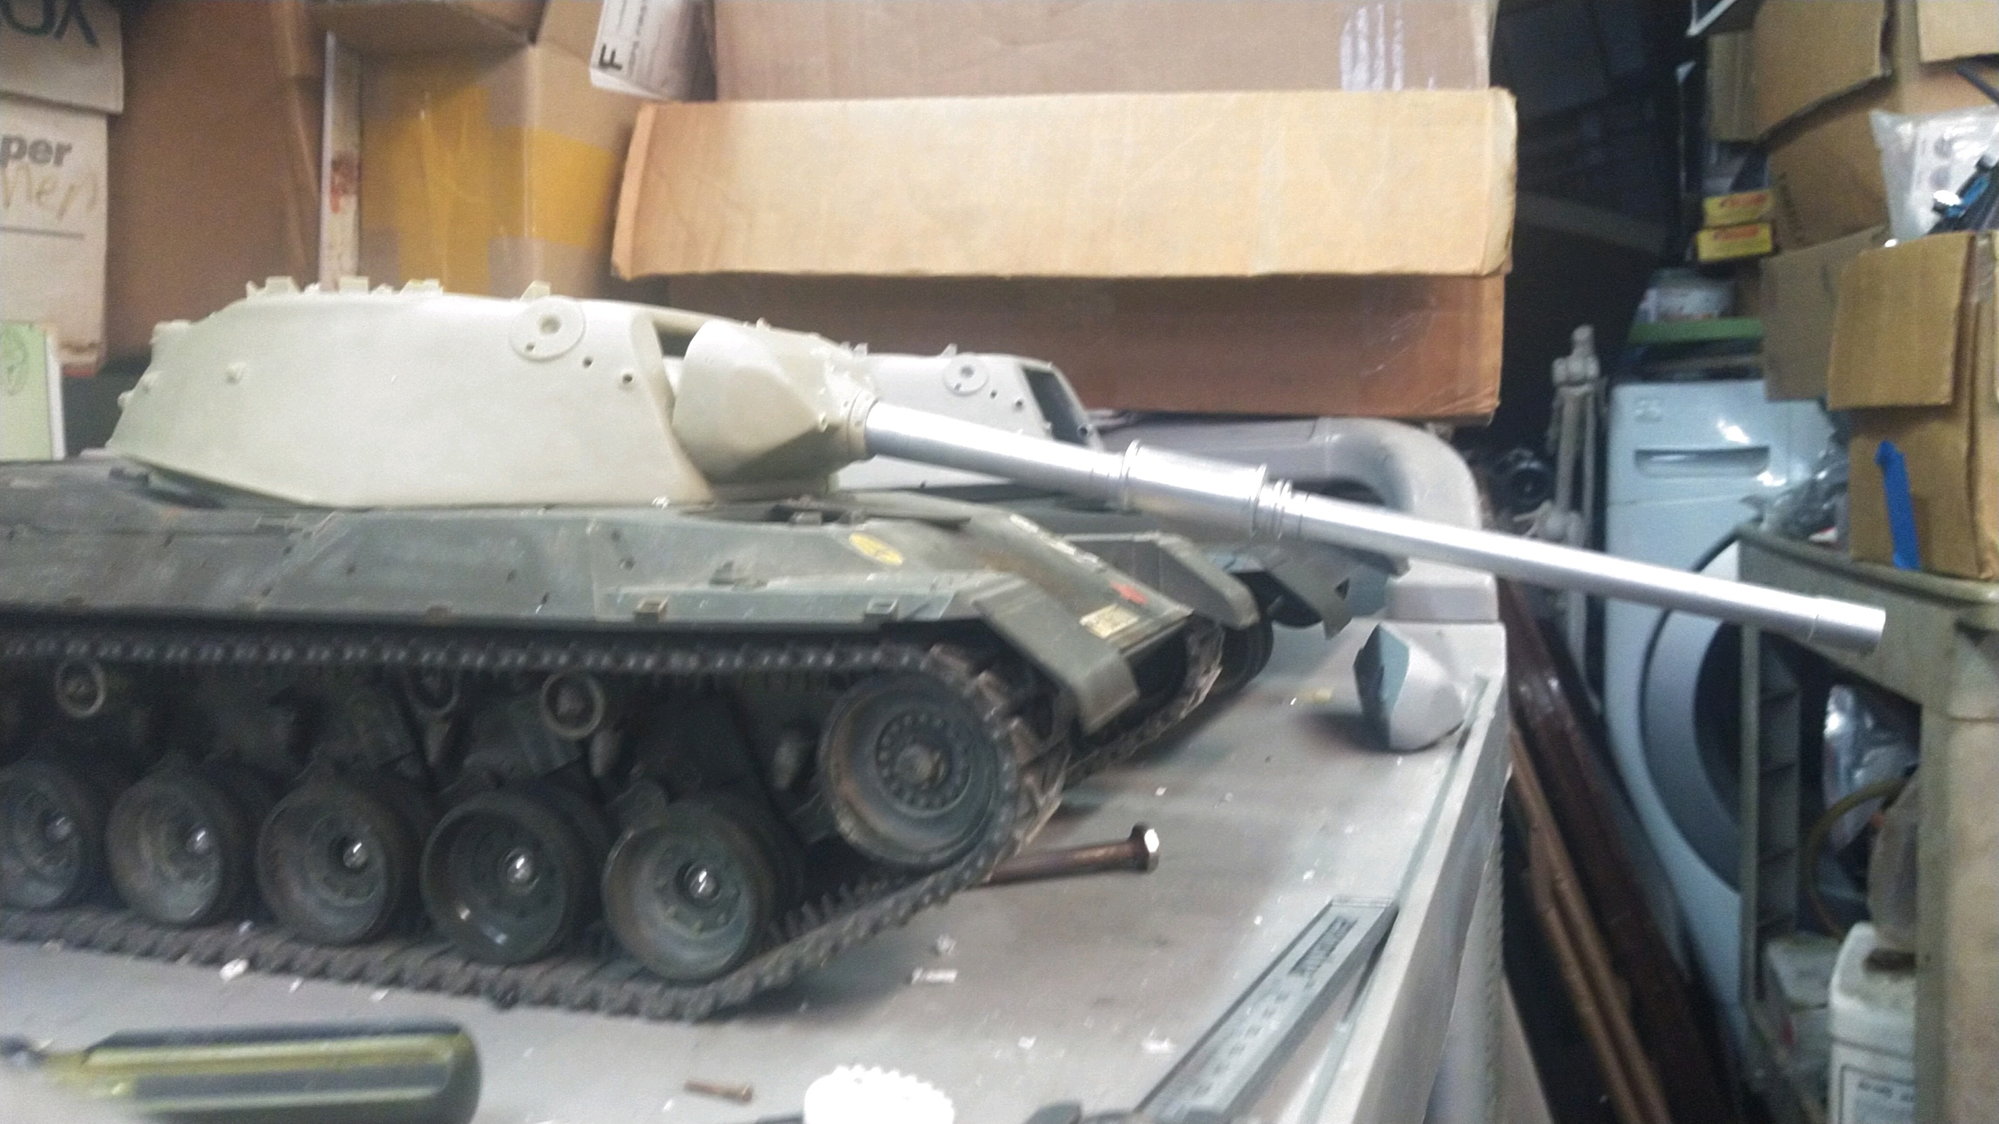
The round perfect scale turret is a serious pain in the ass to work with. Getting the mantlet mounted and the recoil set up and lined up was a serious pain. The details on the cast turret are pretty rough, overall, I wish I had known about the Der Emma Laden turret, he makes a nice 3d printed turret with brass bustle rack. AFV model has an even nicer black resin 3d turret with tons of super detail brass castings but the price will blow you away. Its not really affordable.
The welded turret will be an AS1 which is an Aussie A3 variant. I used the Der Emma Laden recoil mount in it. Sadly, I guess it was desinged to fit into the older turret design as this is the 2010 static release and it has rollers in the bottom of the turret the original clutch and remote motorized did not. So it didnt fit, I had to hack it up alot and modify the heck out of it but the bracket and recoil was still easier than desinging my own system like I did in the 1a7 LEXMAS MEXAS2 tank I built as an experiment.
The rollers are 2x7x2.5 nylon same as used on the super sherman. I fought with setting this thing up for hours last night but finally got it to where I think I am happy with its position.
I havent gotten the transmissions installed in the 3d chassis yet. I will get to it eventually.
The following users liked this post:
tiger rampage (02-10-2023)
02-10-2023, 07:21 AM
#35
Thread Starter
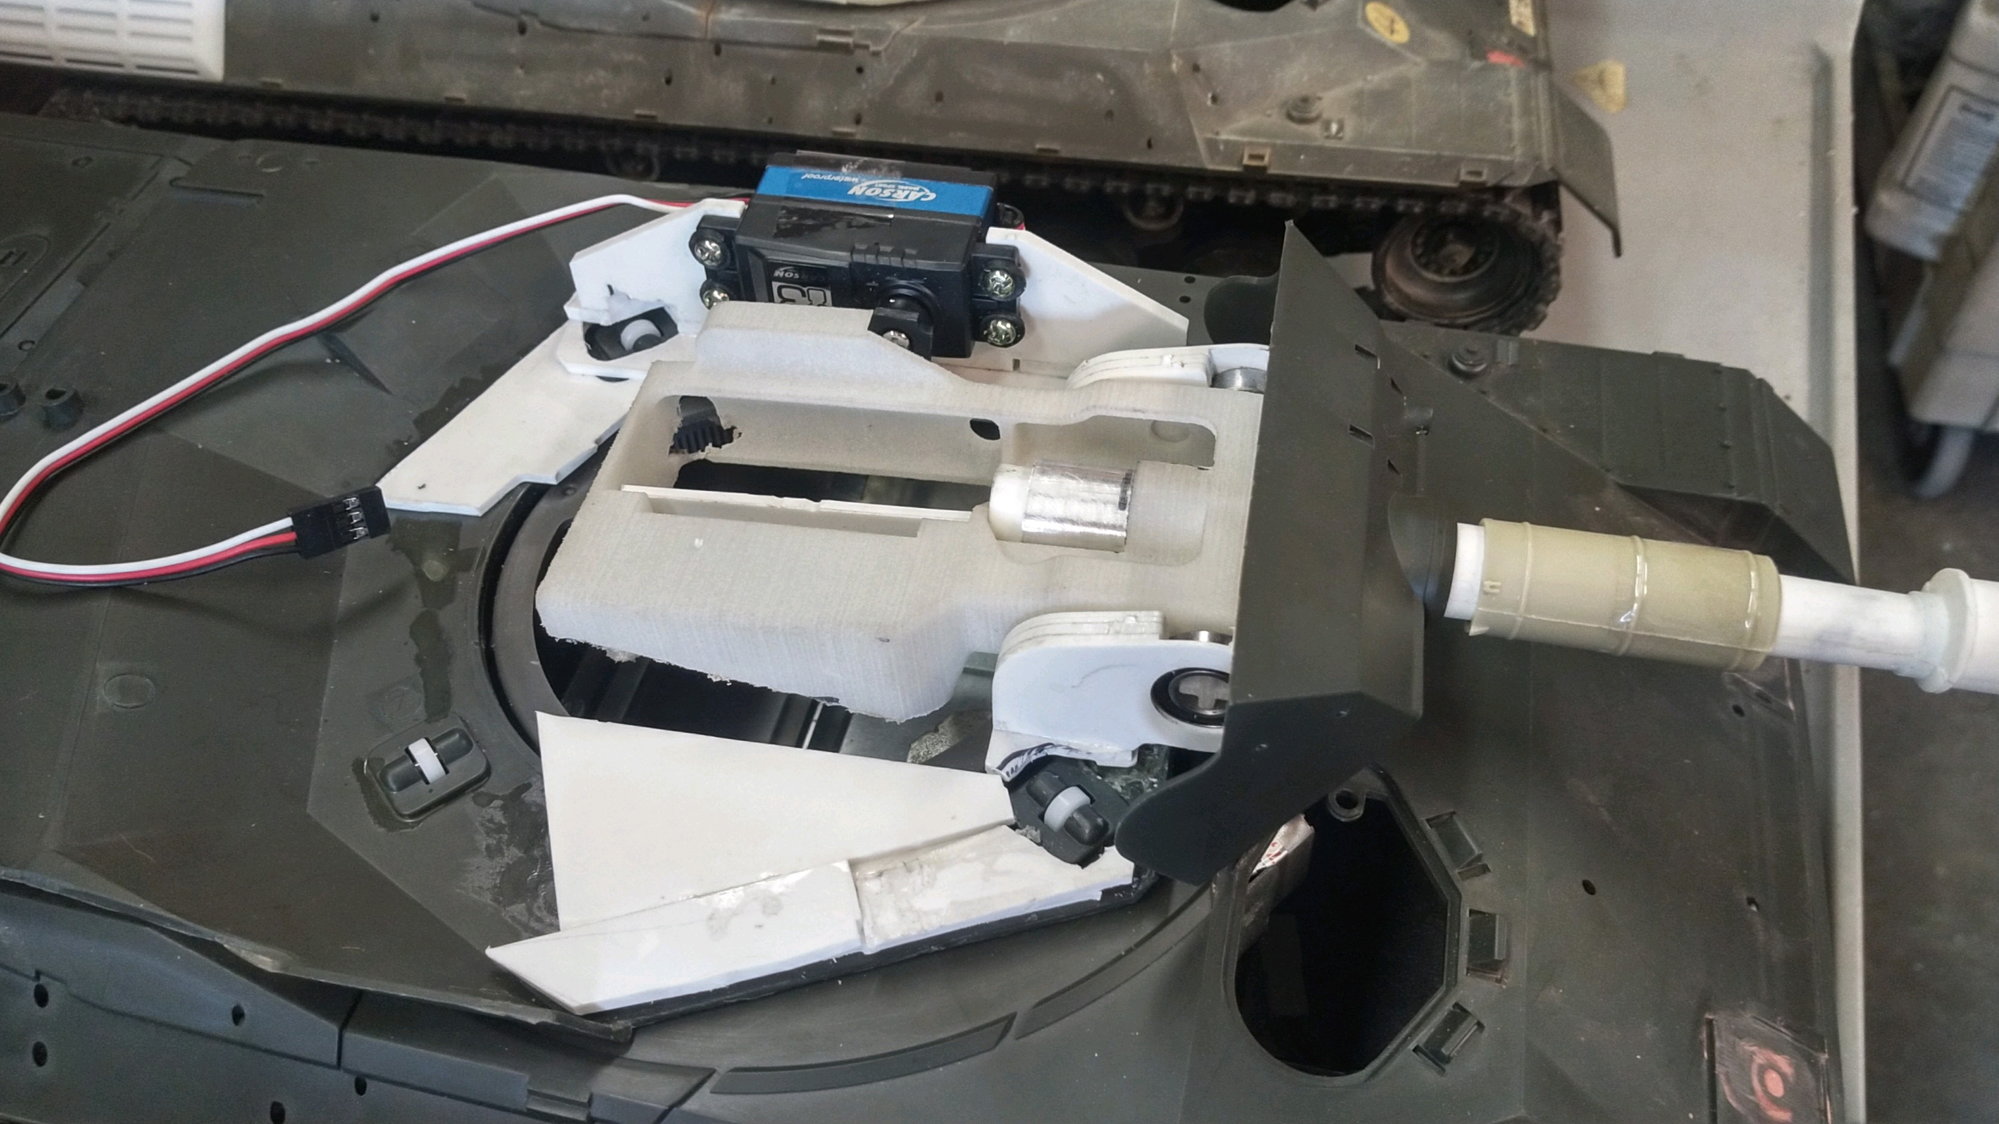
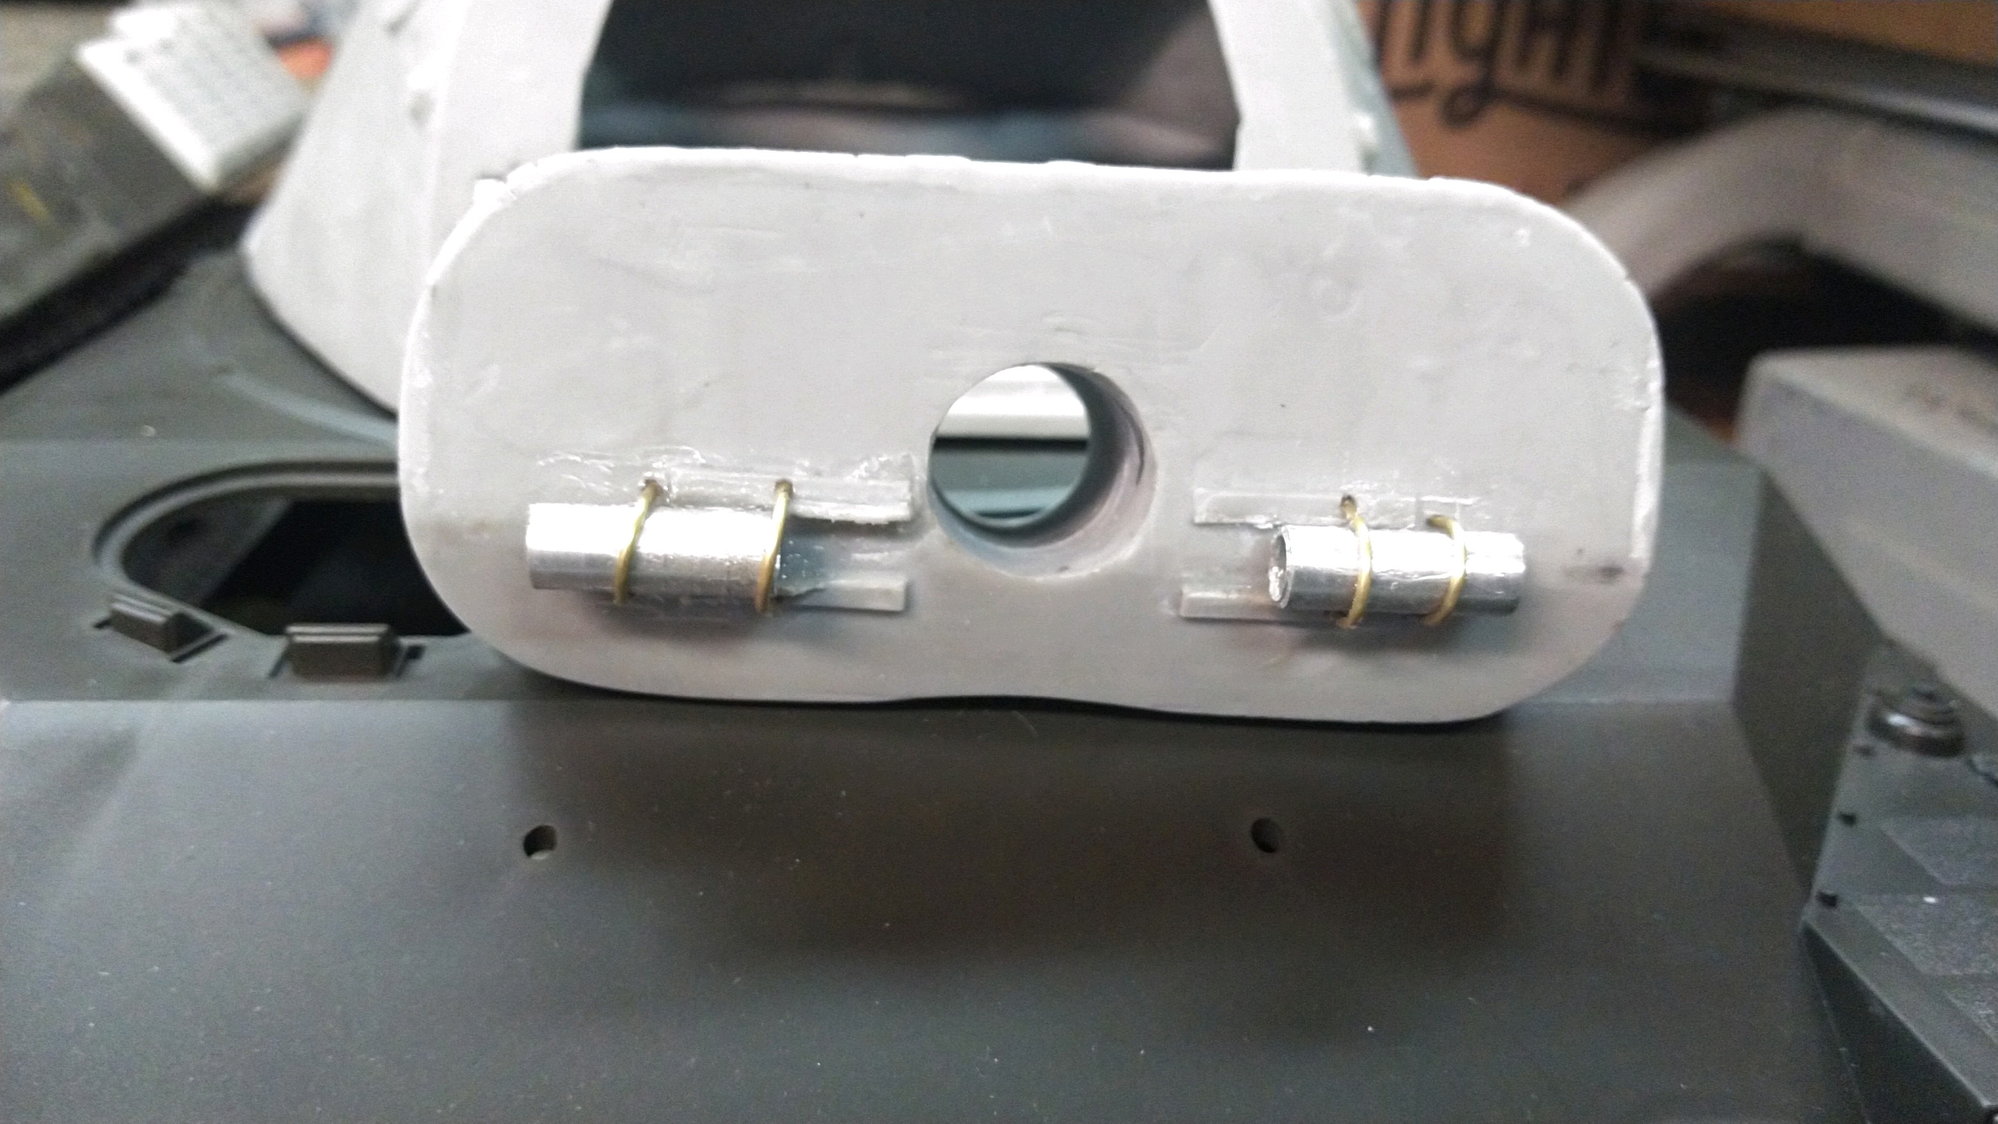
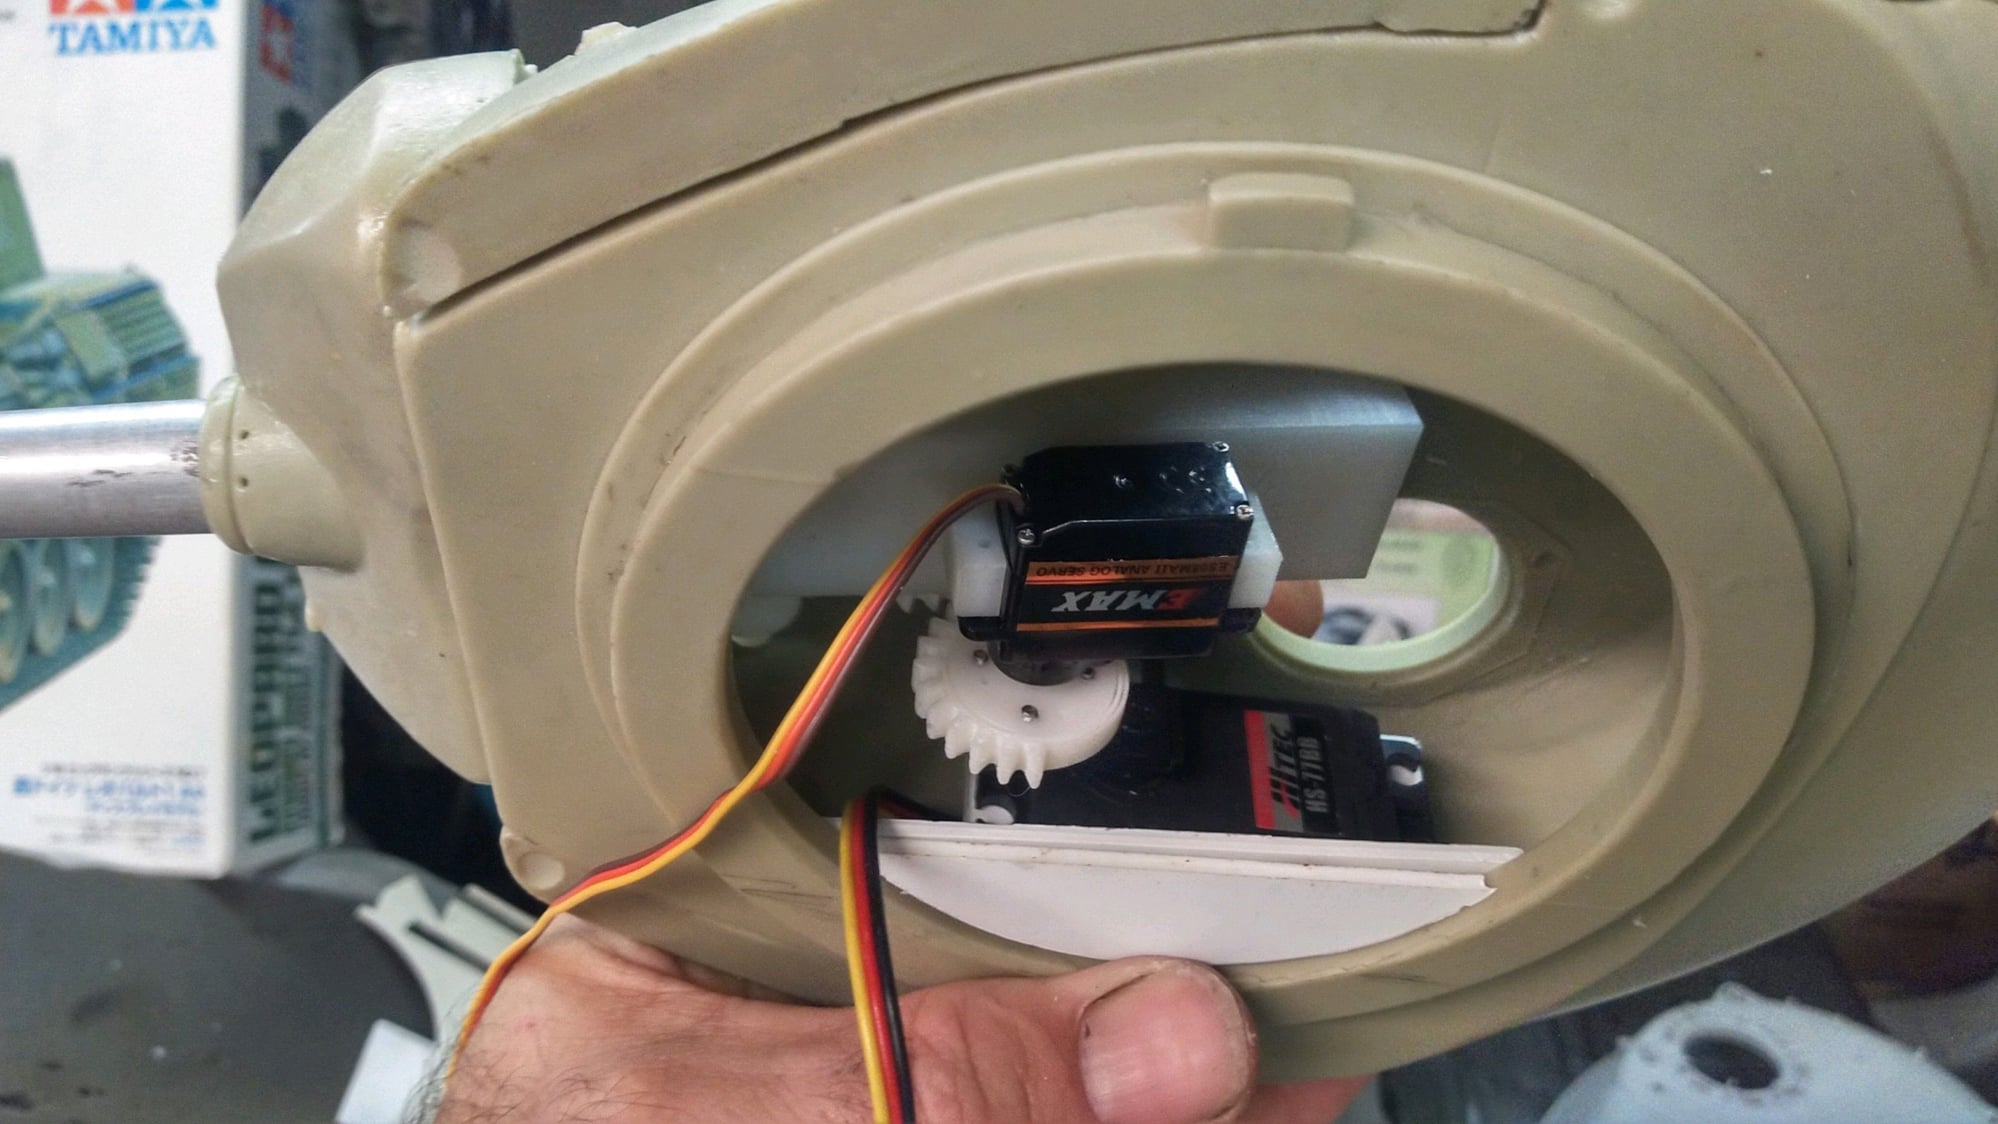
Ive had to hack the heck out of the Der Emma Laden gun mount. It was not made for the static display version of the leopard kit, which has rollers in the bottom because Tamiya was going to make it full option eventually. Those roller mounts are in the way of his large ring which was really made to fit around the leopard 2 ring that most people seem to convert their leopard 1 tanks over to. I didnt buy that conversion kit so nothing lined up well. I just cut it all apart and hacked it to make it fit. I think next time I will go back to using the common 3d printed recoil unit and make my own trunion unit. His is really big and hangs down far.
It took quite of bit of tinkering and fitting to get the elevation servo in the right spot to get the full range of motion out of the mount. I havent glued the brackets or spacers for the servo in place yet but I have it all mocked up and verified my elevation and depression angles.
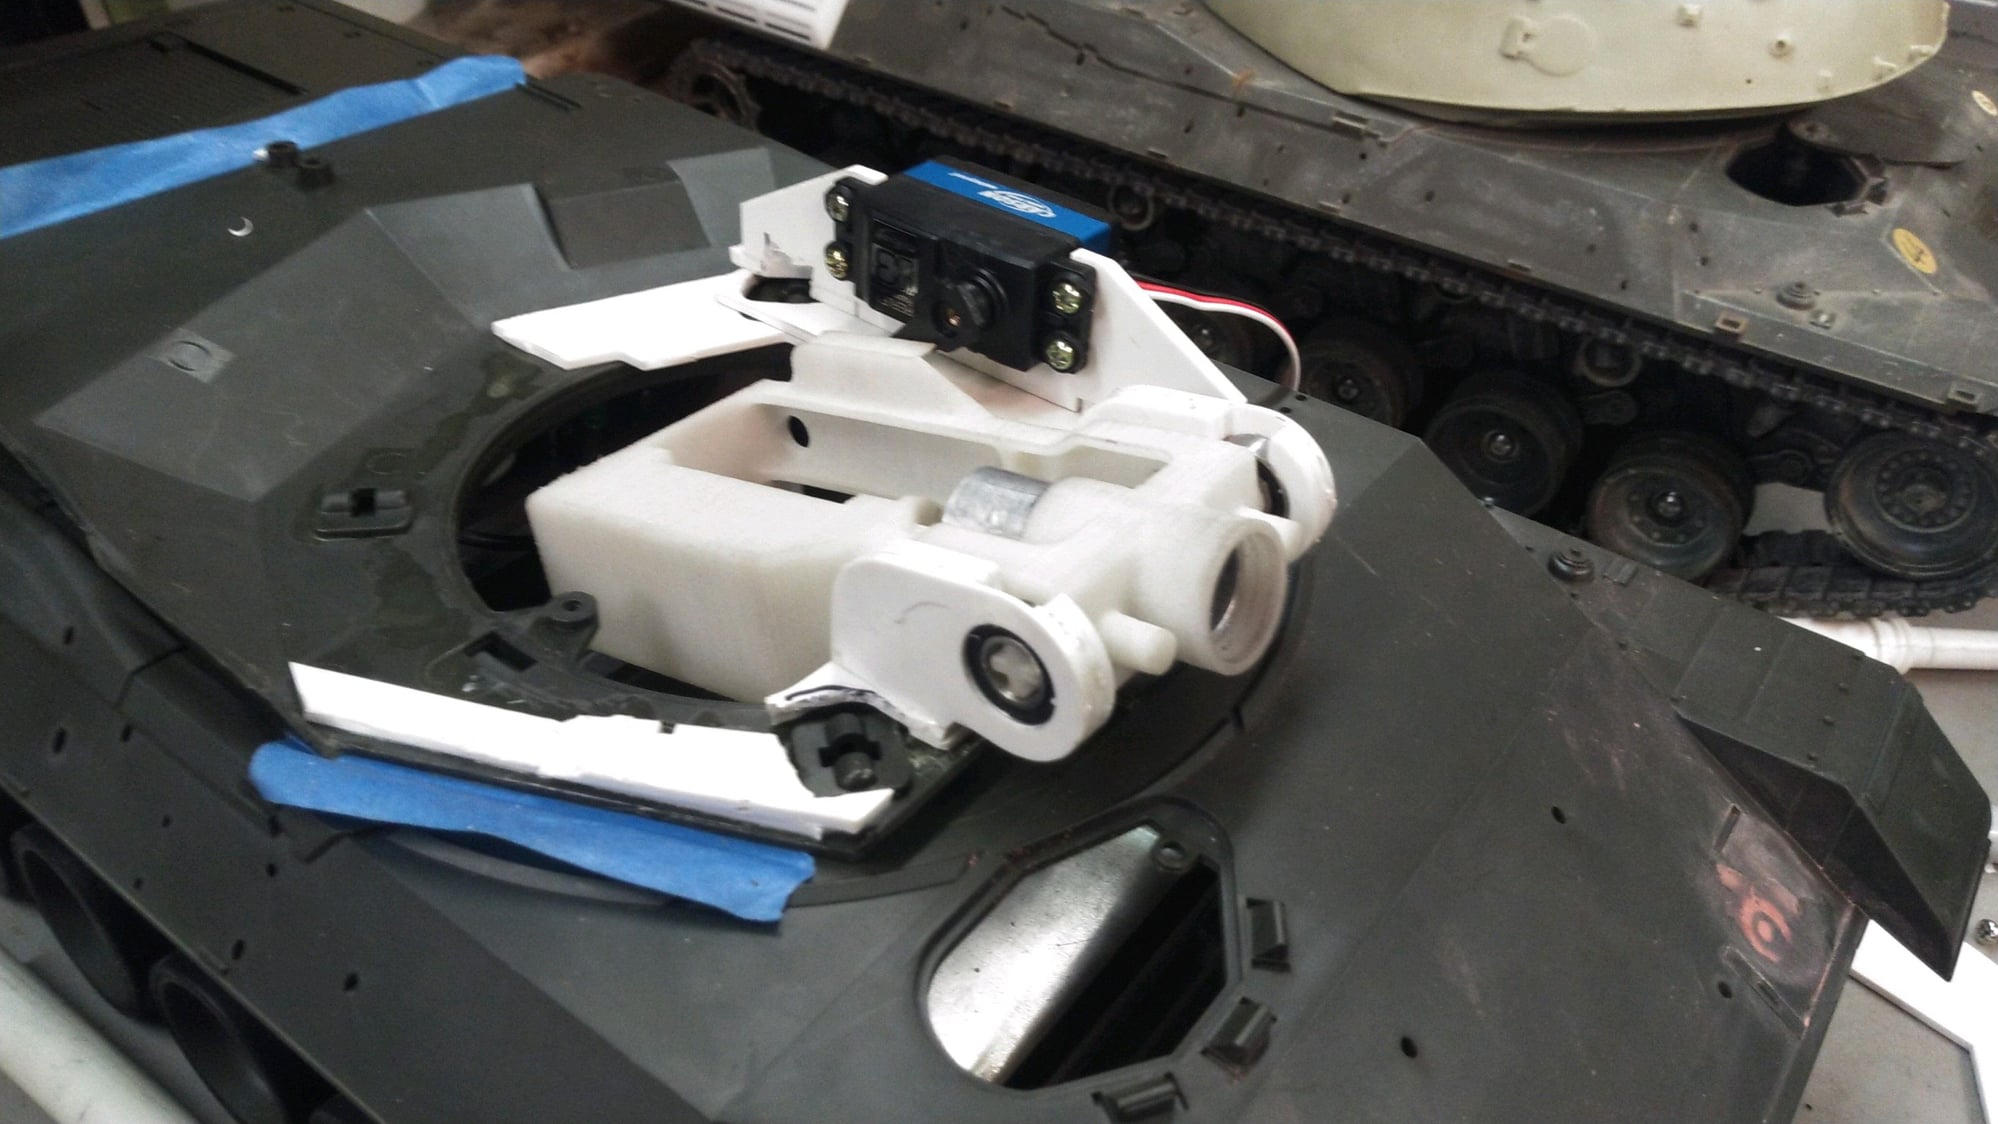
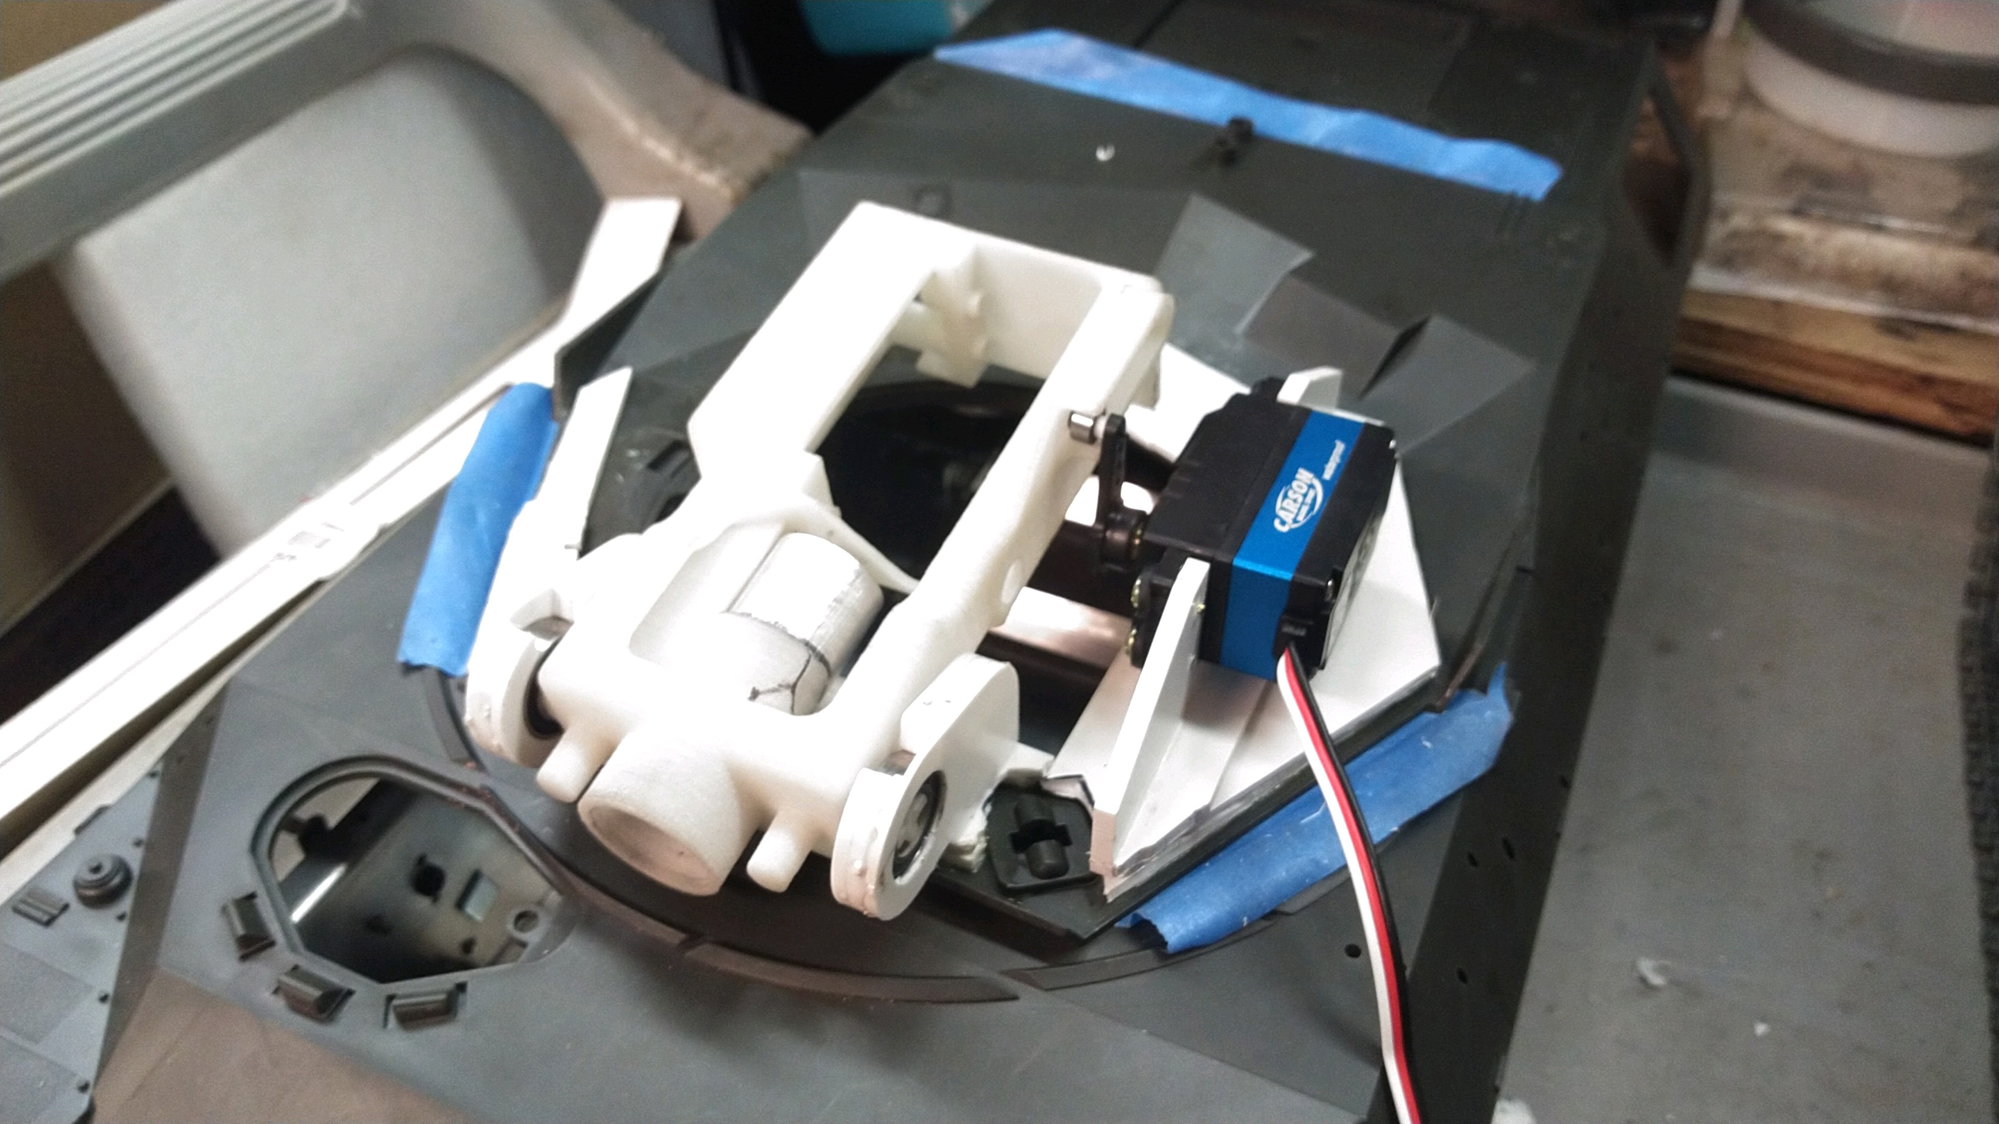
It took quite of bit of tinkering and fitting to get the elevation servo in the right spot to get the full range of motion out of the mount. I havent glued the brackets or spacers for the servo in place yet but I have it all mocked up and verified my elevation and depression angles.
The following users liked this post:
tankme (02-10-2023)
02-13-2023, 05:20 AM
#36
Thread Starter
Tons of work got done these last few days. Im now looking like I have 3 tanks together. Still need a bunch of servos and tank control boards......
But slowly getting there. I feel like I went through a power build session on all these.
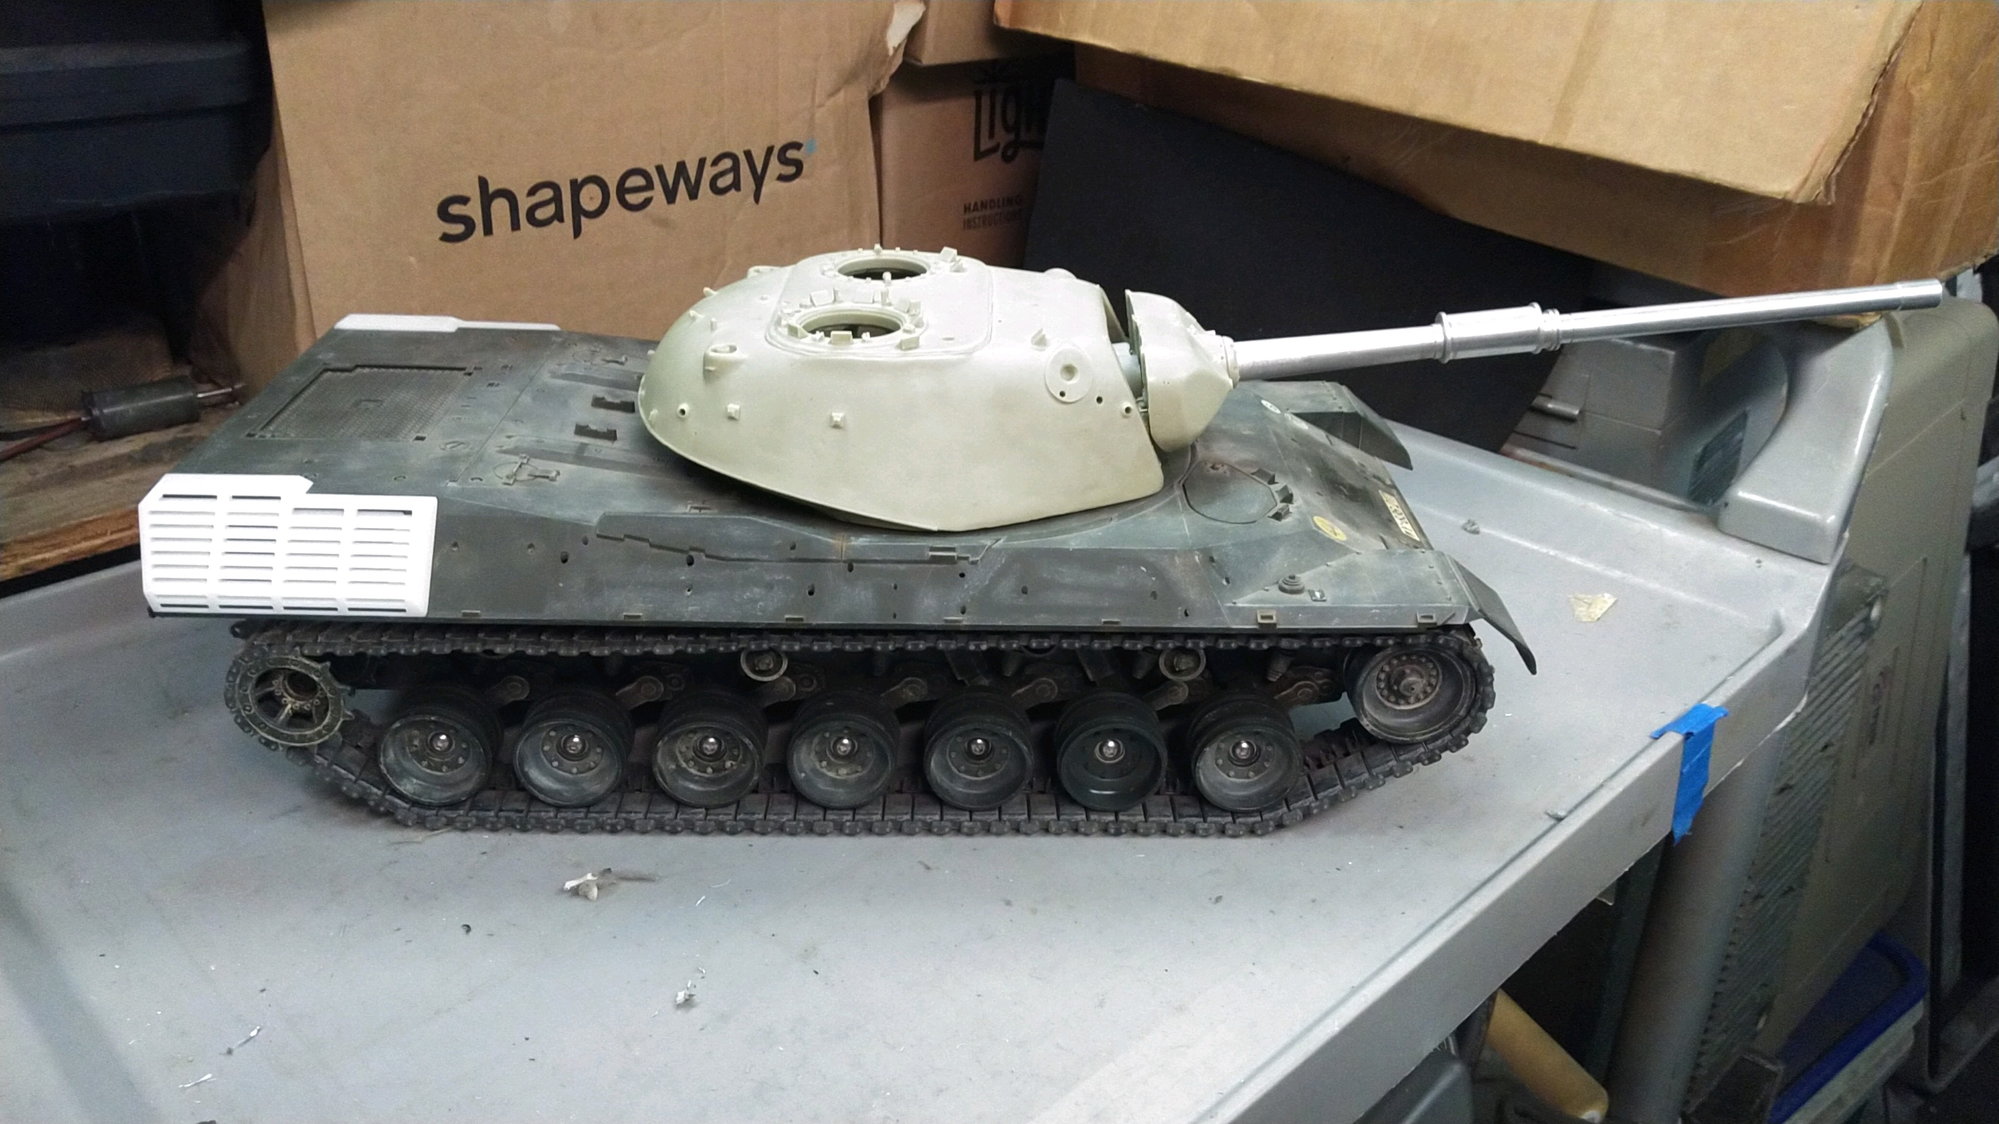
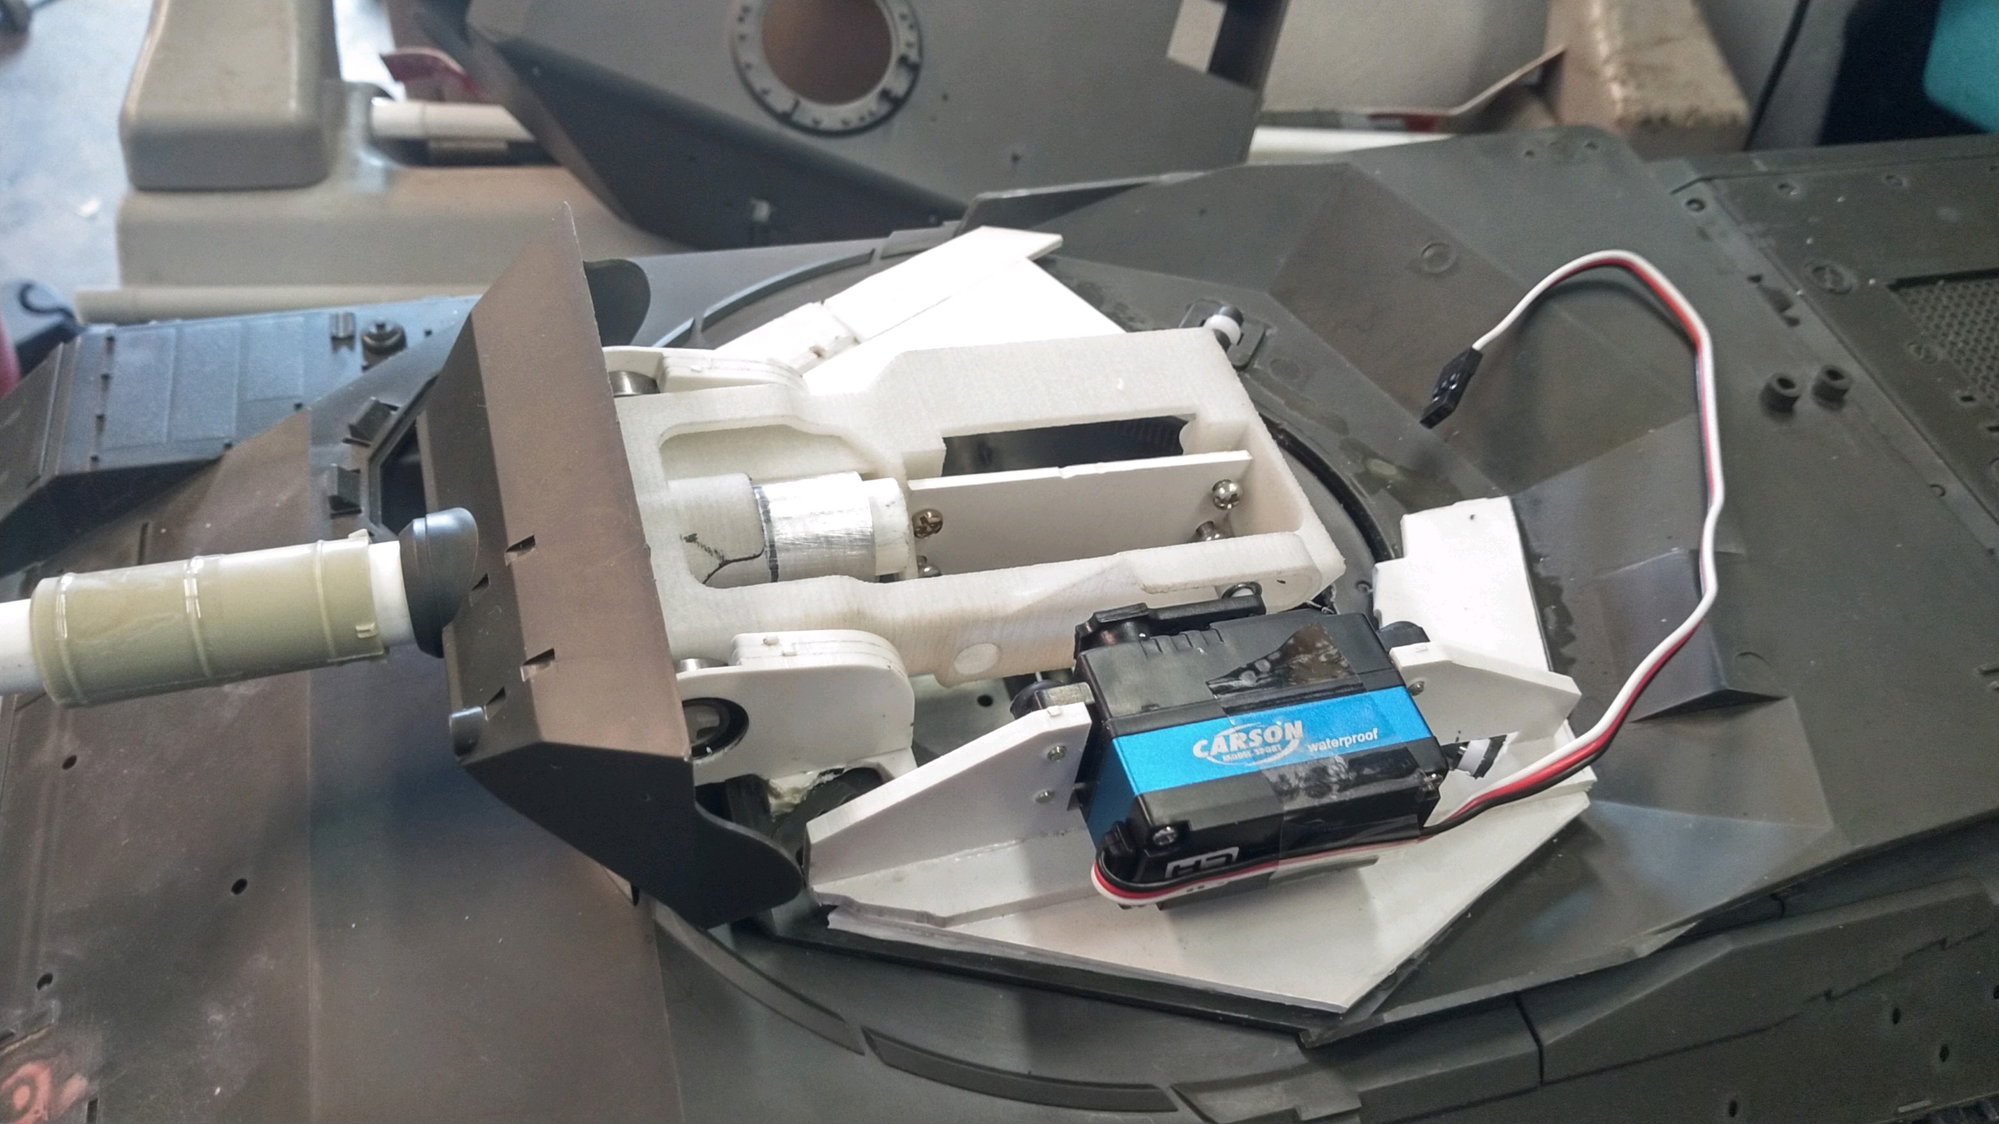
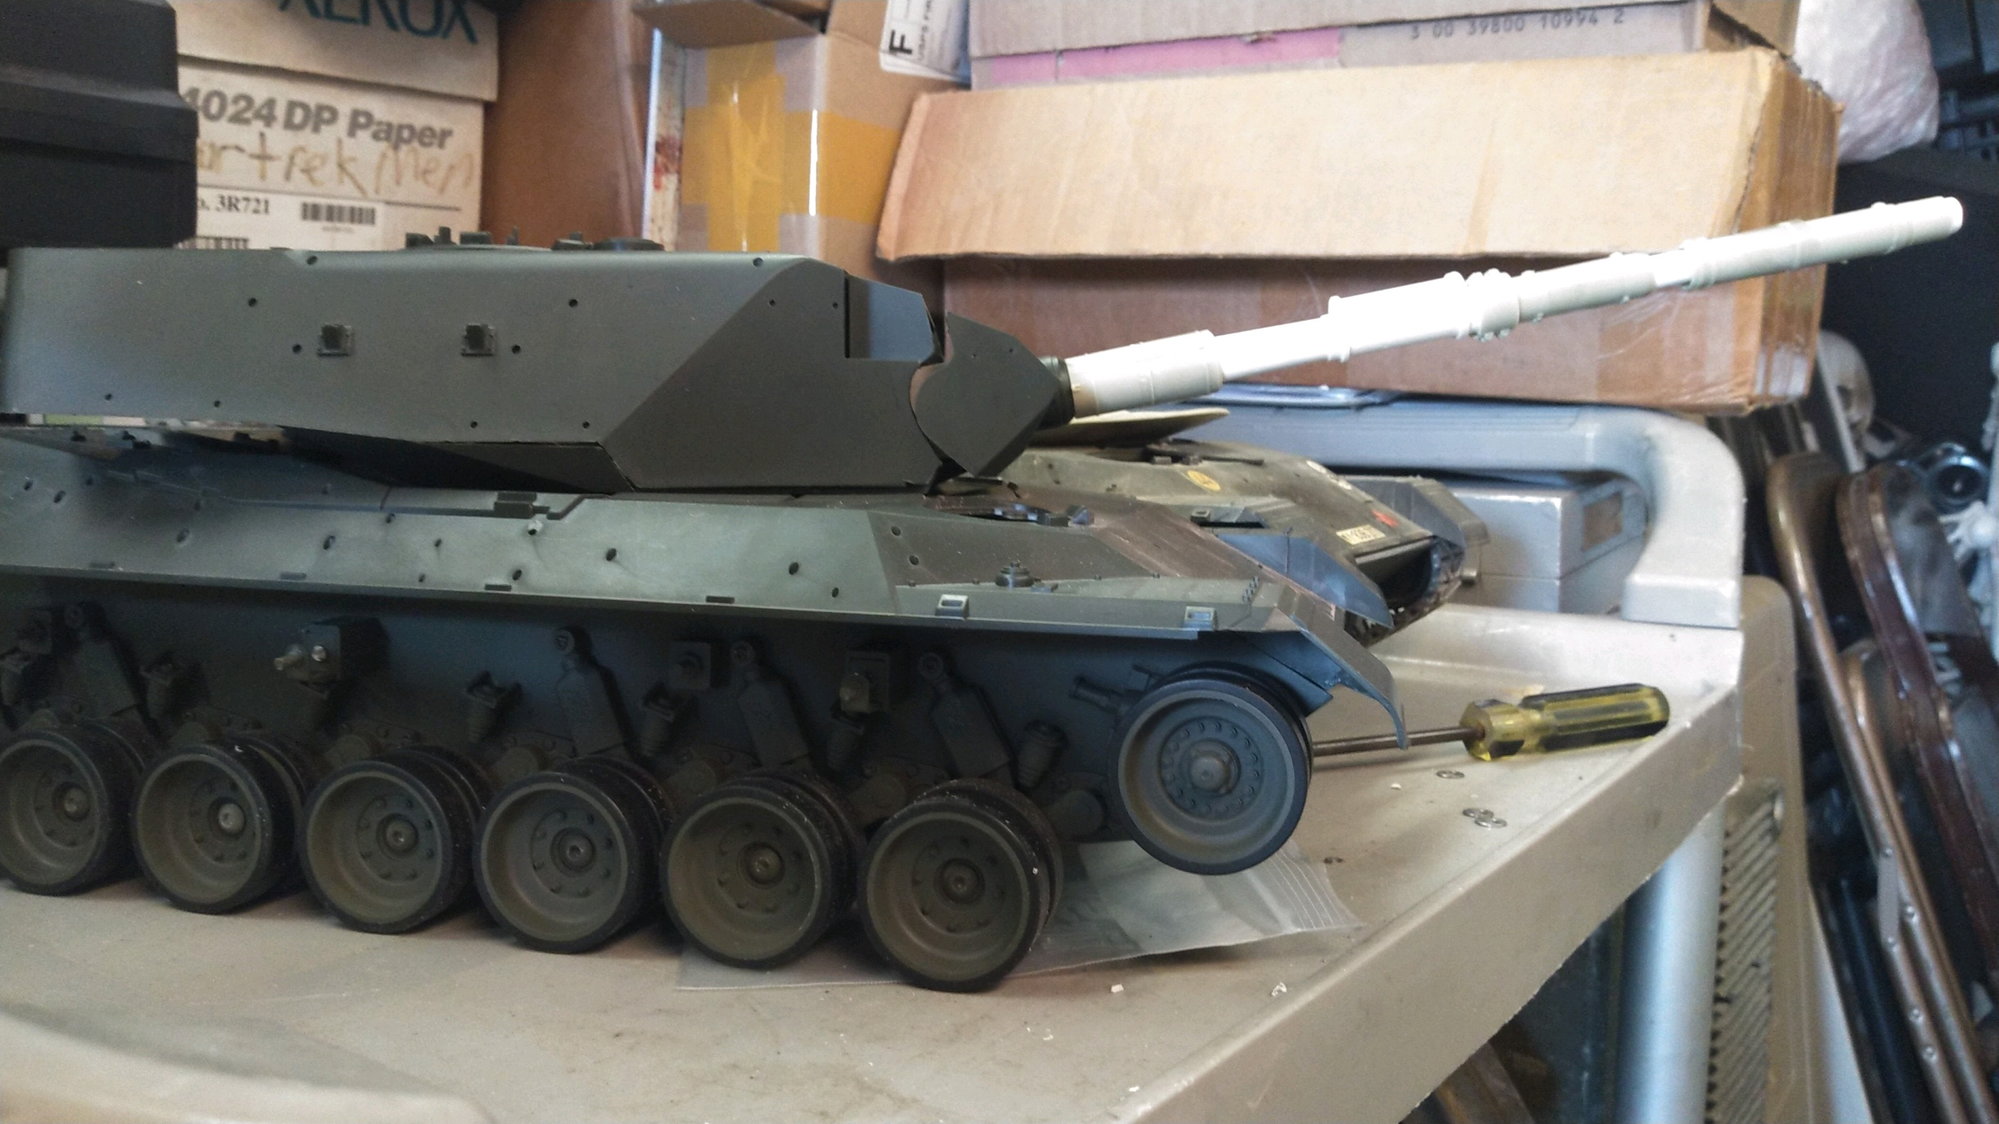
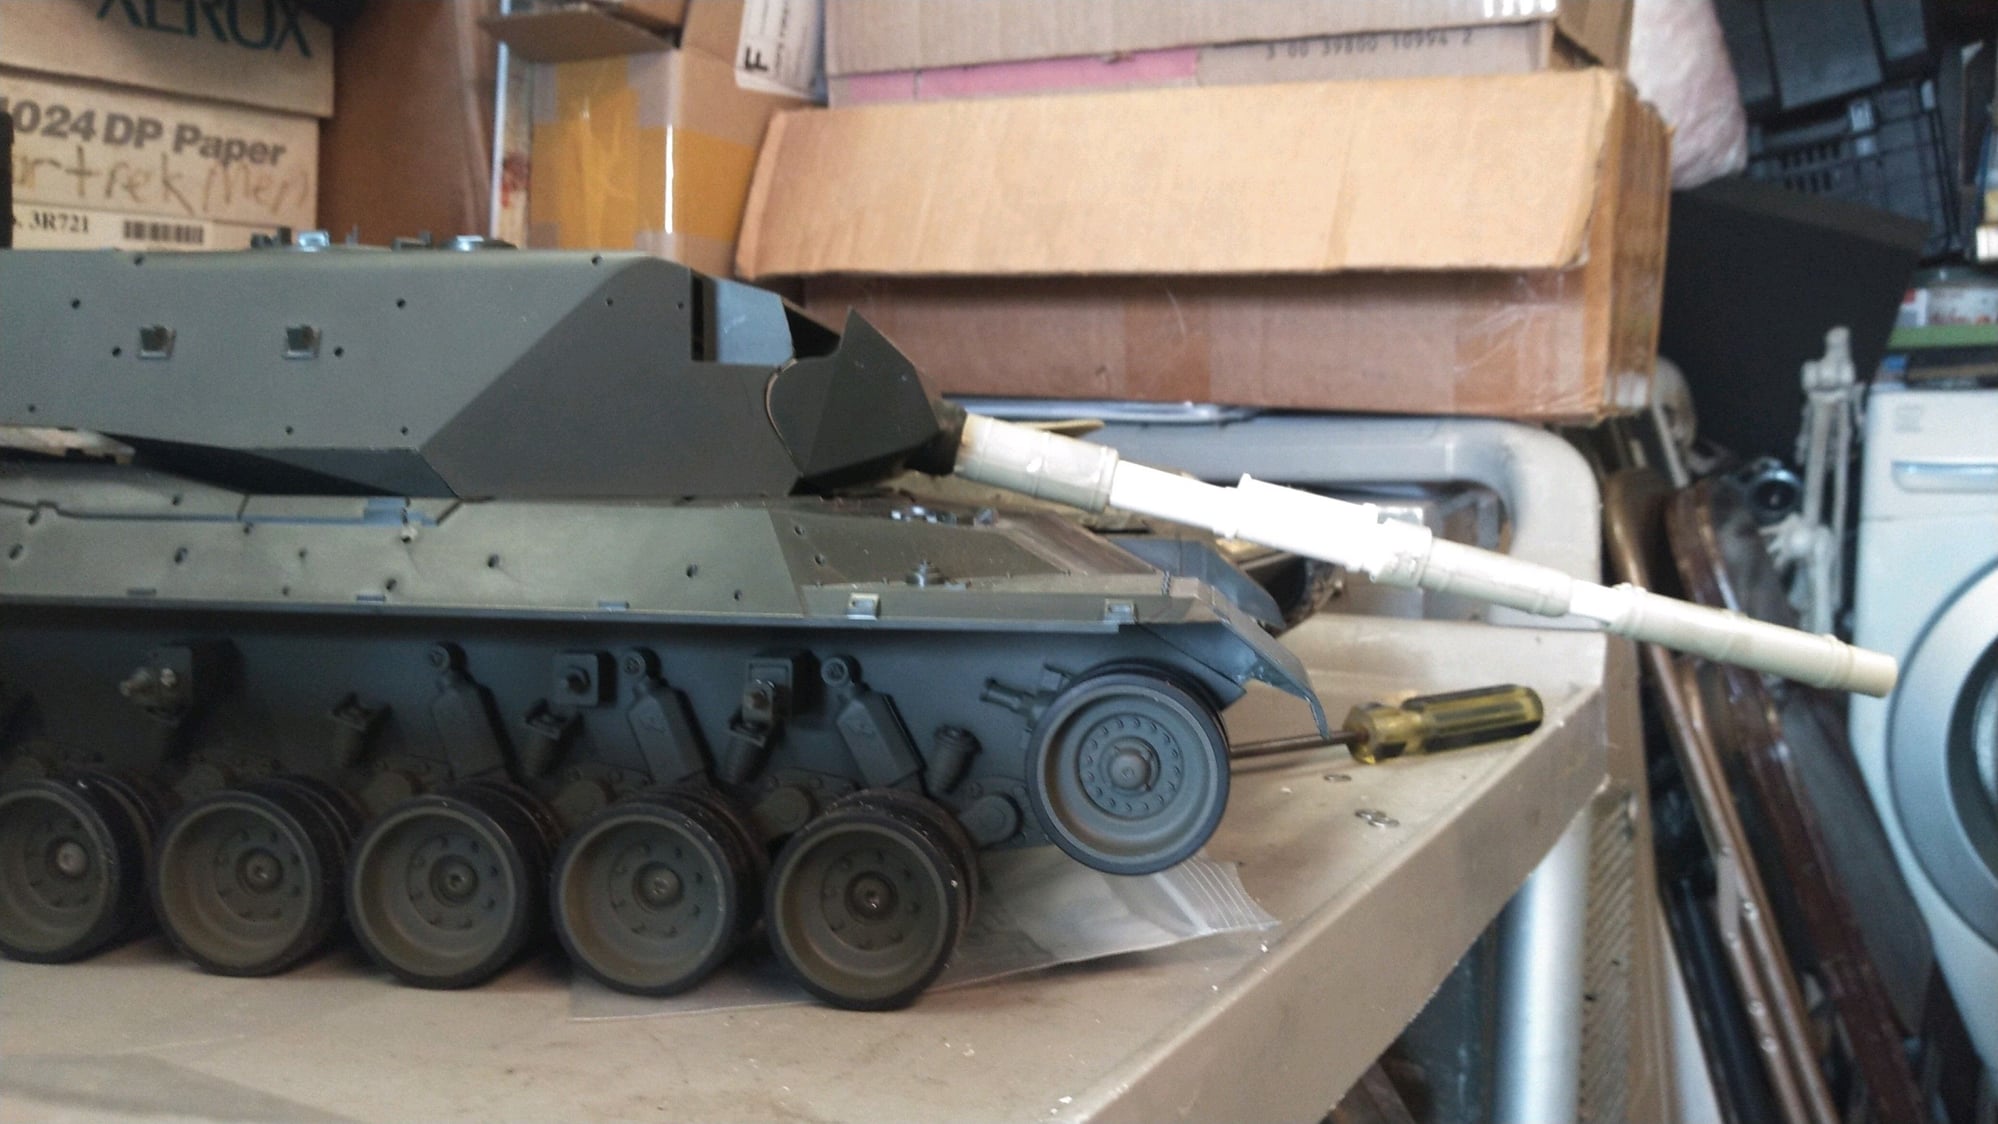
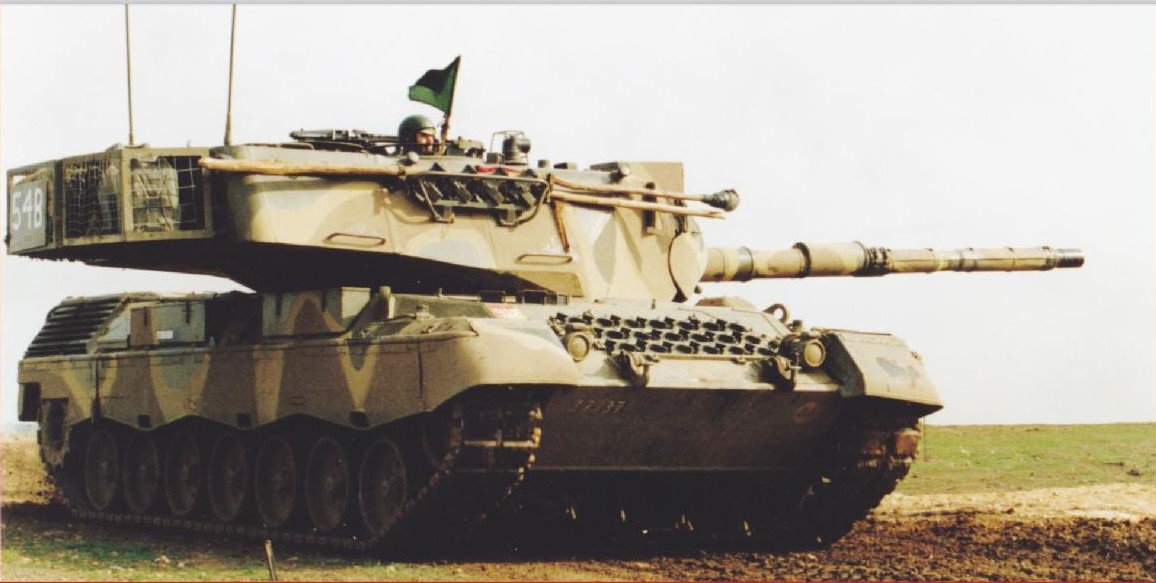
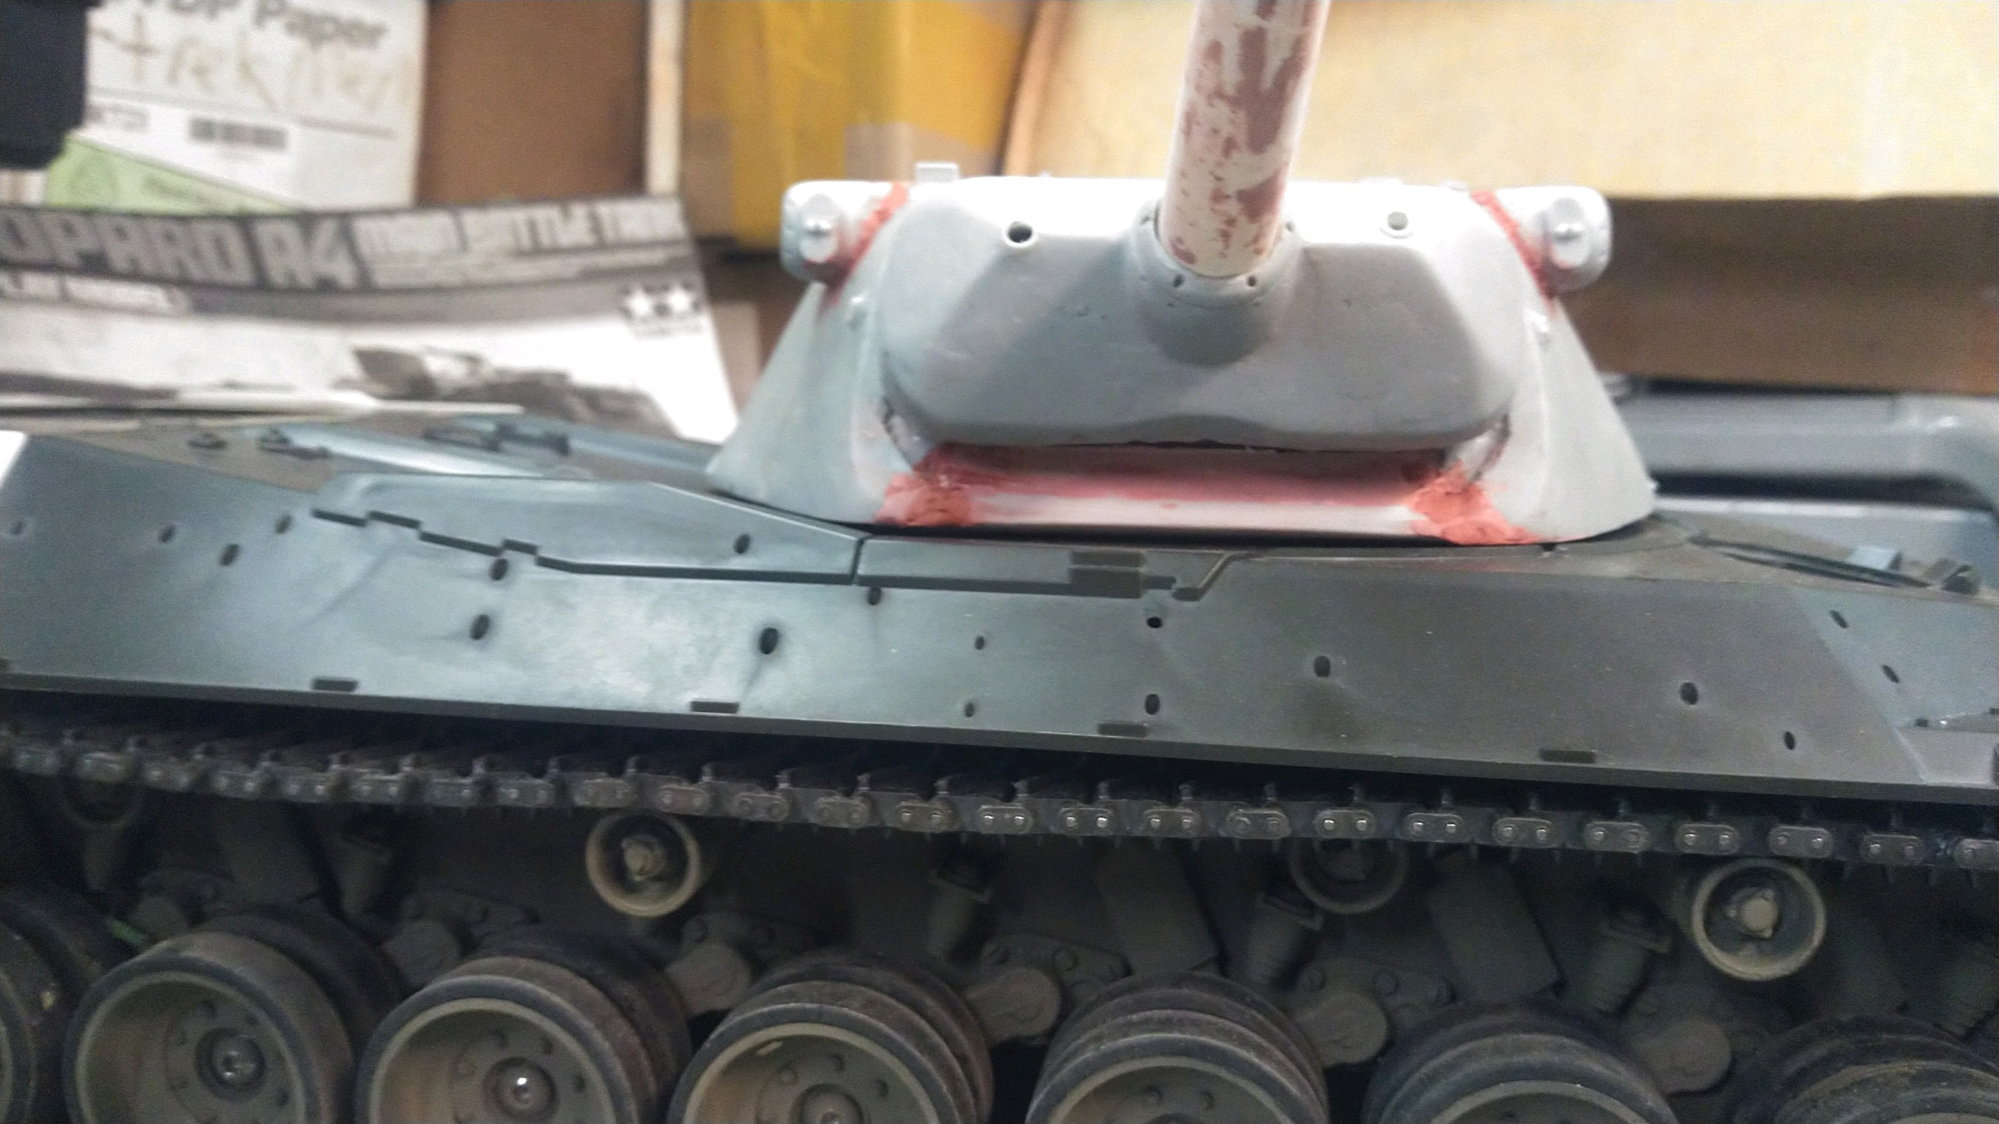
Elevation is complete on the A3 tank which will be an Austrailian AS1 in Mudcam. Im not sure if I want a one color mud cam with crazy lines or a two color mudcam as seen in the last few pictures. All I need is a recoil servo now for this guy and its mechanically done.
The frist early model 1 is a batch 3 with the high exhaust grills and will be a Belgian BE1, Not sure if I will put tool boxes on the sides or just the tools, I think I want to keep it early period. It has a clark servo recoill installed now but no elevation recoil However I worked it over after the second early L1 and both have excellent depression angles now.
The second early L1 might become some other various NATO model maybe an A2 not sure yet. My third early L1 (yes I have a 3d planned on a donor clutch drive tank) will be a Canadian C2 (maybe MEXAS if I can somehow fabricate it some armor)
Plus more to come!
Big photo dump
But slowly getting there. I feel like I went through a power build session on all these.
Elevation is complete on the A3 tank which will be an Austrailian AS1 in Mudcam. Im not sure if I want a one color mud cam with crazy lines or a two color mudcam as seen in the last few pictures. All I need is a recoil servo now for this guy and its mechanically done.
The frist early model 1 is a batch 3 with the high exhaust grills and will be a Belgian BE1, Not sure if I will put tool boxes on the sides or just the tools, I think I want to keep it early period. It has a clark servo recoill installed now but no elevation recoil However I worked it over after the second early L1 and both have excellent depression angles now.
The second early L1 might become some other various NATO model maybe an A2 not sure yet. My third early L1 (yes I have a 3d planned on a donor clutch drive tank) will be a Canadian C2 (maybe MEXAS if I can somehow fabricate it some armor)
Plus more to come!
Big photo dump
The following 3 users liked this post by RichJohnson:
02-14-2023, 07:31 AM
#37
Thread Starter
I got my design of the elevation servo and roation system on the round turrets rouged in. Its not finished but it is set up and viable. I have templates made and need to make more to set up the other two turrets as well as finish off the design and secure everything.
The following 2 users liked this post by RichJohnson:
tankme (02-14-2023),
yellowshaker (02-17-2023)
02-17-2023, 07:36 AM
#38
Thread Starter
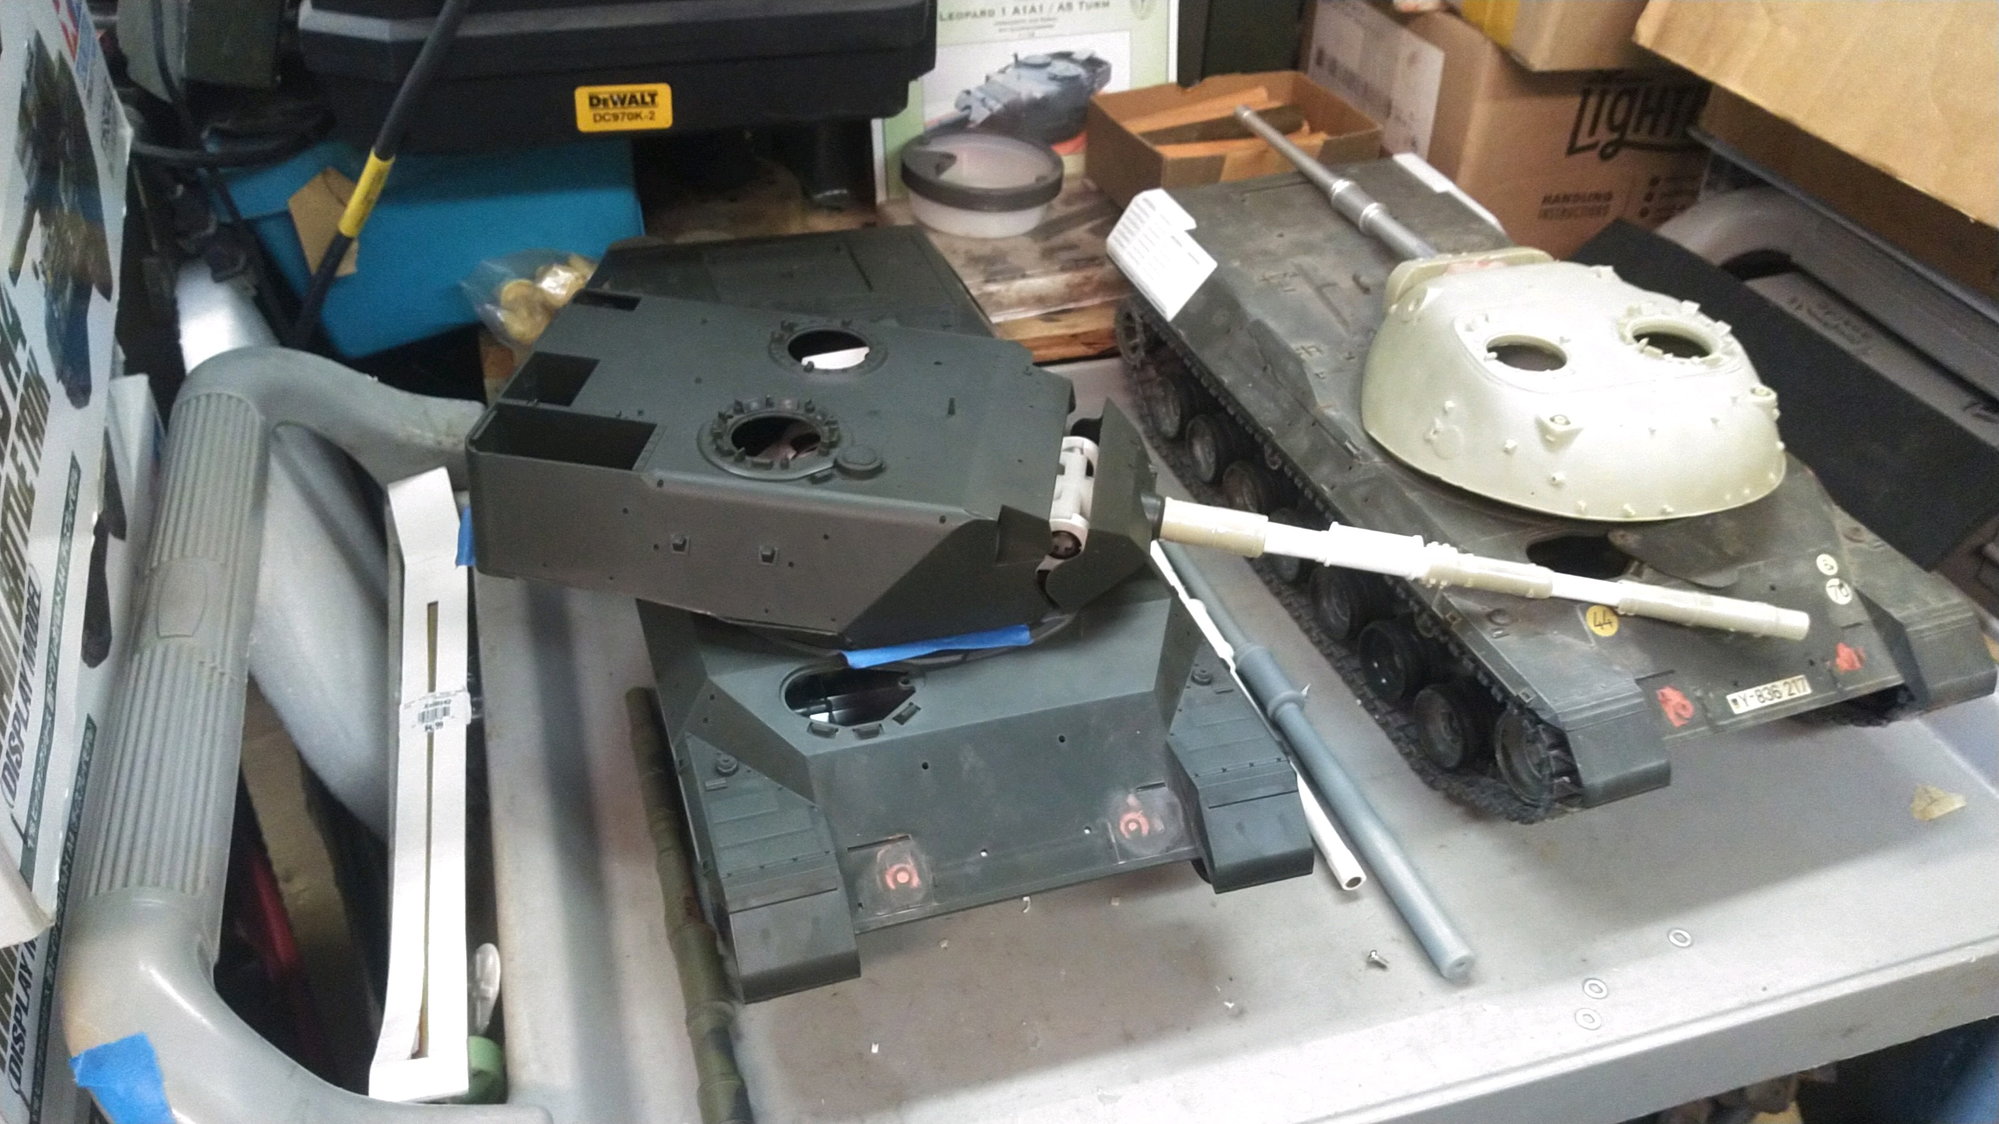
Lots more work done. I got the second round turret setup completed. I also have all the parts fabricated to put in the 3d round turret but I havent opened the box on that one yet as I dont have the recoil mount for it yet. Or a tank chassis ready to put it on as well. That will be in my 3d batch of leopard builds. I dont know if I will do all 3 in the next batch at the same time though. Its kinda wearing me out doing 3 at once (more or less). Those are two welded turrets and one round turret.
I need to move forward with this group for now.
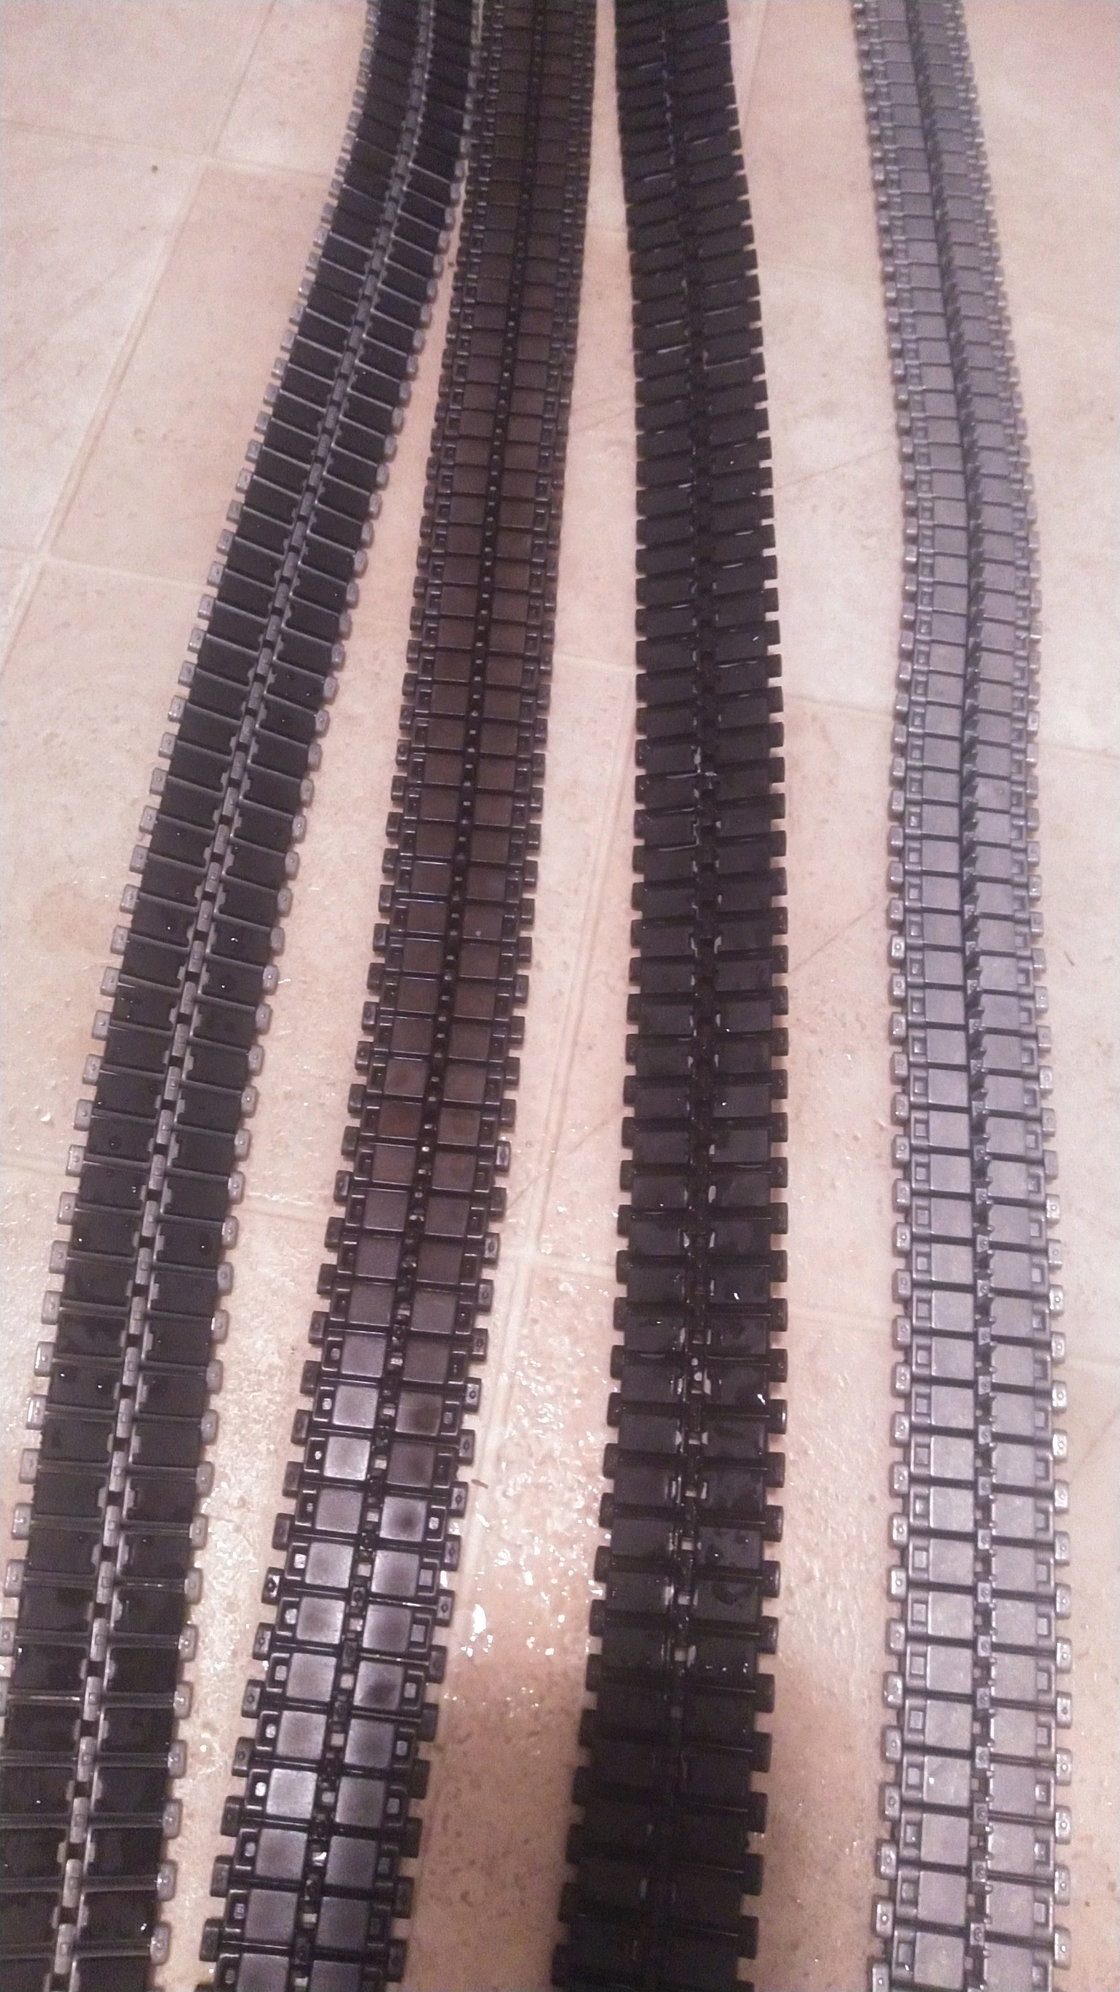
Got two more sets of metal track blackened with gun blueing last night. Need to get my sprockets set up with the retaining rings and get them installed this weekend.
I need to move forward with this group for now.
Got two more sets of metal track blackened with gun blueing last night. Need to get my sprockets set up with the retaining rings and get them installed this weekend.
The following users liked this post:
tankme (02-17-2023)
02-17-2023, 05:12 PM
#40
Wow, love those cast turrets!!!
02-22-2023, 04:35 PM
#41
Thread Starter
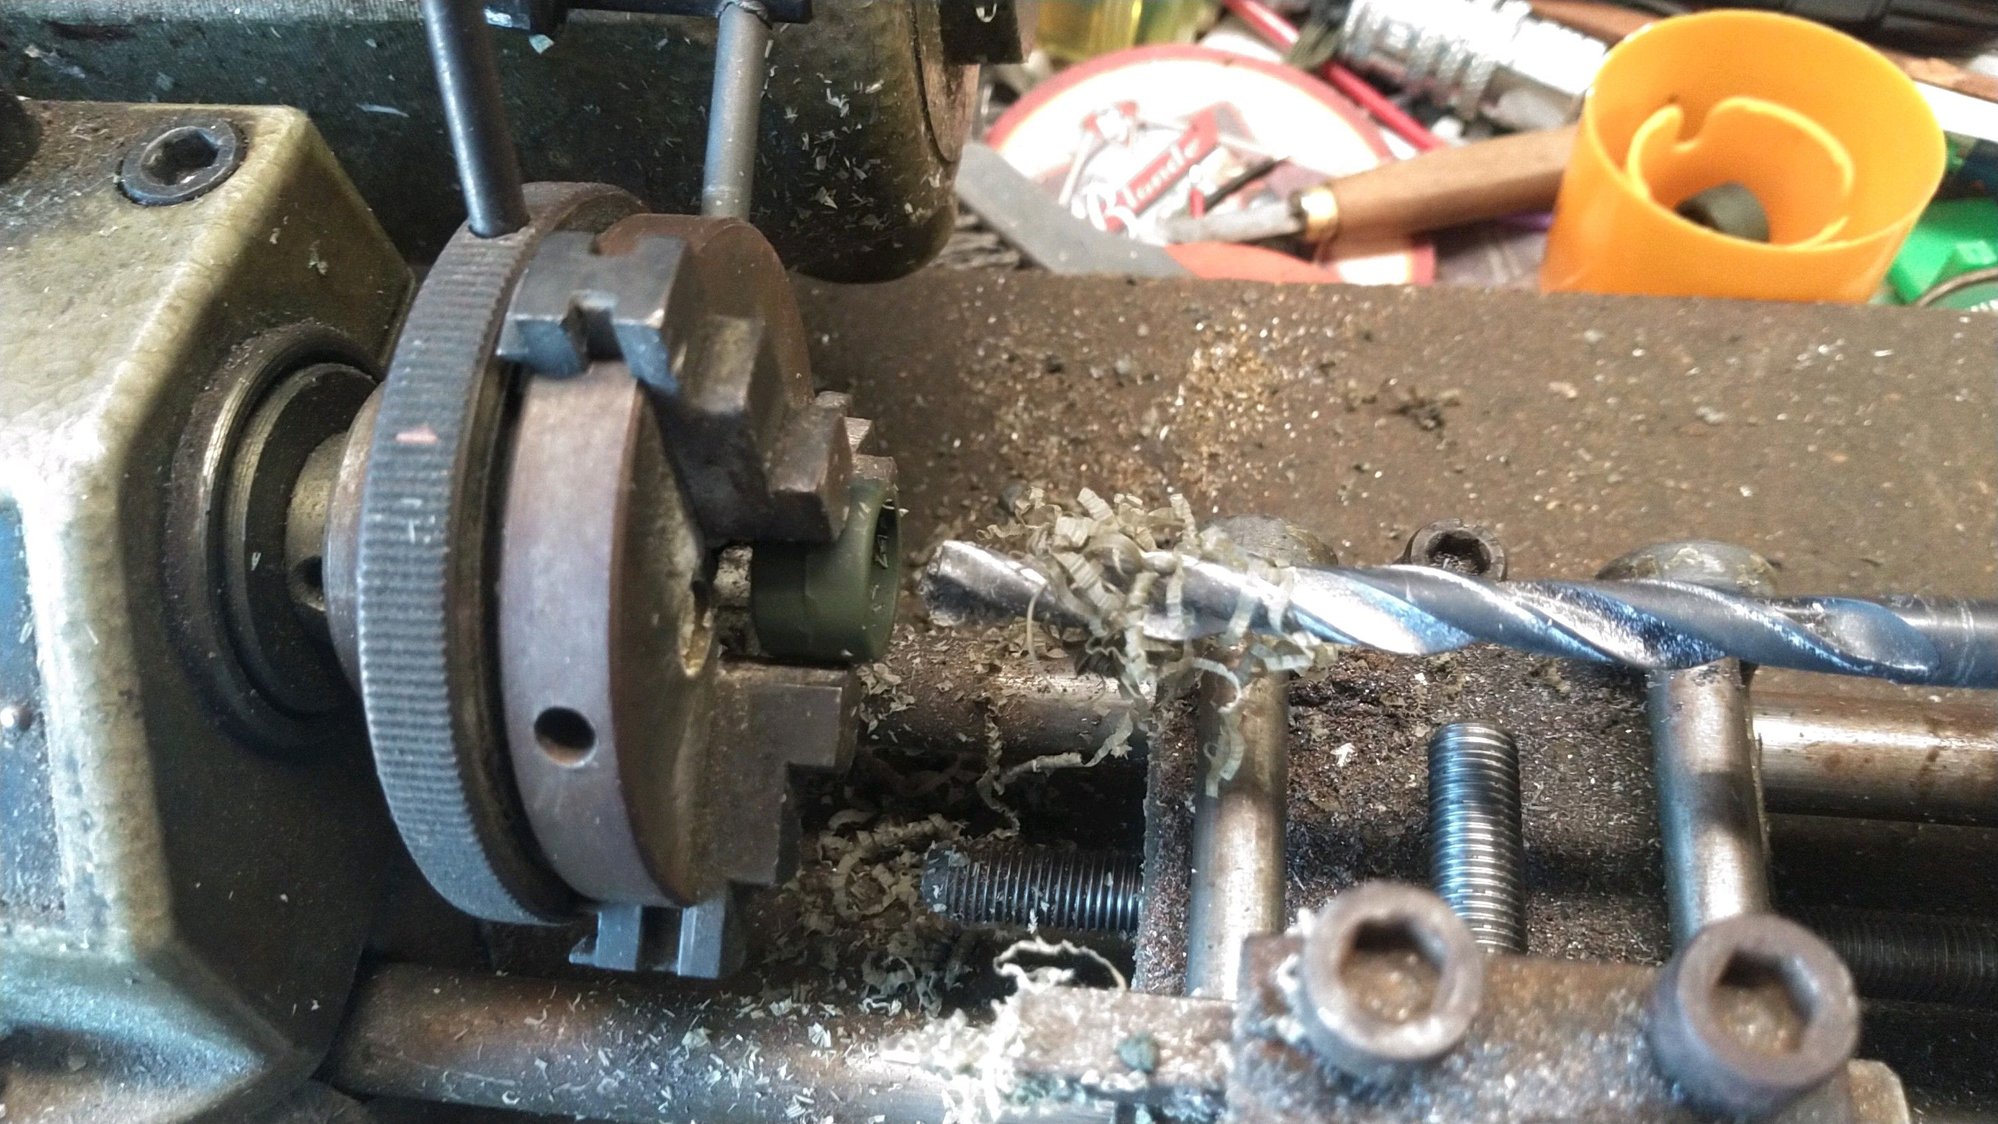
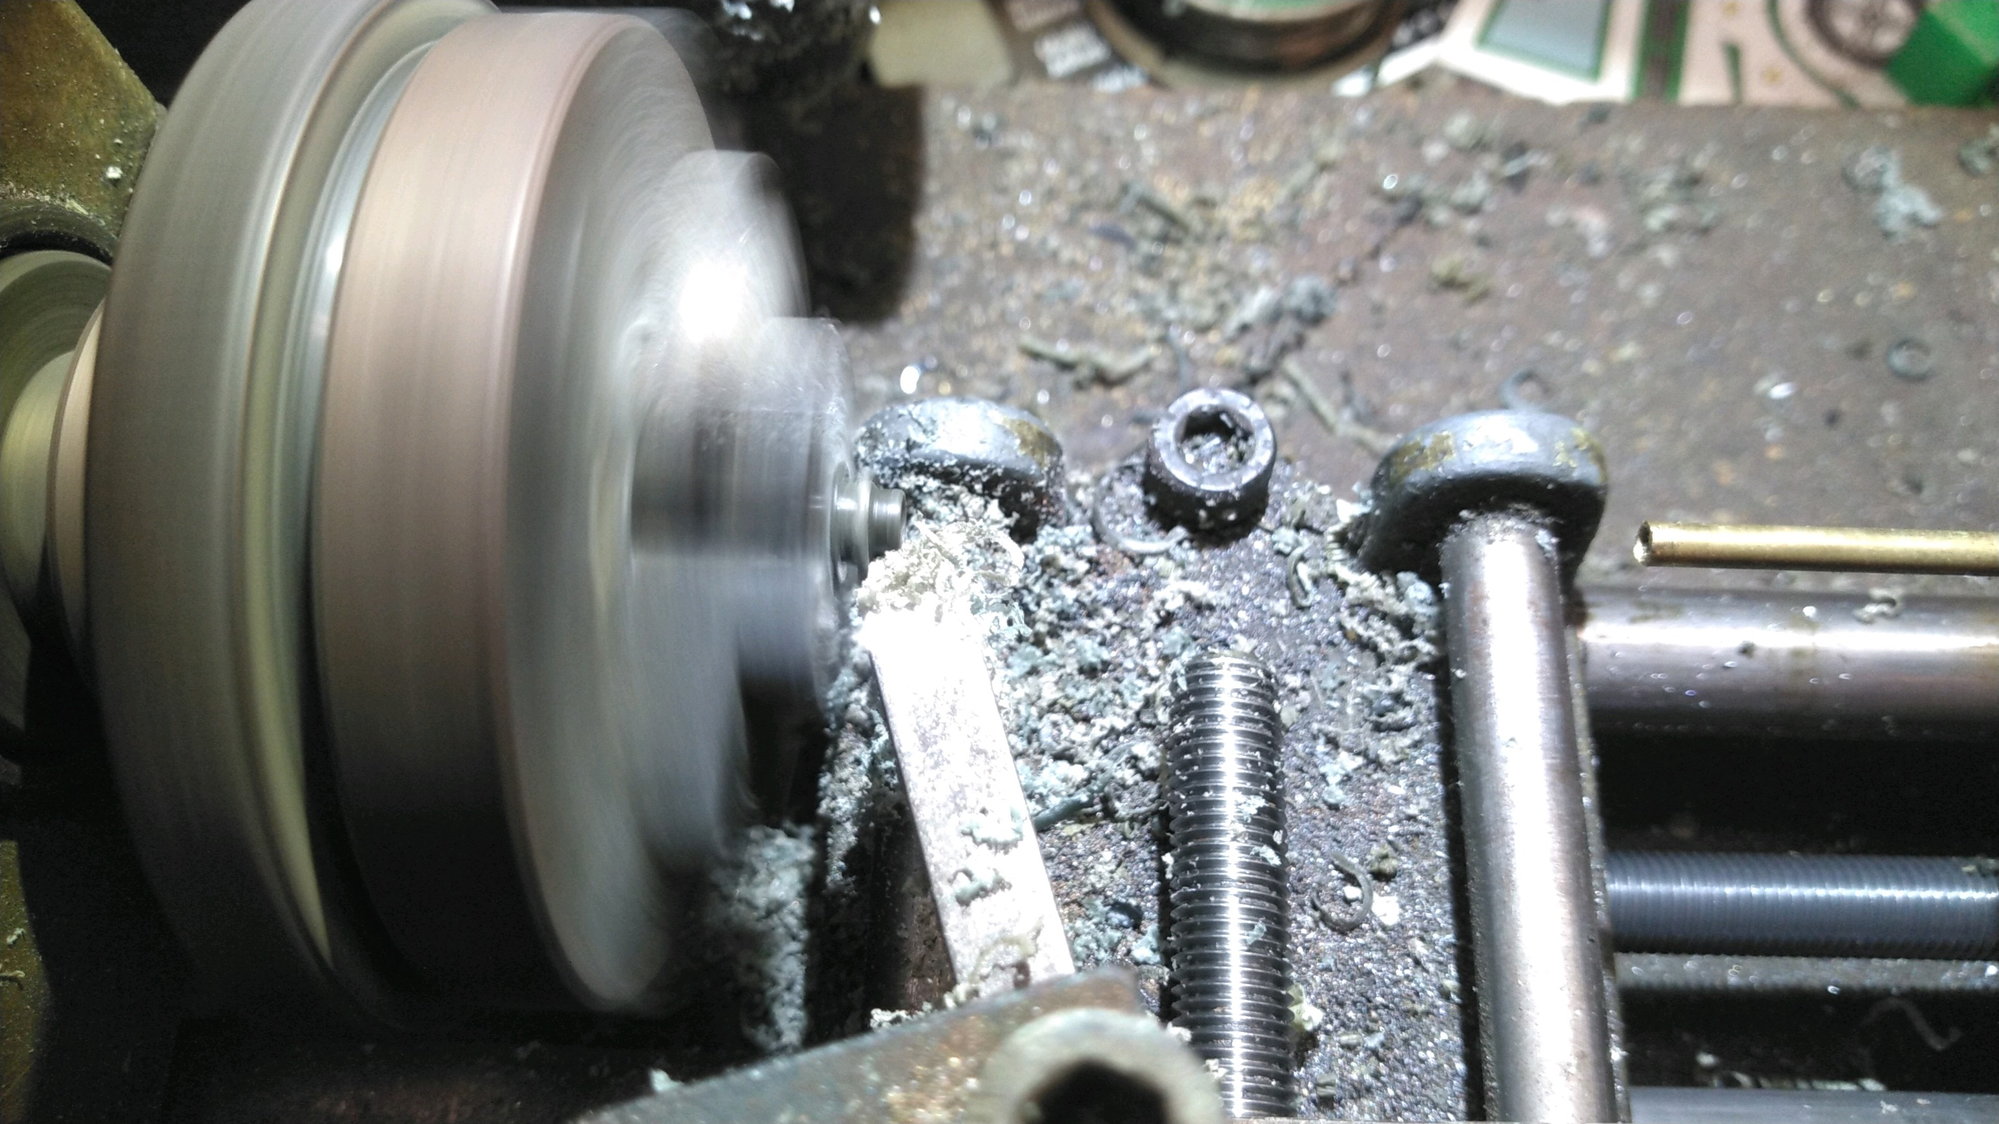
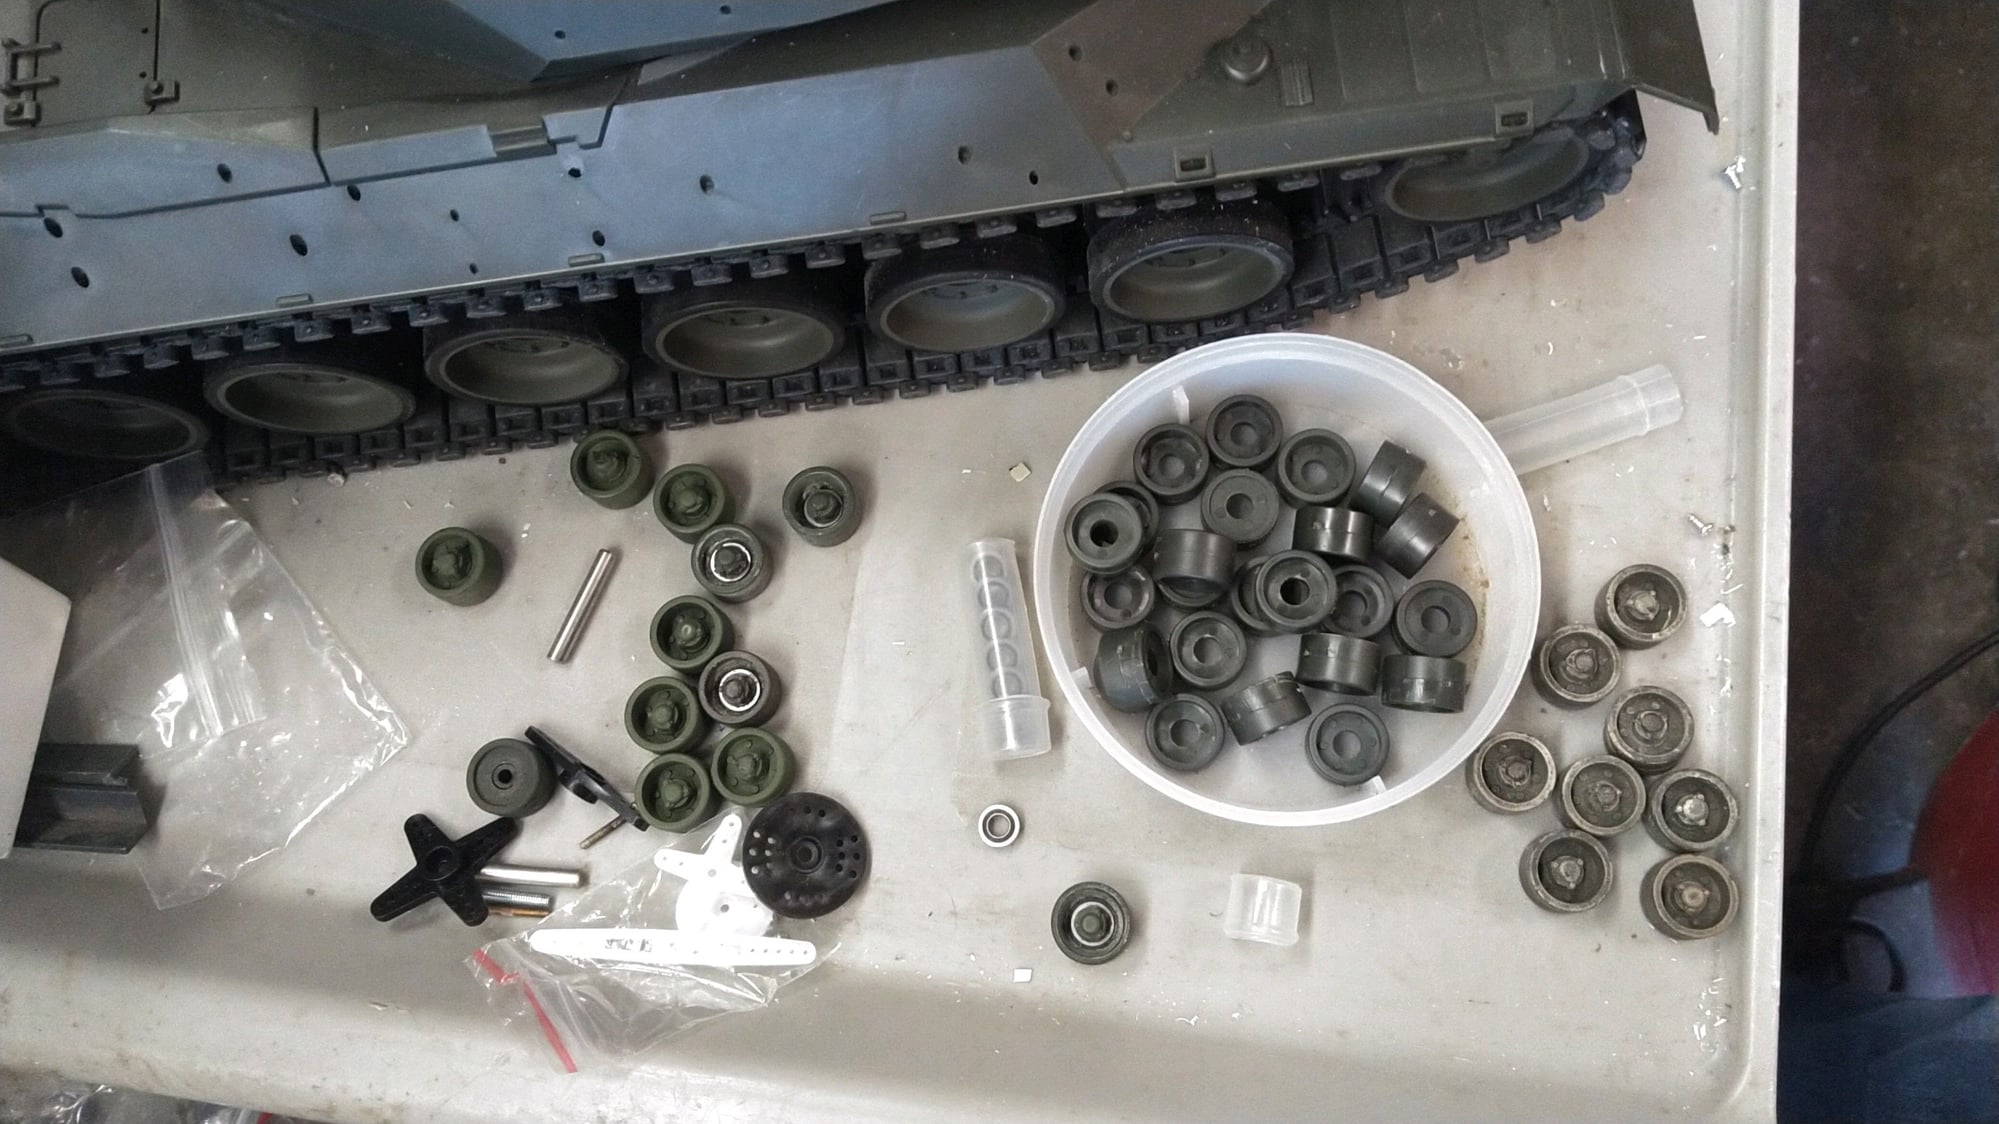
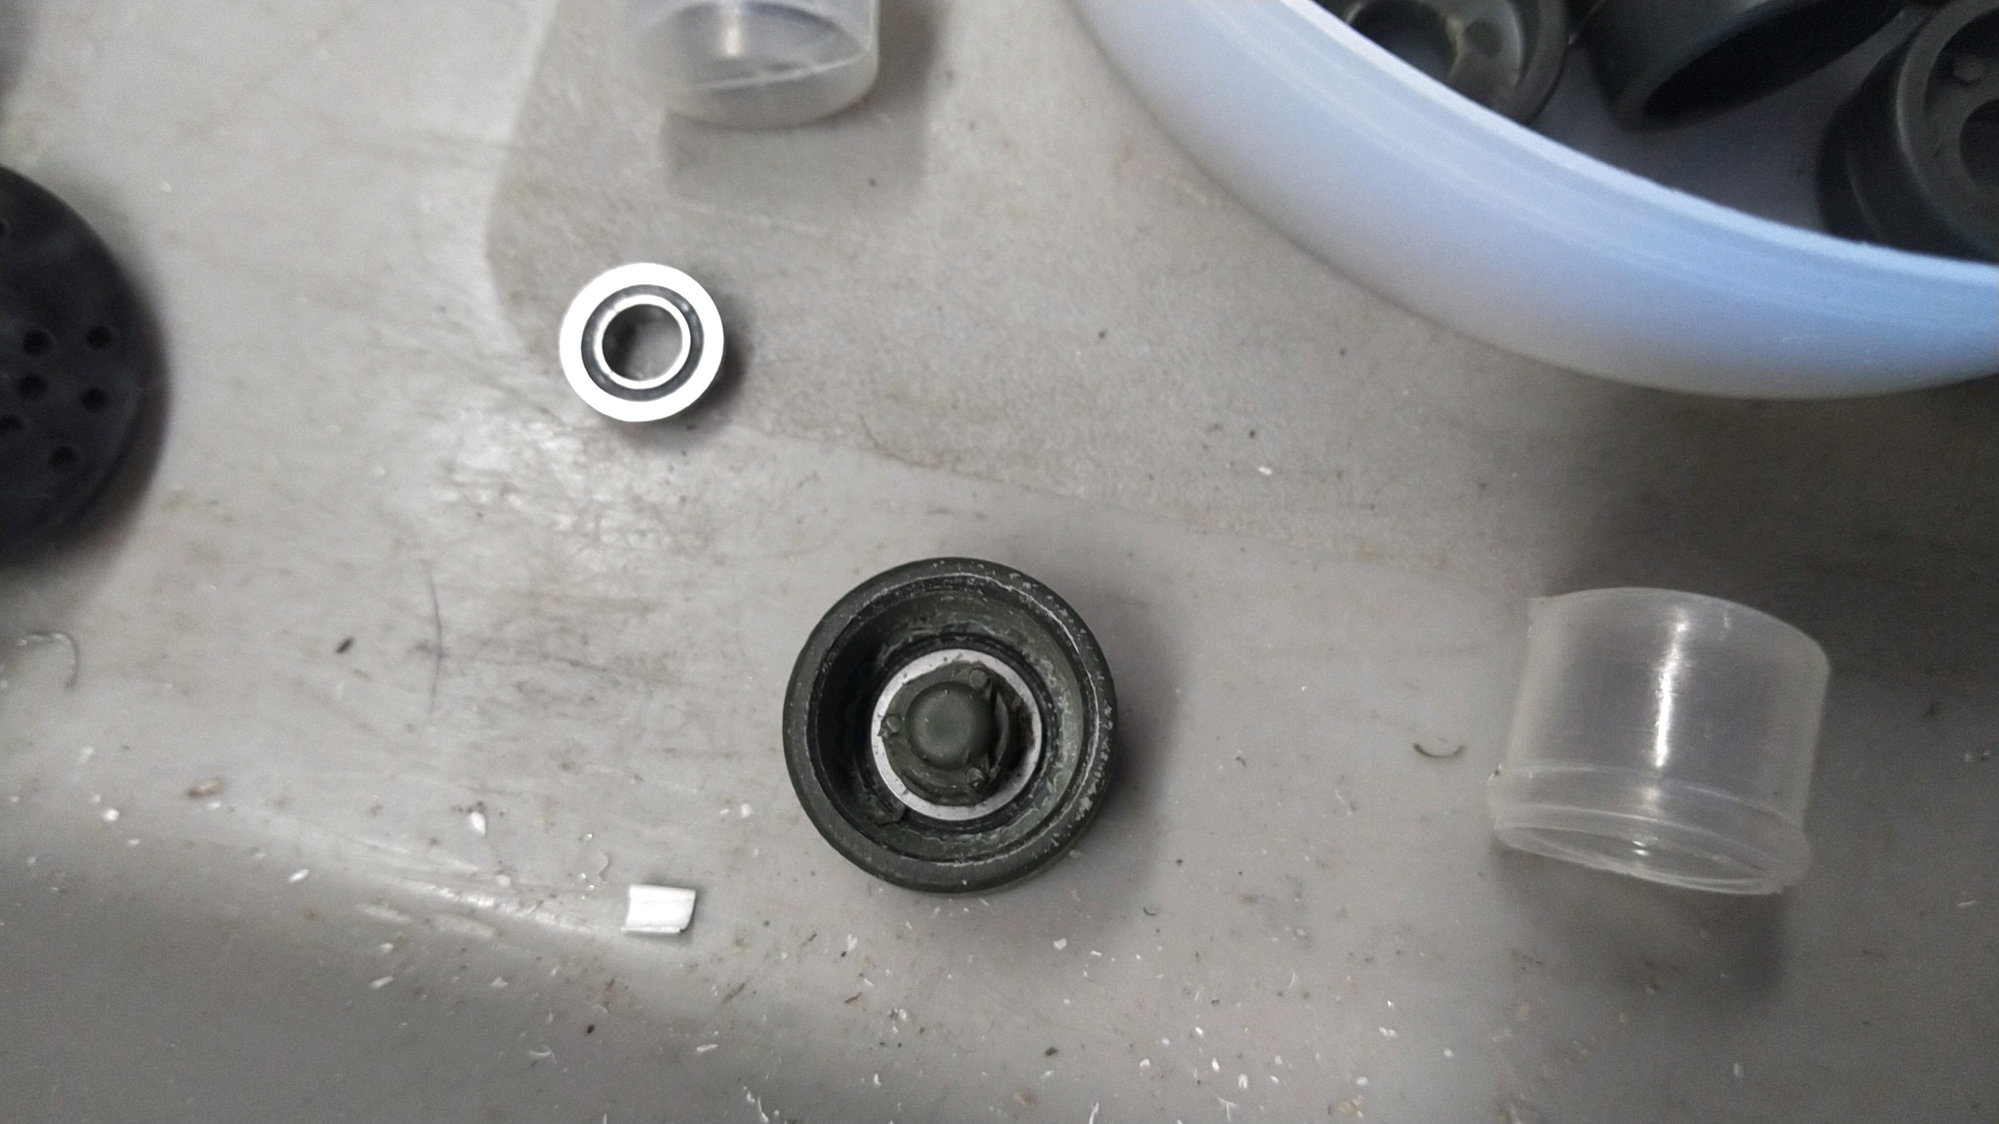
I finally got around to doing the return rollers. Man I hate these things. They are so difficult to set up with ball bearings. Especially turning down the rubbery hub to fit into the ball bearing center.
Also my two Tamiya DMD 11 unit showed up so get ready for some action!
Also my two Tamiya DMD 11 unit showed up so get ready for some action!
02-23-2023, 04:51 AM
#42
I finally got around to doing the return rollers. Man I hate these things. They are so difficult to set up with ball bearings. Especially turning down the rubbery hub to fit into the ball bearing center.
Also my two Tamiya DMD 11 unit showed up so get ready for some action!
Also my two Tamiya DMD 11 unit showed up so get ready for some action!
03-10-2023, 07:10 AM
#43
Thread Starter
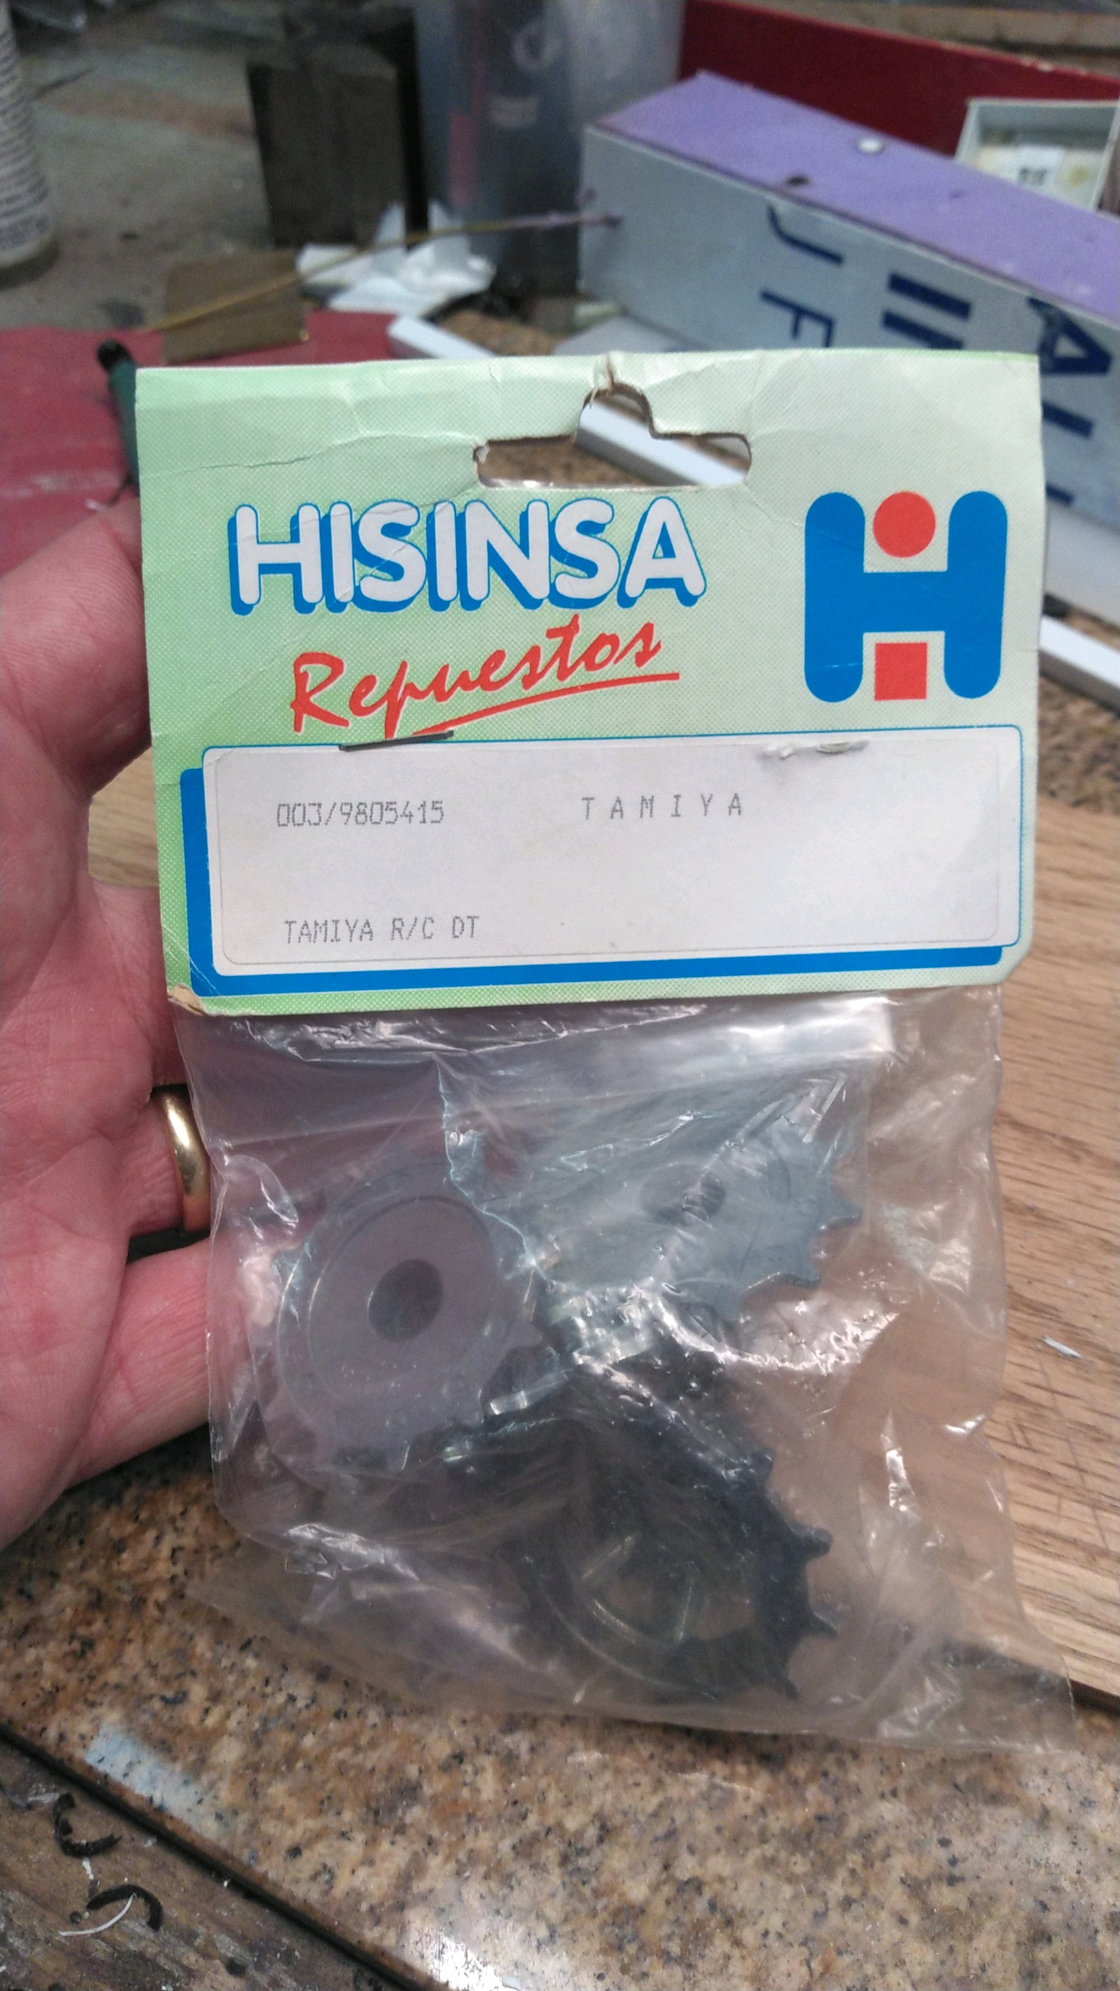
So look what I found on the interwebs. A brand new 1970s spare package of Leopard 1 sprockets. From Spain no less. I had to get them just in case I ever need them.
I got the Belgian Leopard to the point now all the mechanical is now done. I should have taken some pics of the inside, I will do that next time. On this tank I am running tamiya pershing track which will get T84 pads replacing the steel chevrons.
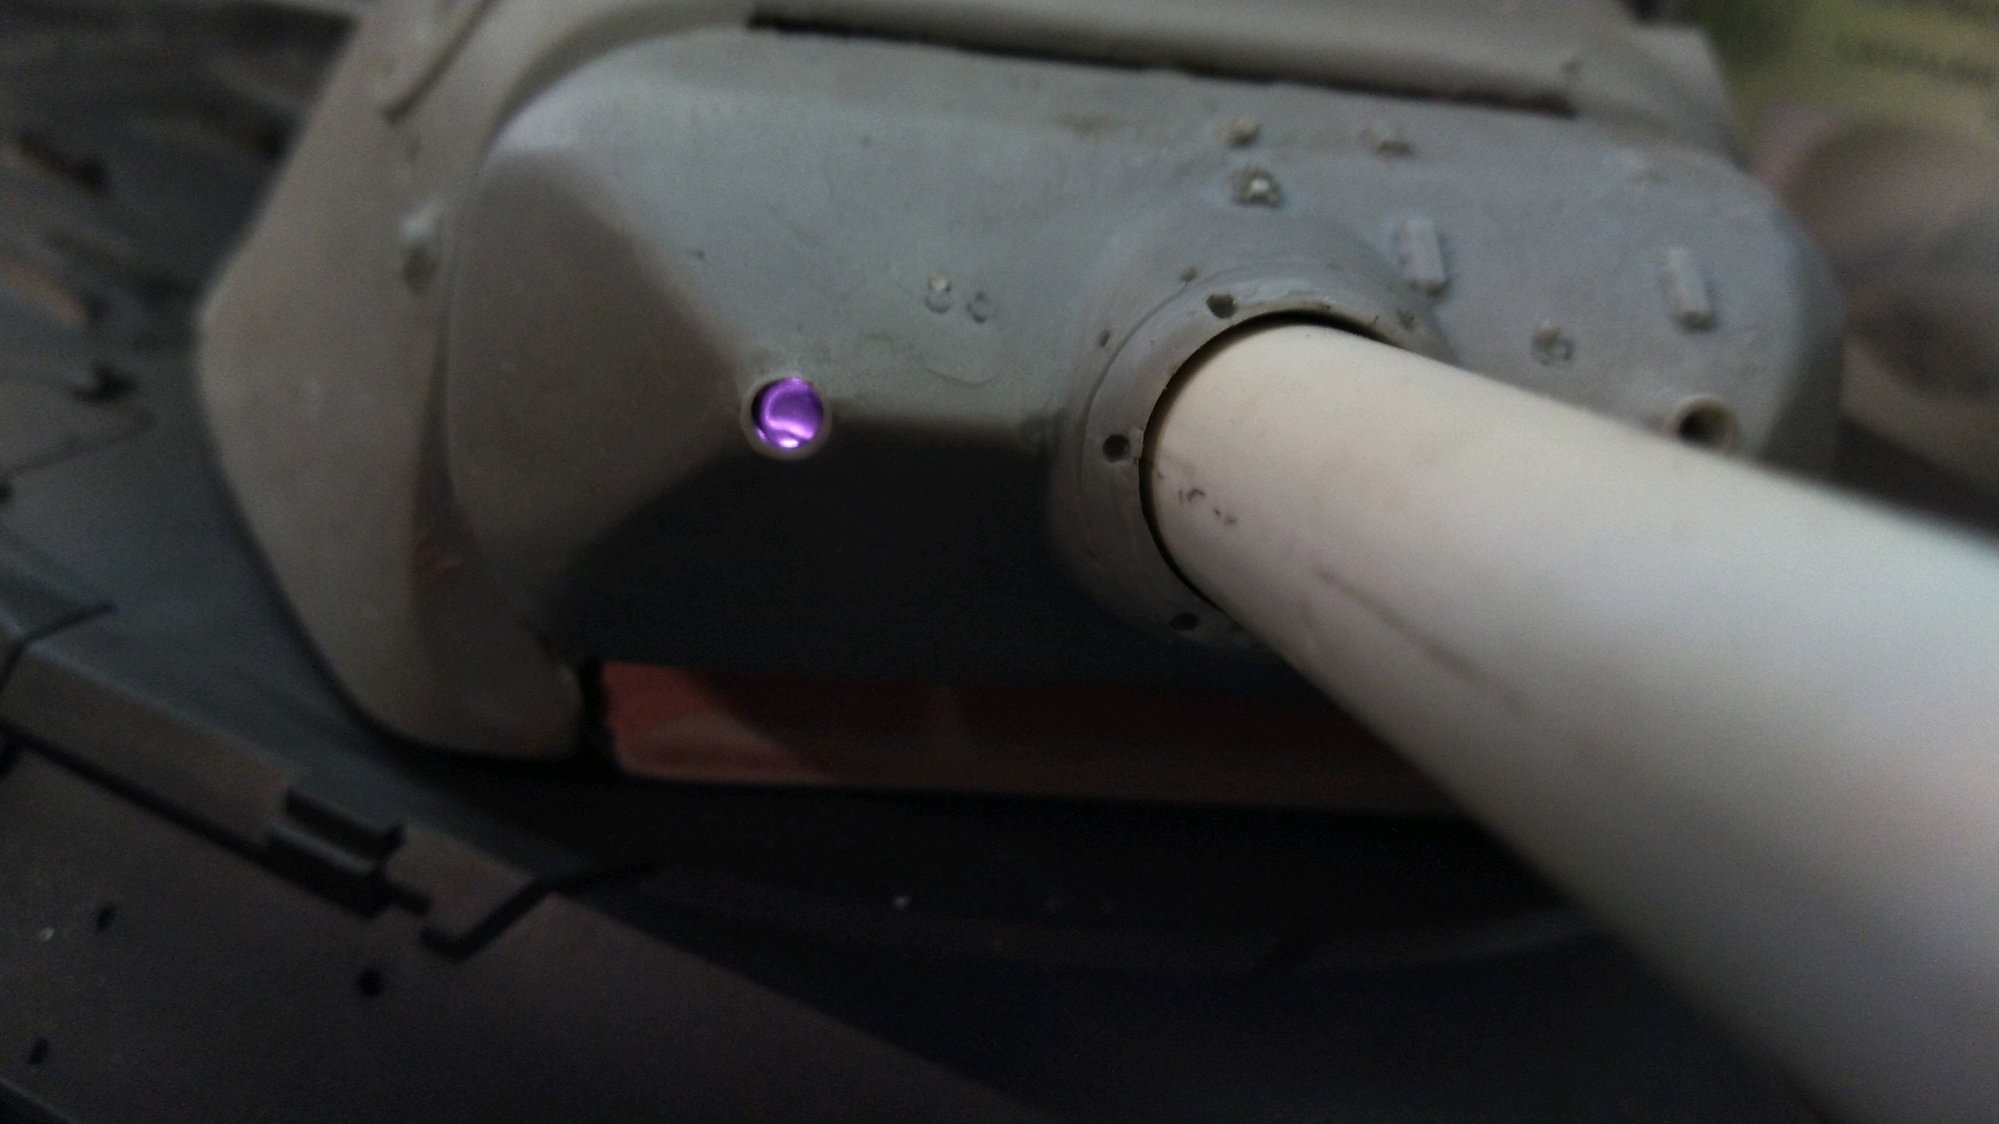
The turret operations are completed and tested. I bored out the back of the gunners sight to install the IR bulb. I opened the apreature up to 3.4mm so its bigger than it used to be but still quite small.
In test firing at 100 feet. It still has a very narrow cone of fire to hit the target tank and there is no adverse IR scatter side ways that would effect teammates.
The Austrailian AS3 (Leopard 1a3) has gotten to the point of test driving and turret operation but I havent installed the IR or battle system yet.
After considerable test driving on pavement and dirt in our battlefield I have determined the really awesome ETO trany I contracted them to make for this tank to my specifications does not have enough torque to turn adequately while running the heavy metal track with grippy rubber pads. I think it would run fine with the old stock stamped metal track or the plastic pershing track but thats not what I want to run on this tank, its supposed to have this track. So.... I will probably have to remove the ETO trany and fit in a pair of tagin 3.1 with 390s like the others. Its sad I paid alot for the trany.

I got the Belgian Leopard to the point now all the mechanical is now done. I should have taken some pics of the inside, I will do that next time. On this tank I am running tamiya pershing track which will get T84 pads replacing the steel chevrons.
The turret operations are completed and tested. I bored out the back of the gunners sight to install the IR bulb. I opened the apreature up to 3.4mm so its bigger than it used to be but still quite small.
In test firing at 100 feet. It still has a very narrow cone of fire to hit the target tank and there is no adverse IR scatter side ways that would effect teammates.
The Austrailian AS3 (Leopard 1a3) has gotten to the point of test driving and turret operation but I havent installed the IR or battle system yet.
After considerable test driving on pavement and dirt in our battlefield I have determined the really awesome ETO trany I contracted them to make for this tank to my specifications does not have enough torque to turn adequately while running the heavy metal track with grippy rubber pads. I think it would run fine with the old stock stamped metal track or the plastic pershing track but thats not what I want to run on this tank, its supposed to have this track. So.... I will probably have to remove the ETO trany and fit in a pair of tagin 3.1 with 390s like the others. Its sad I paid alot for the trany.
The following users liked this post:
bowlman (03-10-2023)
03-14-2023, 07:04 PM
#44
Thread Starter
Well last update for probably the next week. Im off to help operate a steam locomotive for a bit.
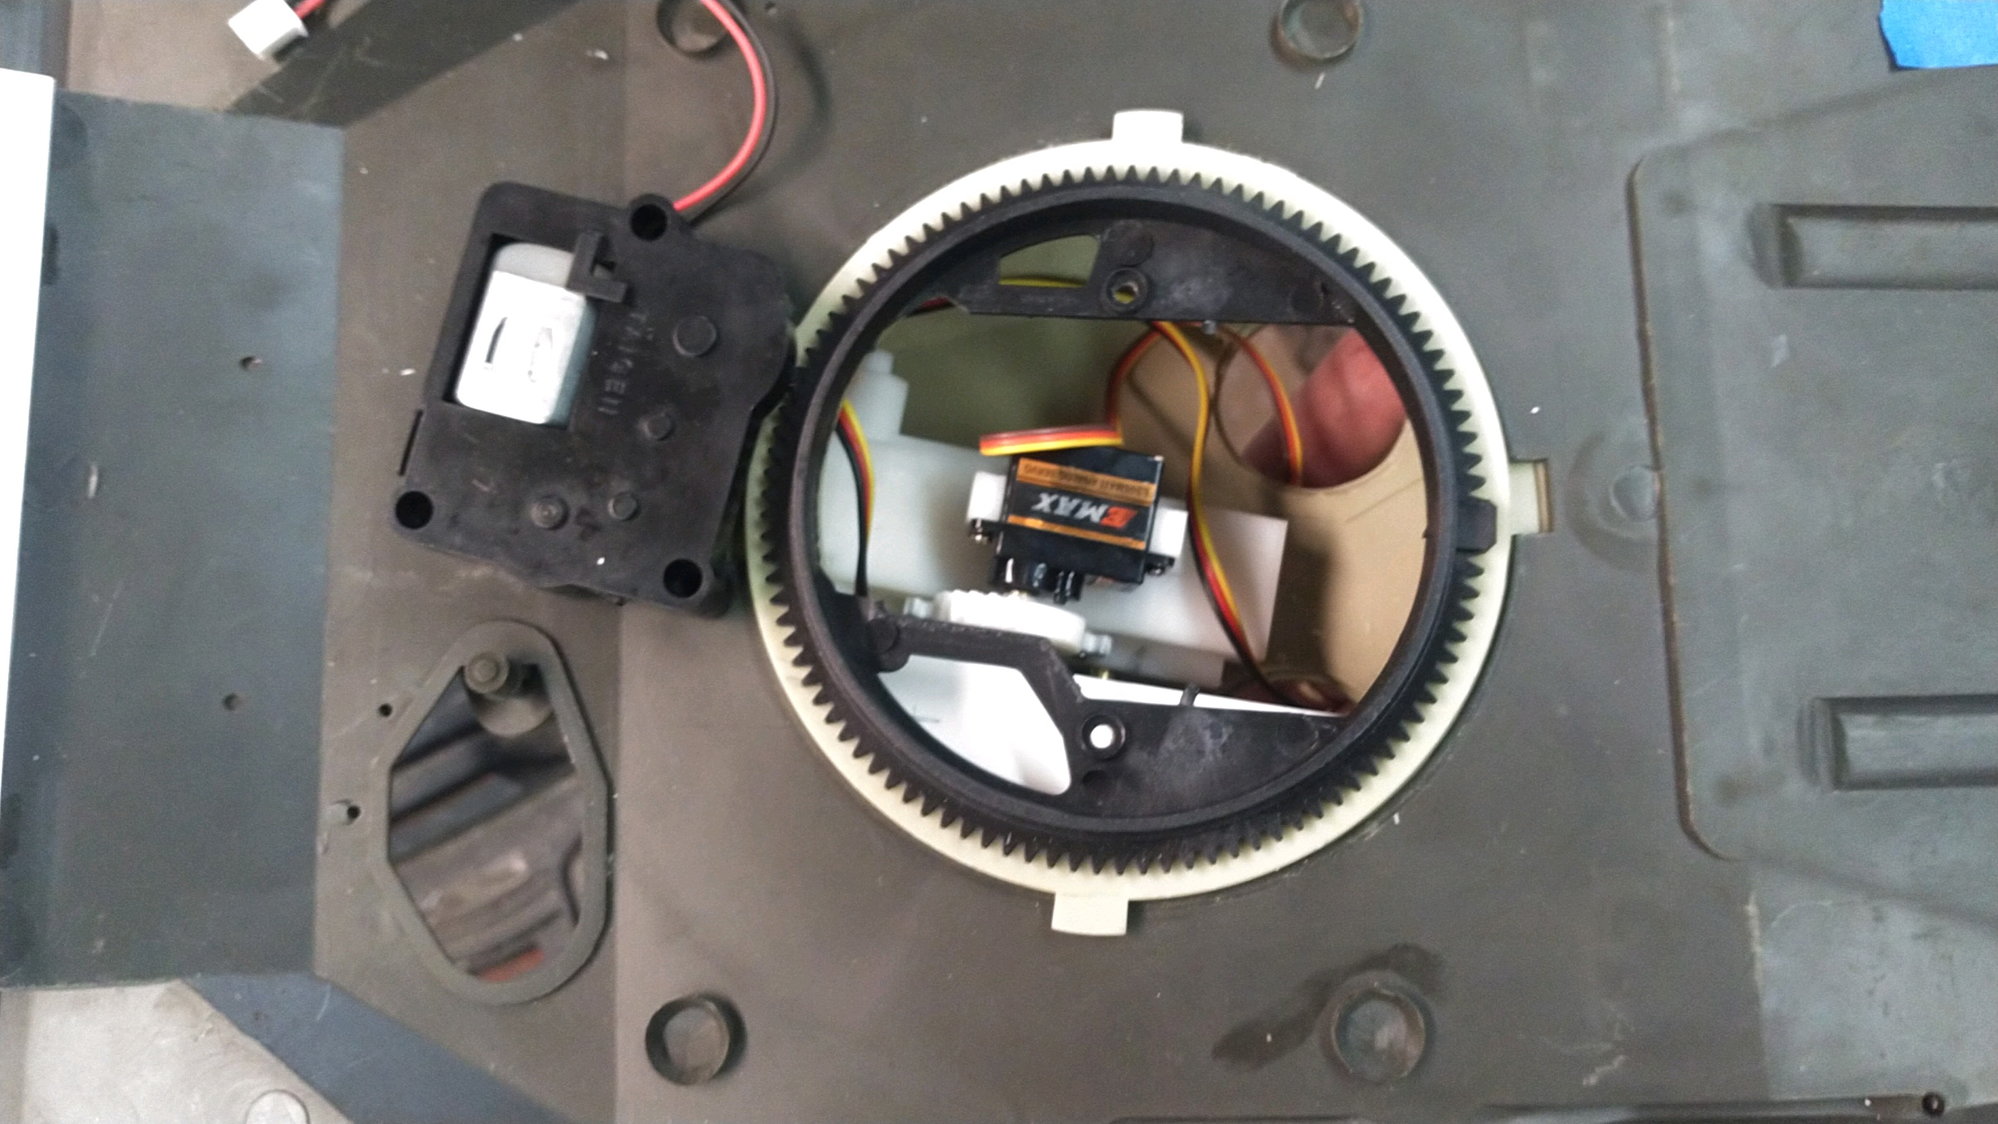
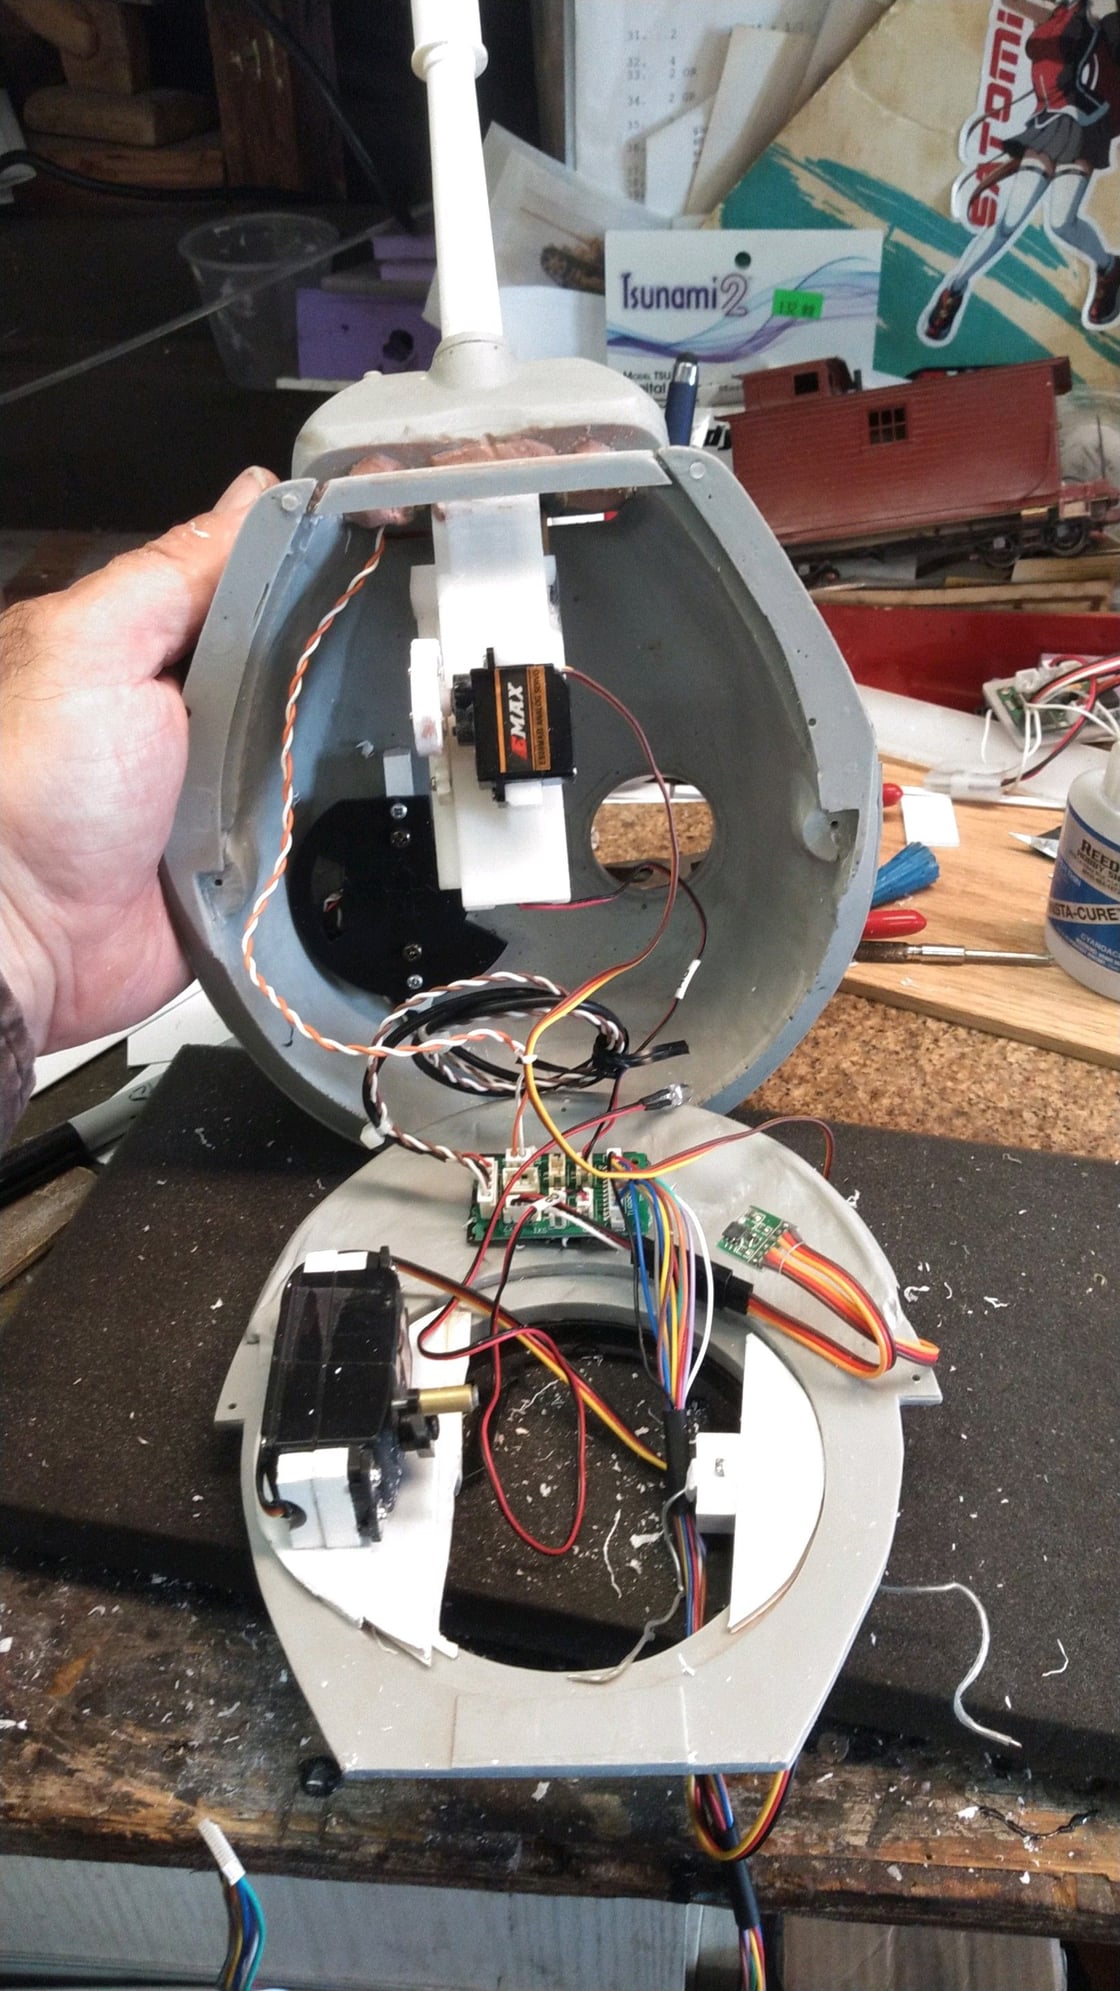
Ive cut the front off the bottom plate of the turret and glued it in place onto the shell so I can make a nice presentable front. Ive done the same with the other round turret tank Im working on as well.
Here is an exploded view inside the turret too.
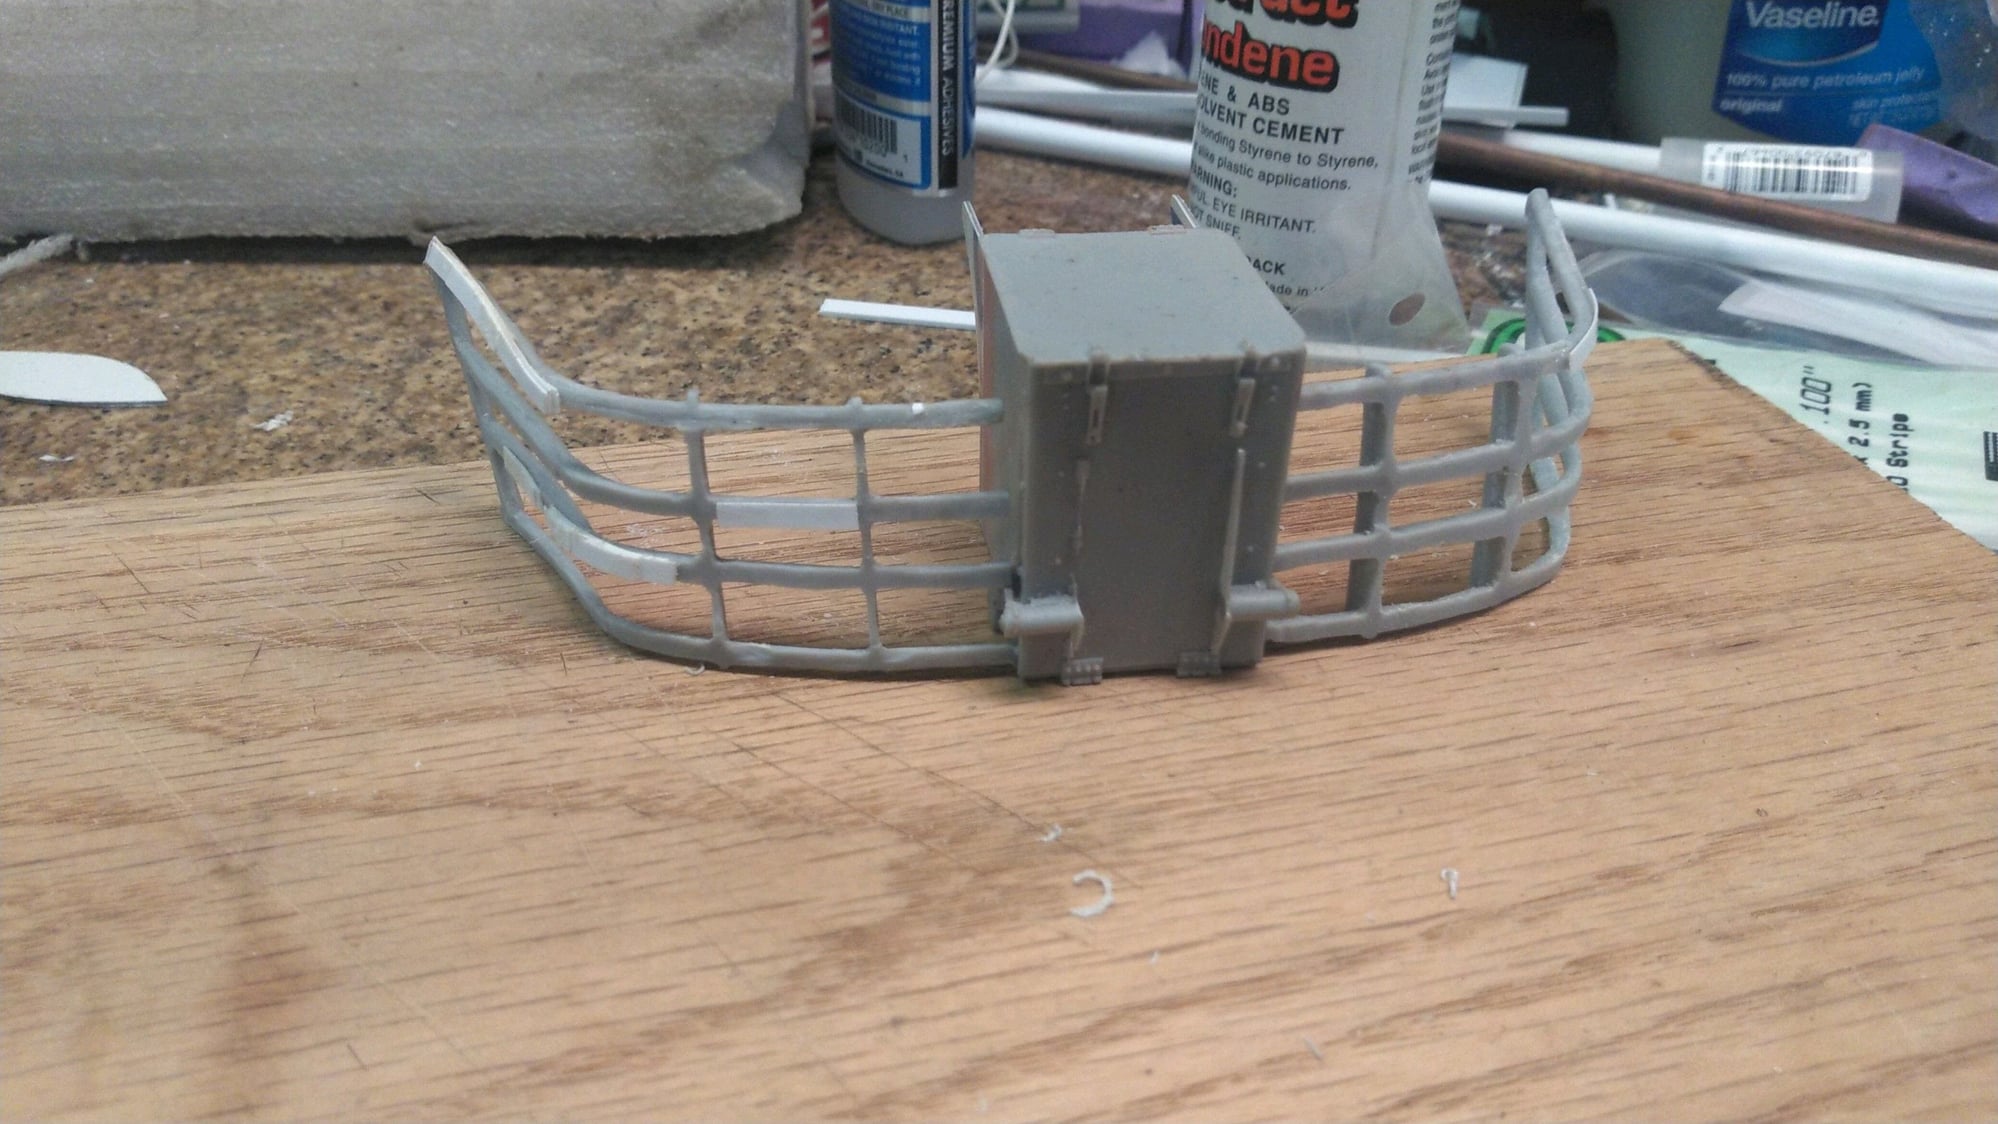
The bustle baskets are a major pain in the ass to say the least. They are molded with the plastic armor wrapped around them. Which kinda ruins them for using as wire frame early baskets. I cut it off and dremelled it away as best I could and while they are now just wire frames they just dont have the quality look I want so I have come to the conclusion I am probably going to cut them apart and use them as templates to make wire baskets with brass. I really didnt want to but I kinda just have to. They dont look all that great even after hours of work on one getting the rods all filed and sanded round.
Ive cut the front off the bottom plate of the turret and glued it in place onto the shell so I can make a nice presentable front. Ive done the same with the other round turret tank Im working on as well.
Here is an exploded view inside the turret too.
The bustle baskets are a major pain in the ass to say the least. They are molded with the plastic armor wrapped around them. Which kinda ruins them for using as wire frame early baskets. I cut it off and dremelled it away as best I could and while they are now just wire frames they just dont have the quality look I want so I have come to the conclusion I am probably going to cut them apart and use them as templates to make wire baskets with brass. I really didnt want to but I kinda just have to. They dont look all that great even after hours of work on one getting the rods all filed and sanded round.
03-20-2023, 01:45 PM
#45
Rich,
So your Hooben Leo still hasn't arrived? I was curious because it's no longer showing on pre-order.
Derek
So your Hooben Leo still hasn't arrived? I was curious because it's no longer showing on pre-order.
Derek
The following users liked this post:
tankme (03-21-2023)
03-21-2023, 01:26 PM
#47
Hopefully they are learning the value of communication to gain more confidence from their customers.
Derek
Derek
03-23-2023, 06:16 AM
#49
Thread Starter
Everything I build on these Leopard 1 tanks is so much more complicated then all the other custom tanks Ive built. They really are a challenging tank to build, at least the way I build them.
I ground the plastic armor shield off the turret basket halves because I am building an early leopard 1 without any plastic armor. Well It looked pretty butchered up. I tried to clean it up but it just looked too bad to use. So I decided to cut up one side and use it to make the bracket template and then make the basket out of brass rod. I told myself I would not do this but its the only solution that will be sturdy enough for my desire and look right. I thought about using plastic rod but I was kinda afraid it would be too fragile though I am still thinking about plastic rod depending on how this brass project builds up.
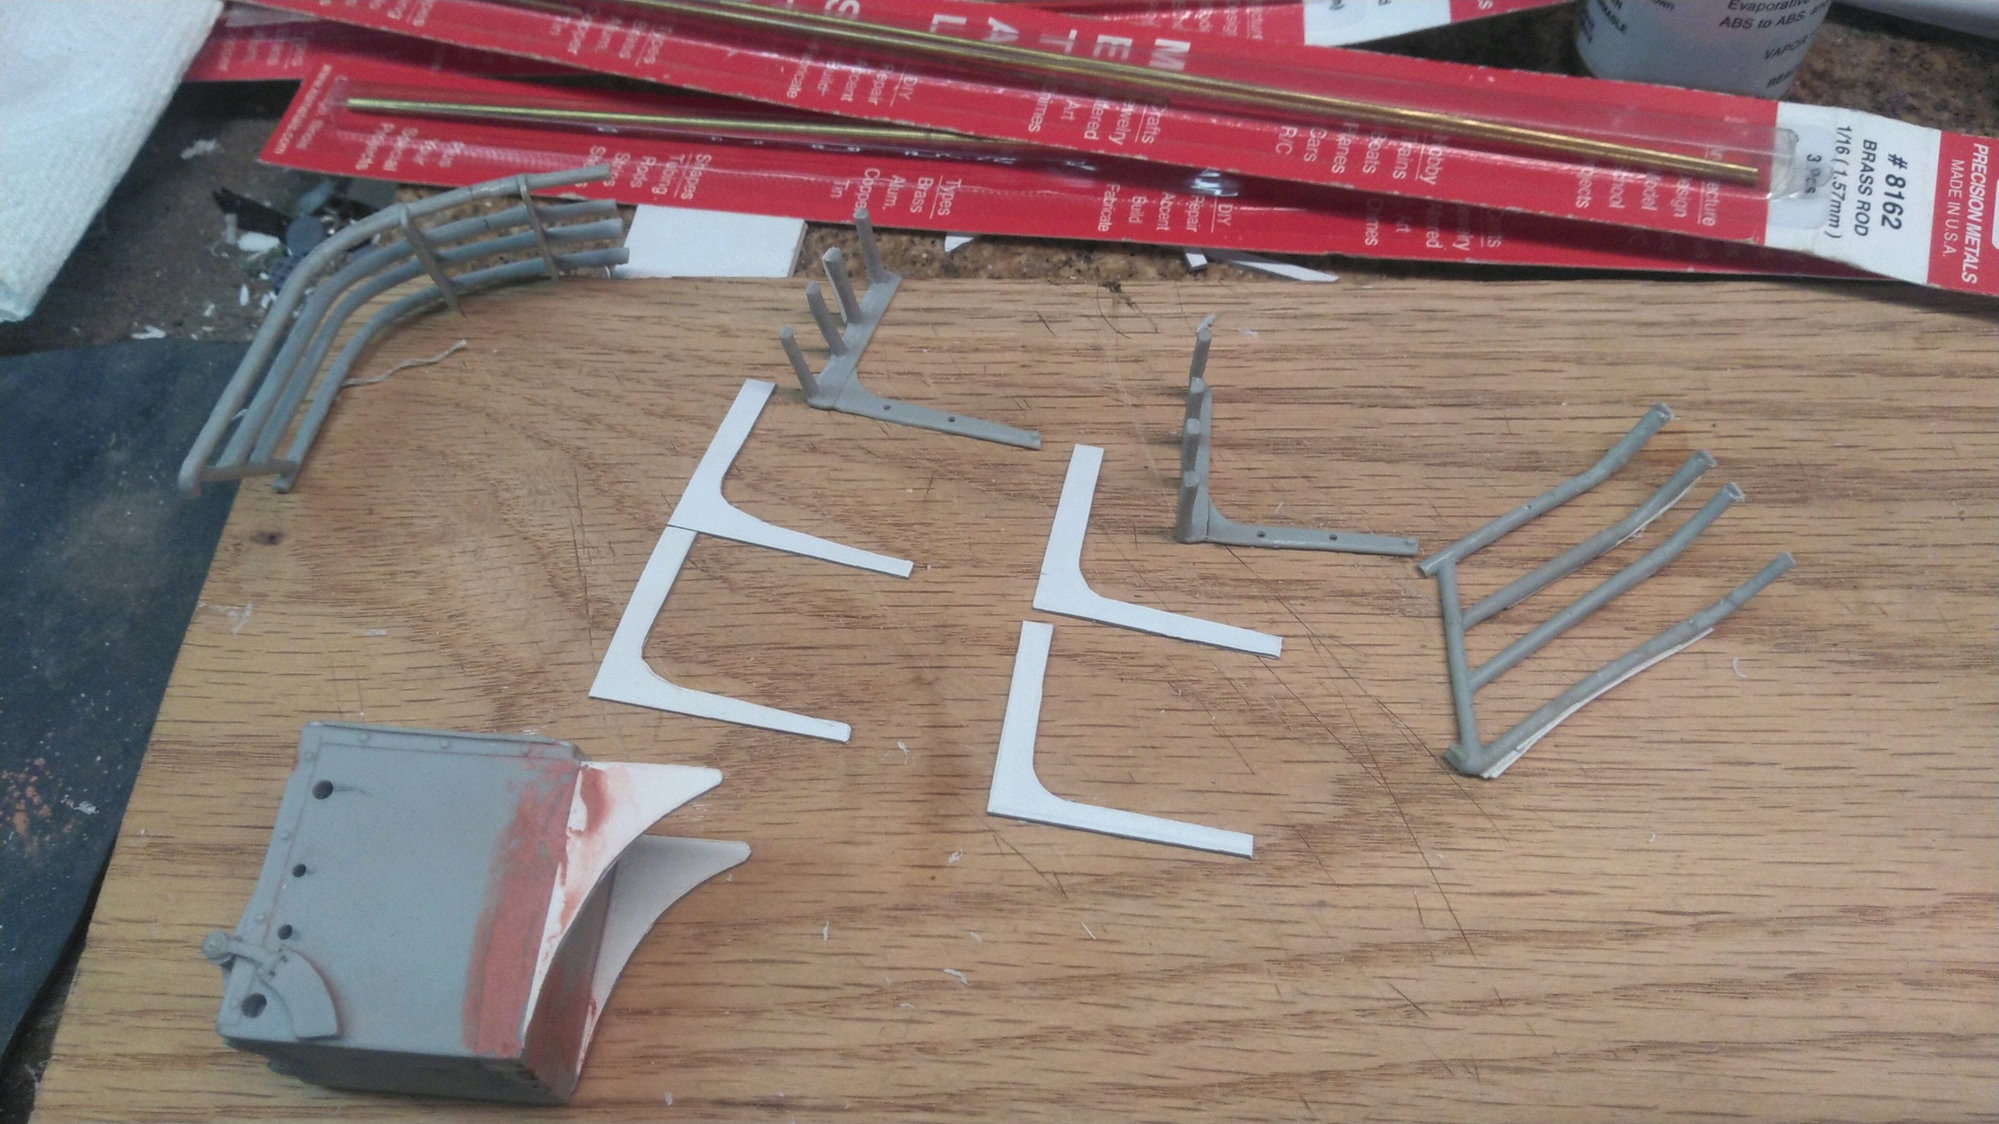
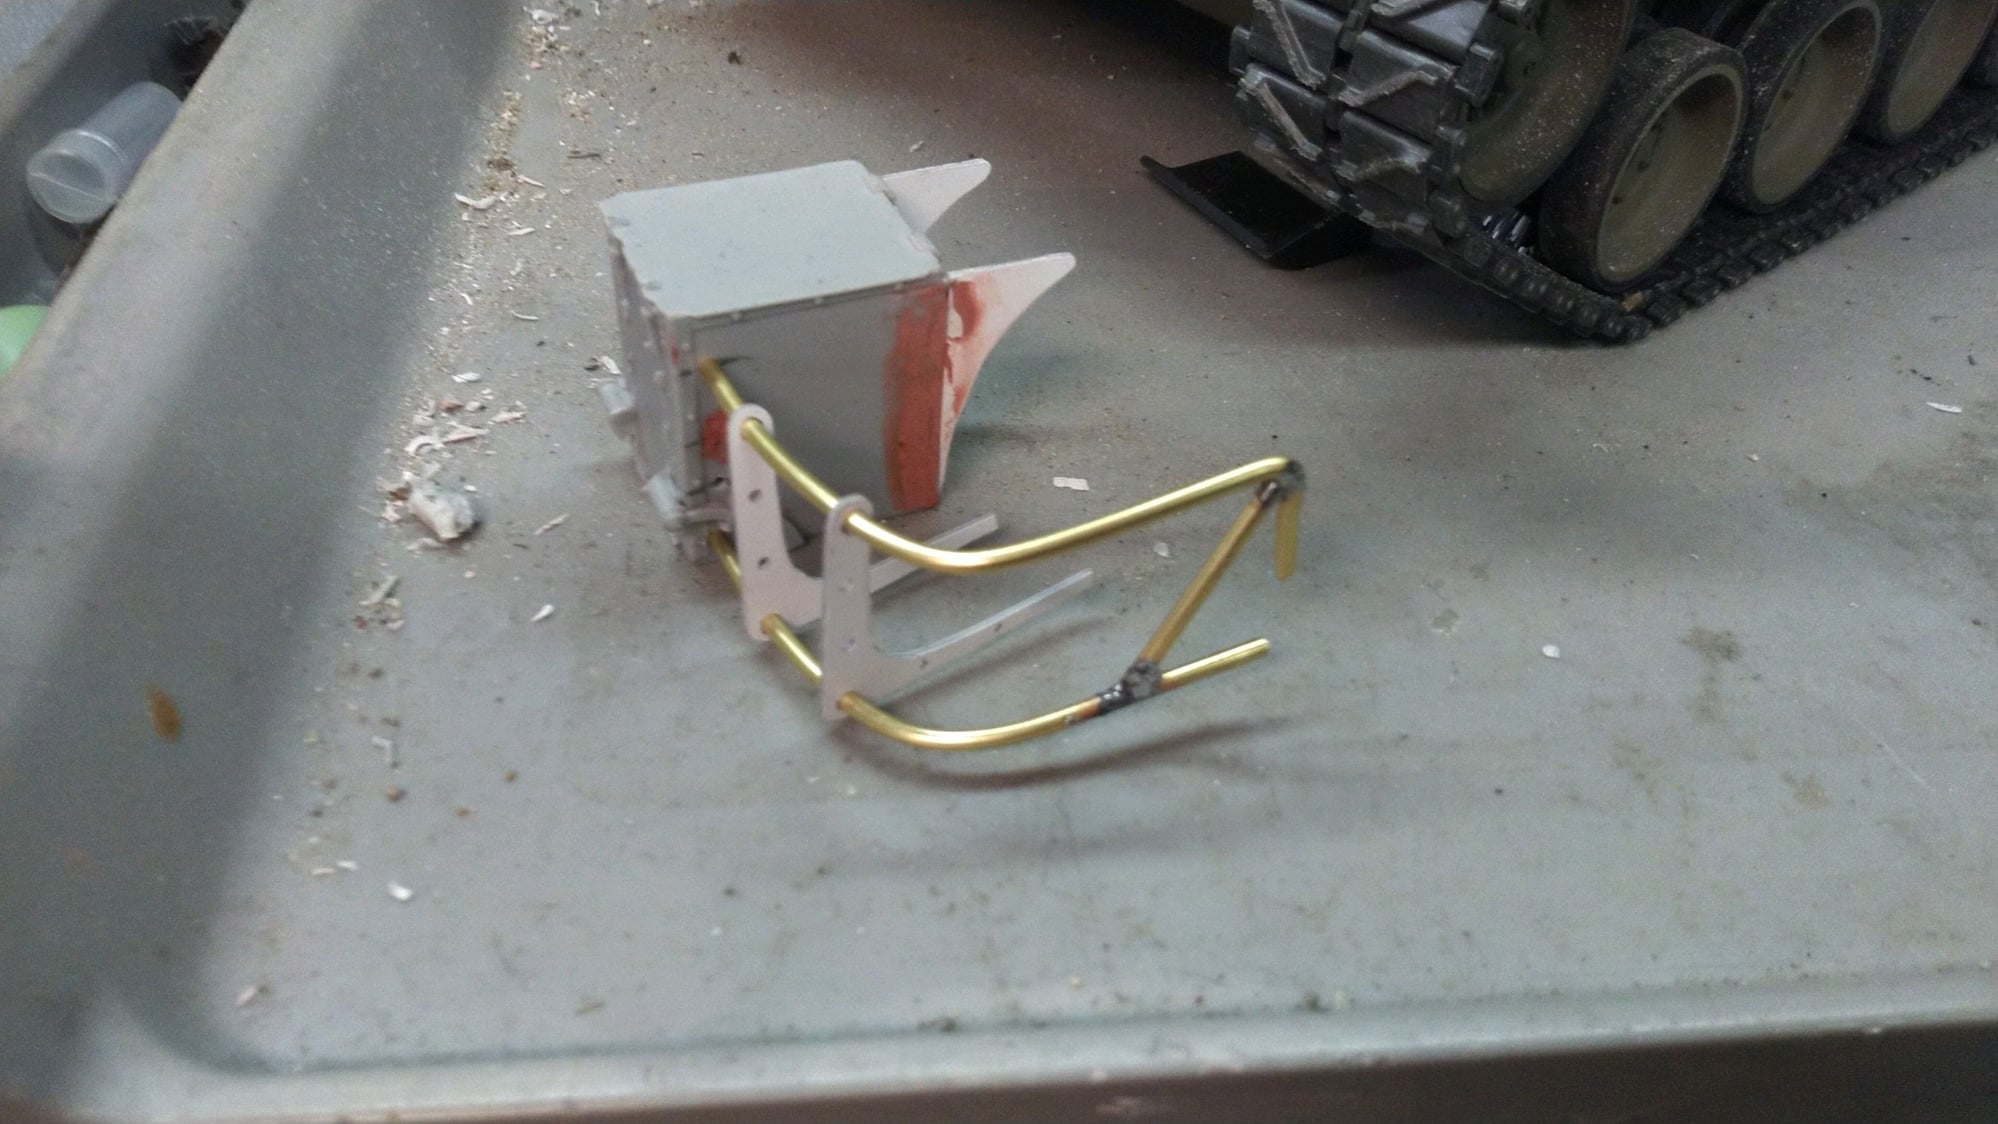
I ground the plastic armor shield off the turret basket halves because I am building an early leopard 1 without any plastic armor. Well It looked pretty butchered up. I tried to clean it up but it just looked too bad to use. So I decided to cut up one side and use it to make the bracket template and then make the basket out of brass rod. I told myself I would not do this but its the only solution that will be sturdy enough for my desire and look right. I thought about using plastic rod but I was kinda afraid it would be too fragile though I am still thinking about plastic rod depending on how this brass project builds up.
The following 2 users liked this post by RichJohnson:
tankme (03-23-2023),
tiger rampage (03-29-2023)
03-25-2023, 09:04 AM
#50
Thread Starter
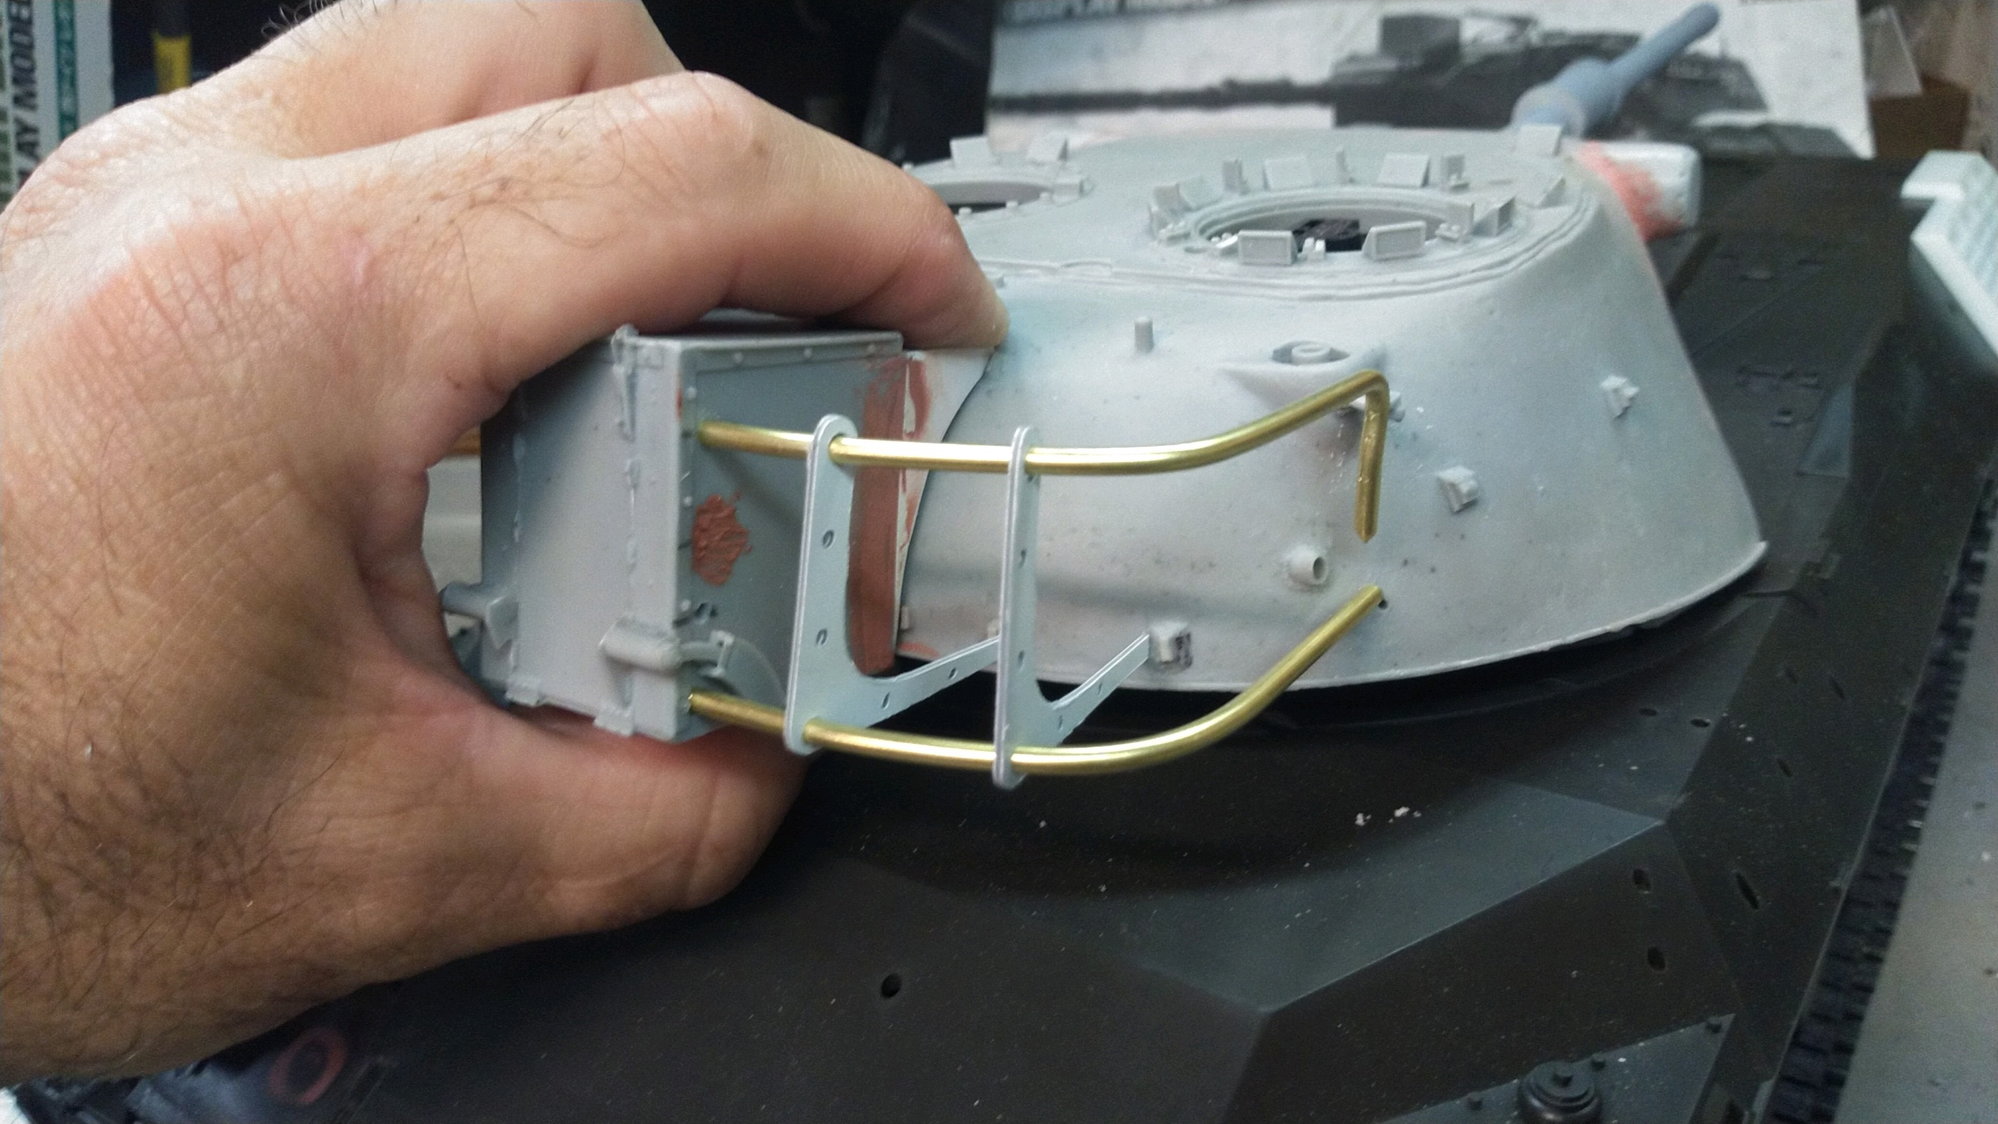
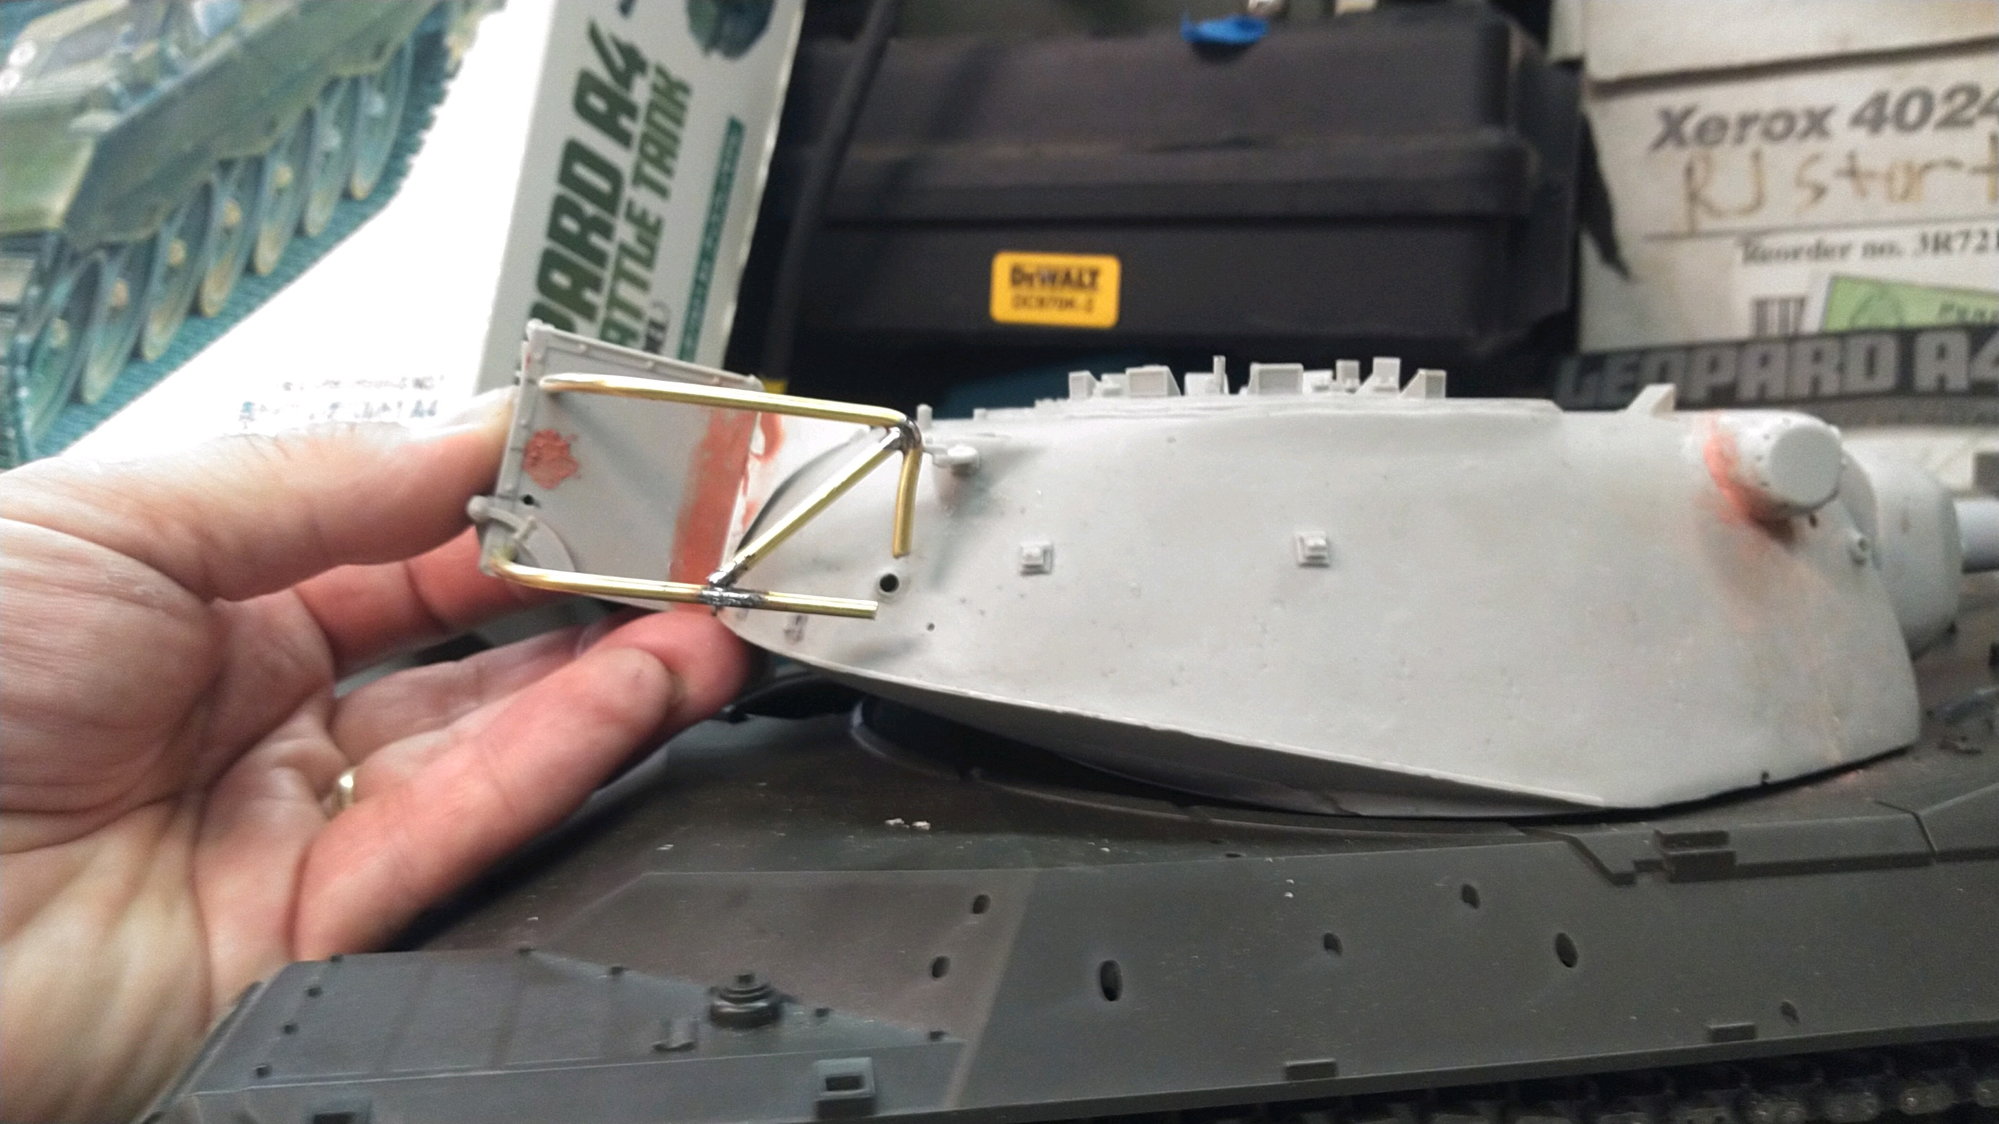
Ok, here is one side of the turret basket basically done.
What a job. I told myself I was not going to do this. I still need to make new tabs on the back of the turret to attach it since the cast one ones broke off in shipping on every one of the turrets I have. Also going to make new brass tabs on the basket to mount the ends to the turret despite having the cast brackets to glue on. Im just using them to mate up the parts then I will replace with brass for strength. Note, the bottom plastic L brackets are not glued in yet so they are floating, which means they are crooked until I glue it all together, they are just for alignment not really strength at this point.
Sigh, I still have the other side to make and then a whole nother set too for the Italian tank.....
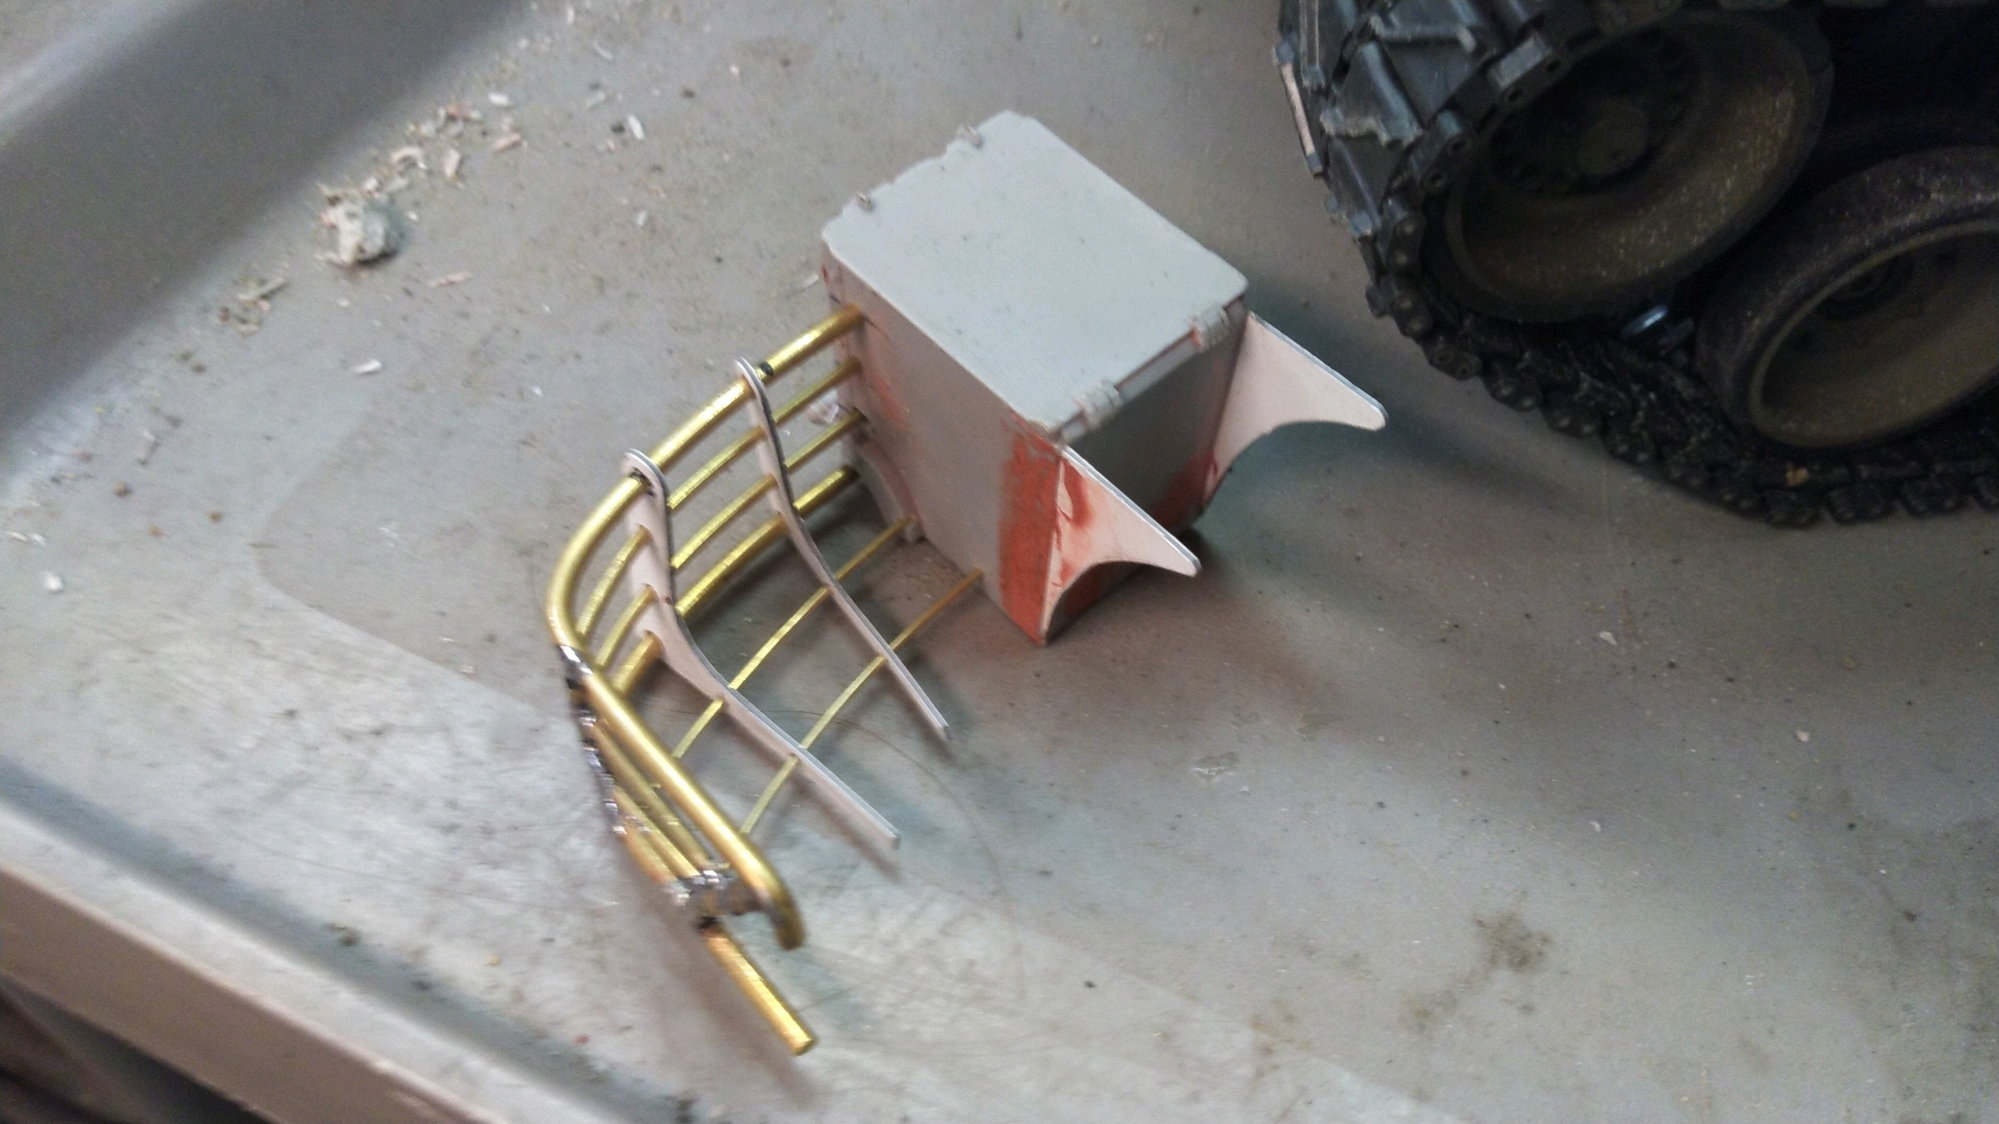
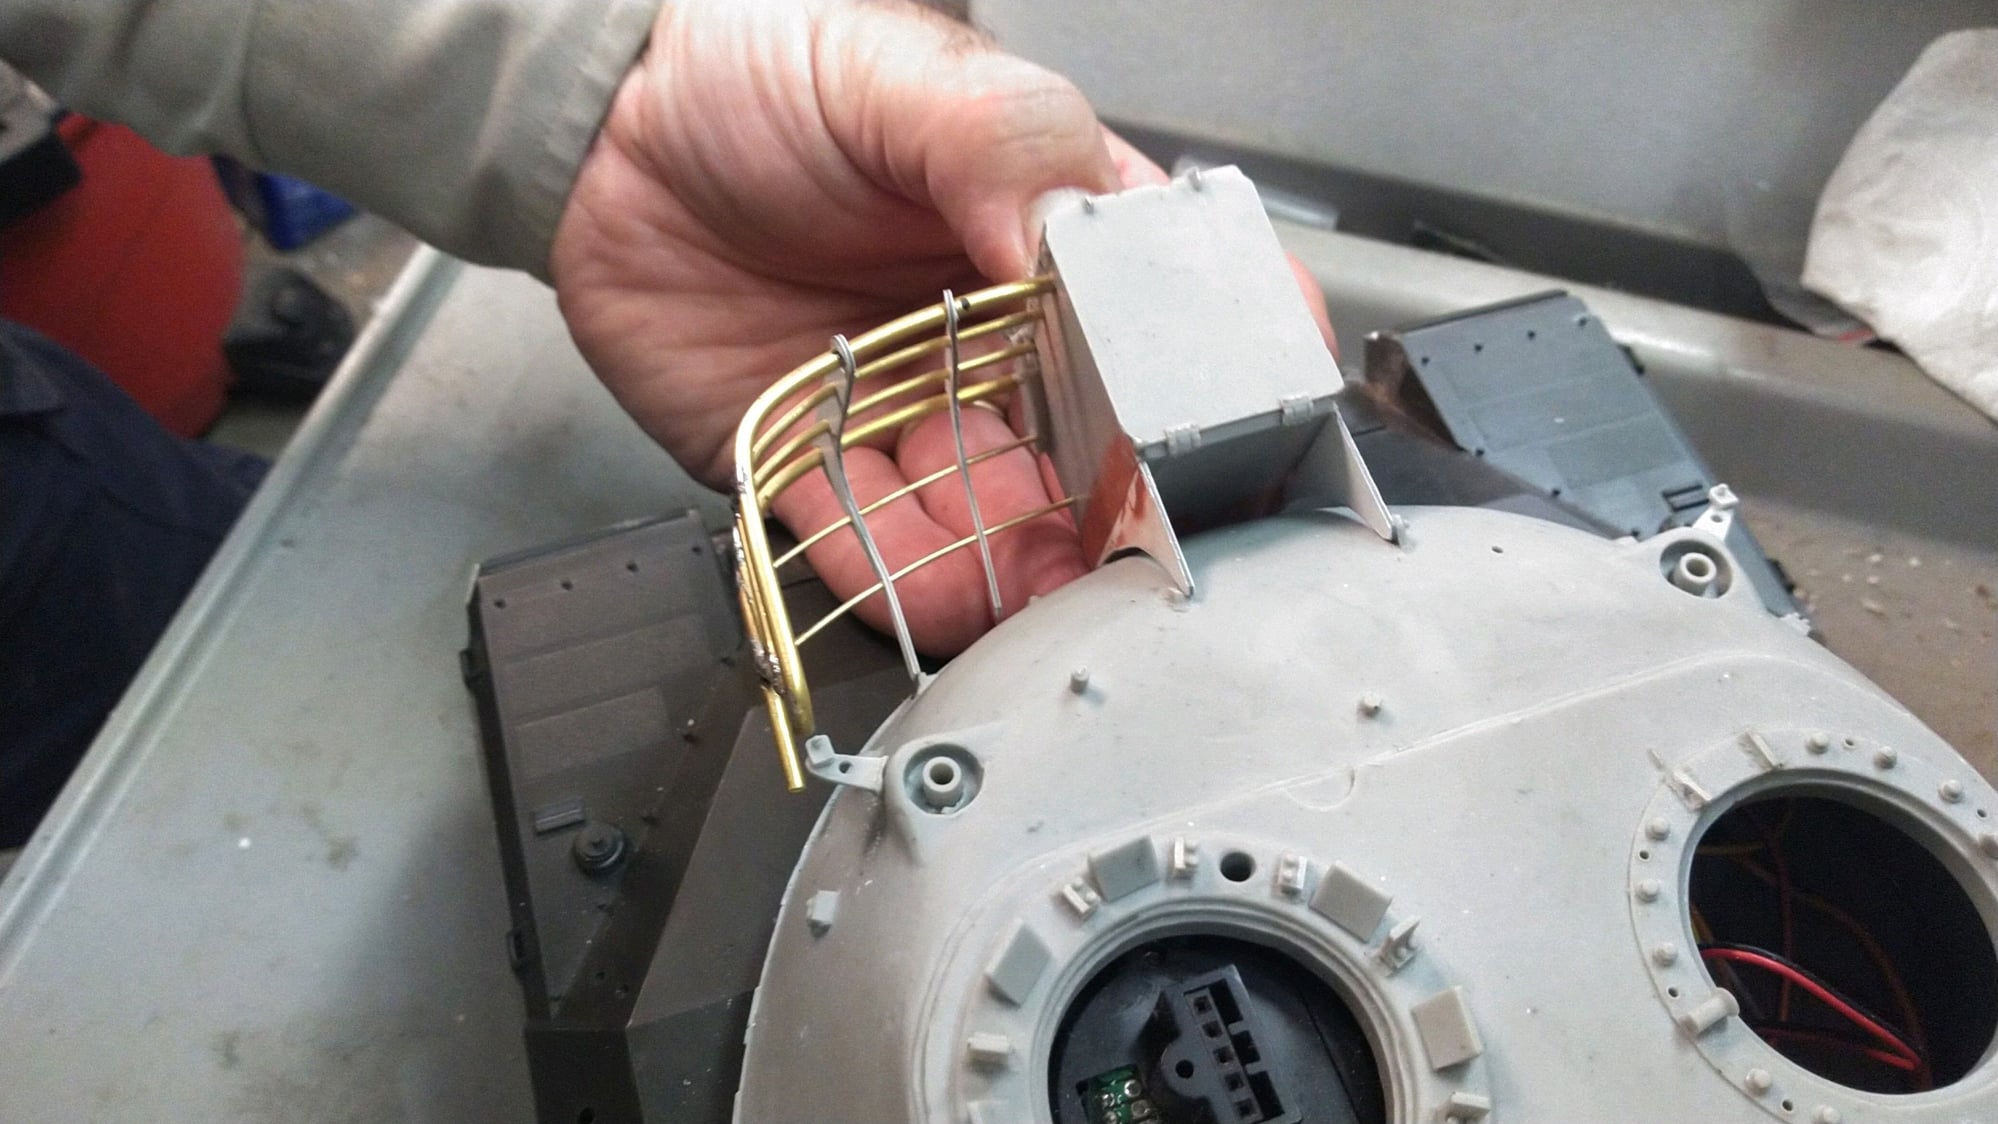
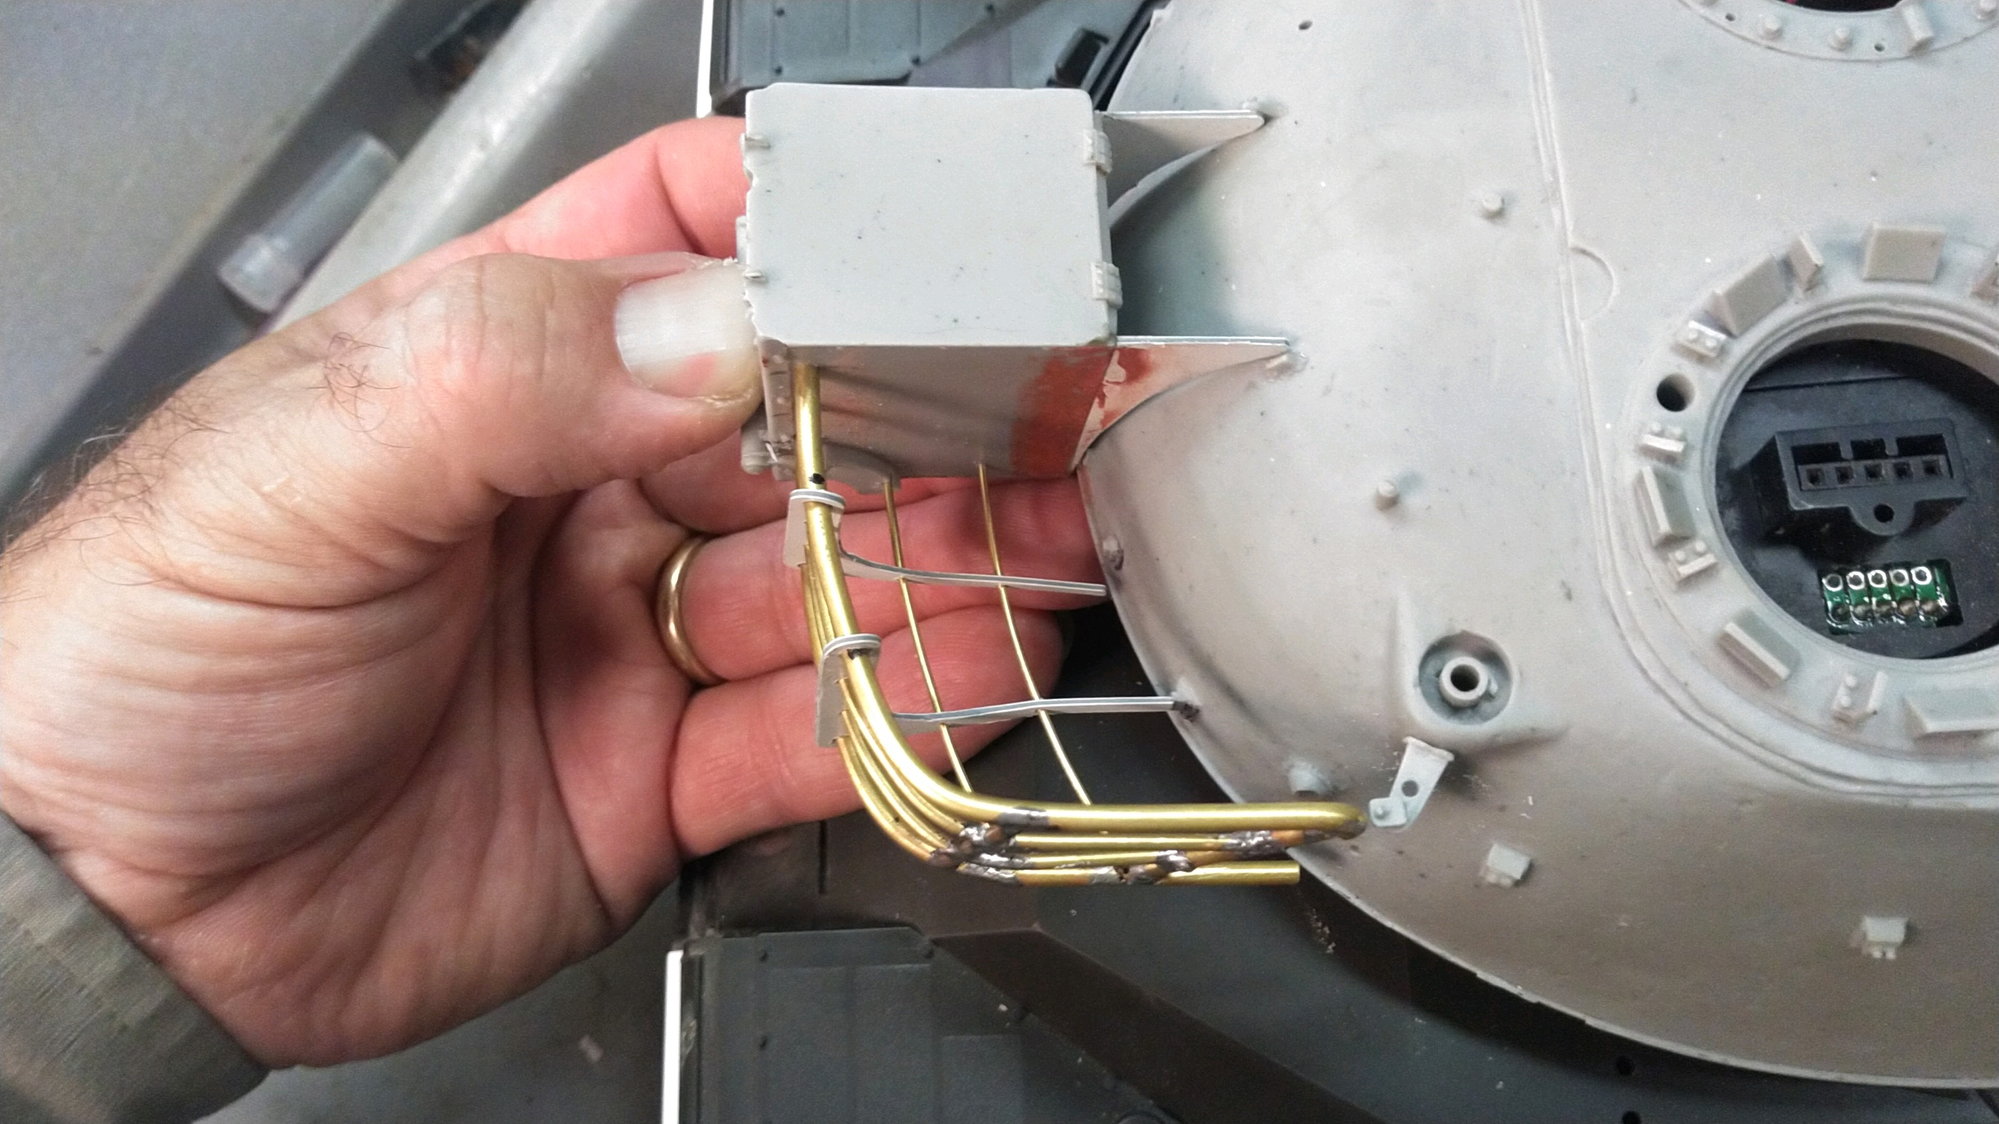
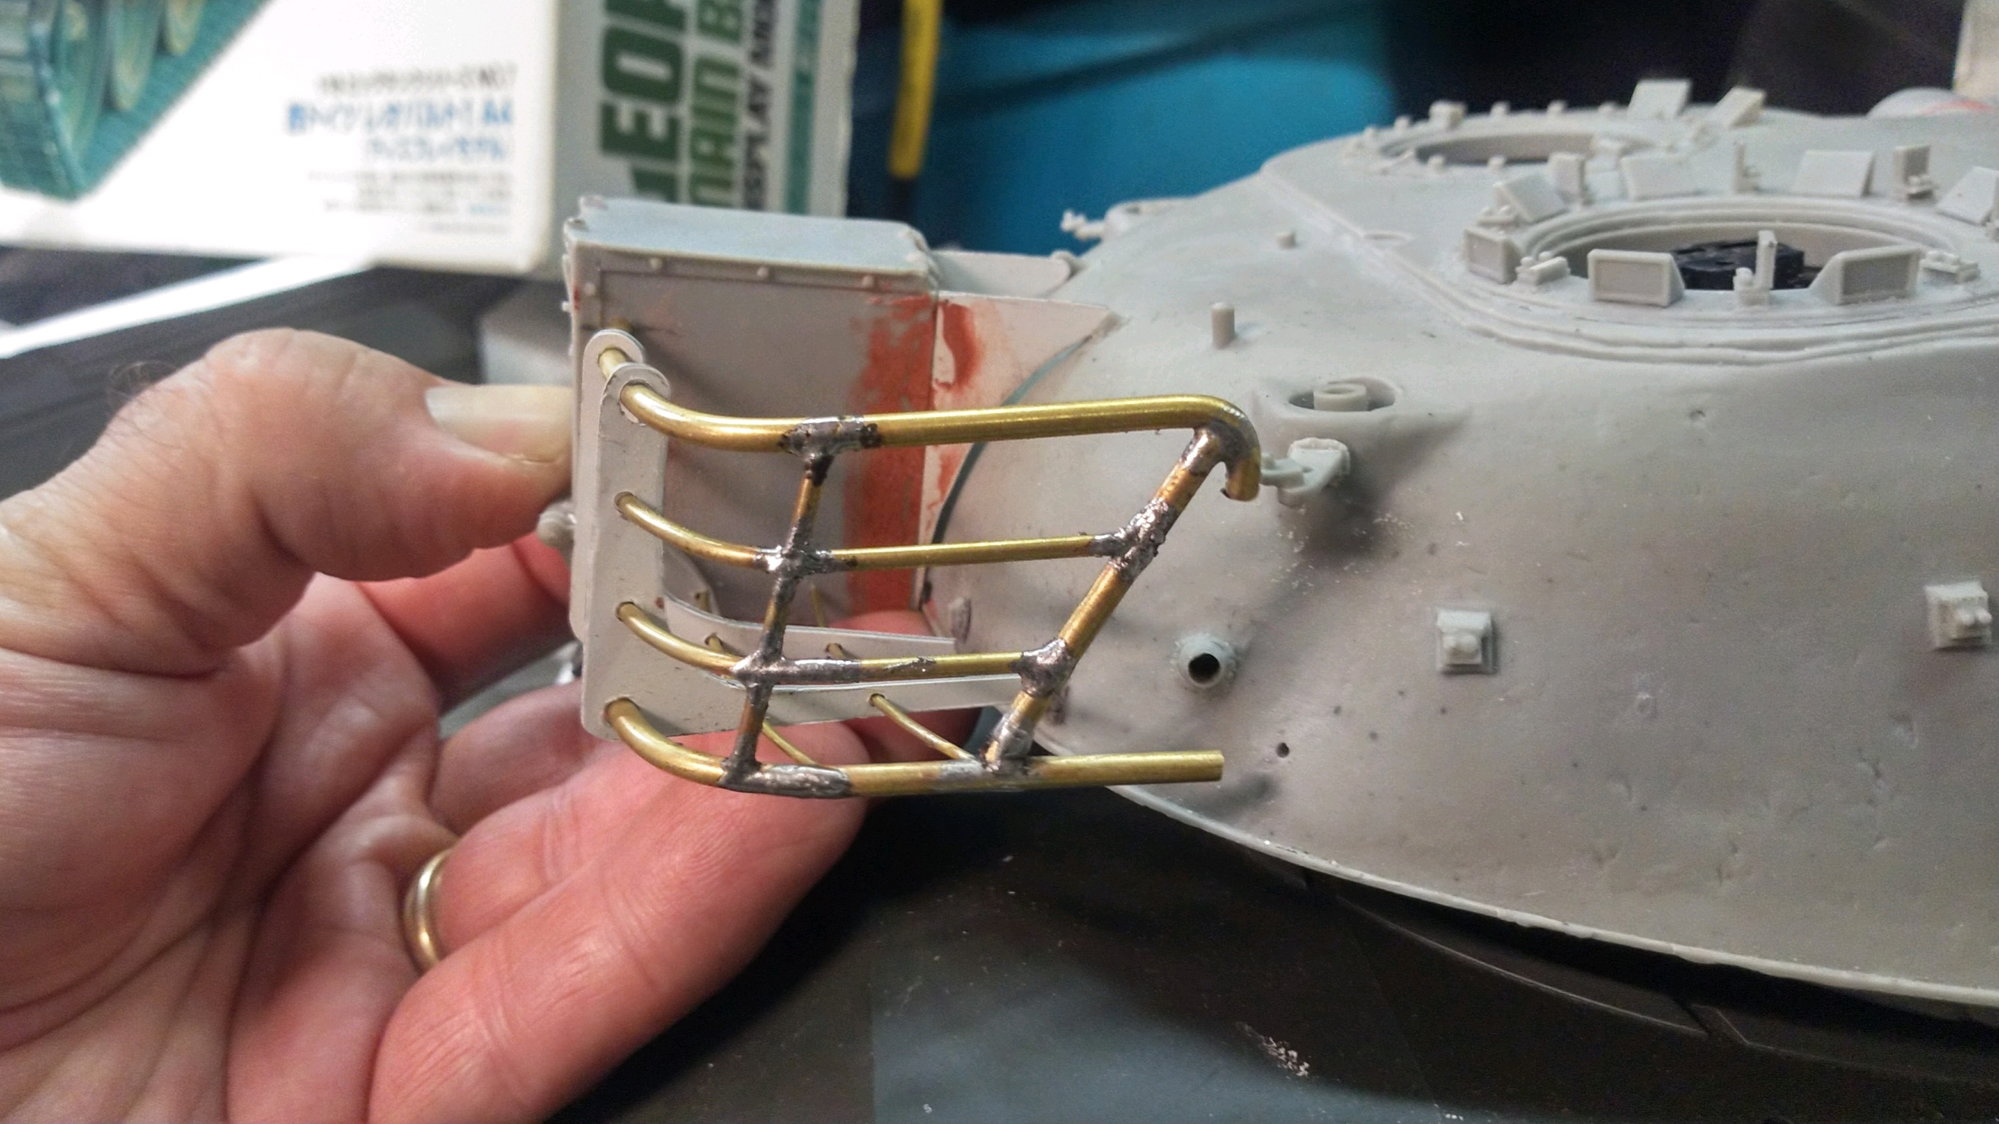
The following 3 users liked this post by RichJohnson: